How To Recharge Vehicles Air Conditioner System
Air Conditioner Recharge
CAR A/C RE-CHARGE
Helpful Information
There are two separate occasions that an air conditioner system needs to be recharged. The first is a normal condition of residual seepage where a simple recharge of refrigerant is needed. The second occasion is when an AC repair has been performed such as replacing a leaky compressor, condenser or evaporator. Once the system has been opened it must be held under vacuum for a period of time (usually 30 minutes) to remove moisture that was allowed into the system when normal atmosphere enters in place of the Freon (refrigerant).
Car air conditioner systems have a mixture of refrigerant and oil to keep the air conditioning compressor lubricated and operating properly. If repairs involve replacing the compressor or any other major components such as the evaporator or condenser system oil must be considered. Though measuring the (peg) oil (synthetic) is difficult because its spread throughout the system an estimation will be needed. In other words if there is a major leak and you can see oil dripping out the system it will need oil, unlike a very small leak which releases very little oil. Sometimes oil can be drawn from the system during the evacuation process. If this occurs add new oil in its place, never reinstall old oil due to contamination issues.
A car's air conditioner system utilizes refrigerant (134a) which is pressurized by the A/C compressor which turns the refrigerant liquid into a gas and creates heat which is dissipated in the condenser allowing the refrigerant gas to be released inside the evaporator. This release of refrigerant (Freon) from a high pressure to a low pressure creates a change of state that causes the evaporator to get cold when the gas converts to liquid. Once the evaporator is cold, air is forced through the evaporator core and out through the vents via the ventilation system. The system is lubricated by a synthetic PEG oil which keeps the AC compressor operating properly. When an air conditioner loses its refrigerant it inhibits it's operation due to the loss of pressure and will shut off automatically. These leaks can sometimes be seen on the system components by showing up as a dark spot where the compressor oil has leaked out. If a leak is difficult to detect a fluorescent internal die (green or yellow) can be injected to help find the leak. All air conditioners leak slightly through the front seal of the compressor so its not uncommon for an AC system to need recharging periodically.
If many AC services are required such as for an automotive repair and service shop a recovery machine is needed to collect and recycle the 134a. This recycling machine gathers refrigerant along with some of the compressor oil which is then separated into individual tanks. Although the compressor oil is useless the 134a that is collected can be used again though its not recommended. (Typically used refrigerant contains moisture which can cause damage to the system.)

Refrigerant Recovery Machine
To charge an AC system a high and low side port is used to install refrigerant while monitoring the operation of the system. (Note: If vacuum down for a recharge or repair is needed a refrigerant recovery system should be used.) Most AC systems hold about two pounds of 134a (28oz.) and about 4oz of peg oil. The AC system will not work correctly if the engine is overheating or running hot.
Common Problems
Car air conditioner systems have a mixture of refrigerant and oil to keep the air conditioning compressor lubricated and operating properly. If repairs involve replacing the compressor or any other major components such as the evaporator or condenser system oil must be considered. Though measuring the (peg) oil (synthetic) is difficult because its spread throughout the system an estimation will be needed. In other words if there is a major leak and you can see oil dripping out the system it will need oil, unlike a very small leak which releases very little oil. Sometimes oil can be drawn from the system during the evacuation process. If this occurs add new oil in its place, never reinstall old oil due to contamination issues.
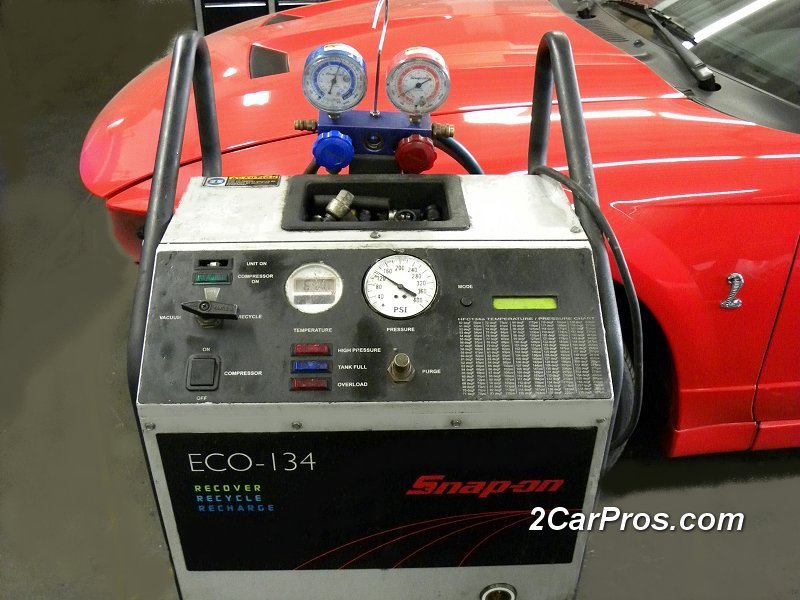
Refrigerant Recovery Machine
- Failed compressor
- Refrigerant leak
- Plugged orifice tube/expansion valve
- Failed vent control system
- Shorted control switch or relay
- Plugged condenser or evaporator (cooling fins)
- Clean evaporator at the front of the vehicle to ensure maximum system performance. You can use a garden hose or compressed air to clean the cooling fins.
- If you have charged the system but it still doesn't get cold the system has an internal problem and repair will need to be made. These problems include: failed compressor, expansion valve, orifice tube or cooling fan motor.
These repair instructions give step by step instructions on how to recharge an automotive air conditioner.
Difficulty Scale: 4 of 10
This guide pertains to all vehicles.
Tools and Supplies Needed to Complete this Job
Step 1 - Start engine and adjust the AC system to "full cold" mode with vent set to the "mid" level. (Air flow should come out of the main vents in dash, also electric radiator fan should be ON if so equipped) After about 3 minutes of running the air temperature should be cold. If the air is warm (not cold) raise the hood of the car to check the AC compressor. With the engine still running the compressor clutch should be engaged. If the compressor clutch cycles on and off at idle or engine cruising speeds the system probably needs recharging. If the compressor is not engaged with the system set to the "on" position or, an AC system recharge is needed proceed to the next step. If the AC compressor is engaged and the air is not cold, locate the exhaust tube to the evaporator near the firewall. (There are two tubes headed to and from the evaporator, the exhaust tube is the larger of the two.) Once this tube has been located grasp the tube to determine the temperature of the tube. If the tube is cold but there is warm air being blow from the vents, troubleshooting and repair is needed. If the temperature of the low side tube is warm continue to the next step.
Step 2 - With the engine "off", locate the high and low pressure charge ports used to service the air conditioner system. The high pressure port is located on the liquid (small tube) part of the system. (Usually between the compressor and condenser.) The low side port or "charge port" is were the 134a is installed, this fitting is larger is size than the high pressure fitting. (Never charge the AC system through the high side port, this can cause the refrigerant container to receive high pressure which can cause a rupture.)

AC Compressor With High Pressure Port
Step 3 - Once the low side pressure port has been located remove the dust cap and attach the low side pressure hose (blue) and observe the gauge reading. Ambient outside temperature will cause static pressure to vary. As a general rule of thumb the gauge should read between 60 and 80 PSI. If ambient pressures are okay and the compressor is not engaging with the system "on", troubleshooting and repair is needed. If ambient pressure is okay, start the engine and turn the AC system to full cold with a high fan speed setting. The compressor should engage while the low side gauge readings decrease.
Step 4 - If the system requires a simple recharge and a "low side" charge kit is being used, while holding the can upside-down slowly open the valve to allow refrigerant to enter the system. (Caution: once 134a starts to flow stop opening the valve, do not open valve fully.) As the 134a enters the system the low side gauge will start to fluctuate, this is normal. As the system is charging grasp the outgoing evaporator line to monitor the temperature, the system is full when the line gets cold. (Caution: Once the outgoing evaporator tube gets cold stop filling the system to avoid overcharging.) (Note: Adding too much refrigerant will inhibited the systems operation.) Once AC system charge is complete, close the charge kit valve, and quickly remove the low side charge port fitting. (Note: Some discharge is normal). Before re installing the dust cap check the port valve for leakage.) After recharging the system check the inside vent air temperature to complete the recharge.
- Air conditioner recharge gauge set or re-charge kit
- 134a Refrigerant
- Protective eyewear and gloves
Step 2 - With the engine "off", locate the high and low pressure charge ports used to service the air conditioner system. The high pressure port is located on the liquid (small tube) part of the system. (Usually between the compressor and condenser.) The low side port or "charge port" is were the 134a is installed, this fitting is larger is size than the high pressure fitting. (Never charge the AC system through the high side port, this can cause the refrigerant container to receive high pressure which can cause a rupture.)
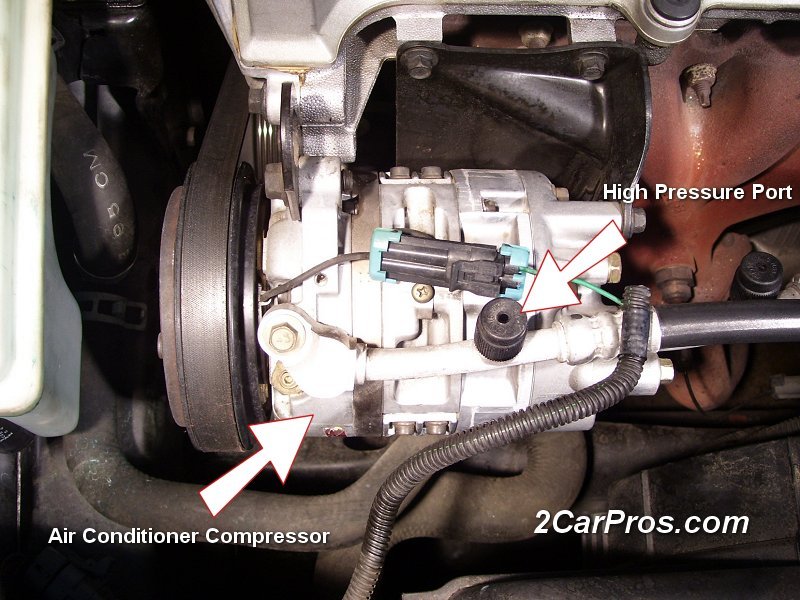
AC Compressor With High Pressure Port

Air Conditioner Recharge Gauge
Step 5 - This step is generally used for troubleshooting or repairing an air conditioner system but can be used to recharge the system as well. Additionally, if a system is a number of year old its generally a good idea to vacuum down and recharge the system to remove damage causing moisture. This vacuum down procedure is performed with the use of an AC evacuation pump. Once the system is held under vacuum remove the vacuum pump by closing the low side valve. This valve should remain closed for about 30 minutes while monitoring the gauge reading. This test provides a check of the systems integrity before refrigerant is installed, if the gauge moves toward zero there is a leak in the system and it must be re-inspected and repaired. With the engine off, locate both high and low pressure port fittings and attach the red hose (high pressure side) and the blue hose to the low side charge pressure port. With both hoses attached the ambient pressure should be equal in the both gauges (with 134a still installed). If recharging after a repair (no refrigerant) attach an air conditioner vacuum pump and open the low side gauge. Allow to remain on vacuum for about 30 minutes, then close the low side valve and turn off the pump, the system should hold vacuum. If the system does not hold vacuum repairs are needed.
Step 6 - The system is now ready to be charged. With the engine off slowly open the low side valve and allow the 134a to start flowing, the low side gauge will fluctuate upward. In a few minutes the gauge will stop moving, this means the system and charge container have equalized, close the gauge. At this point check the system for leaks from faulty seals or hoses, if everything looks okay start the engine and turn the AC system ON with full fan.
Step 7 - The low side gauge should move downward with the high side gauge moving upward. This means the AC compressor is working and moving refrigerant around in the system. (Note: If the high pressure gauge (red) moves to extreme high pressure the AC systems expansion valve or orifice tube is clogged and must be repaired before it will work properly.) Slowly re-open the low side valve (blue) and allow refrigerant to flow, the low side gauge will raise and fluctuate. As the system fills, the high side gauge will slowly rise, as the gauge rises grasp the exhaust tube of the evaporator, allow the refrigerant to flow until cold, shut the low side valve and turn off the engine. Remove both gauge set hoses (quickly), and re-install the valve dust caps. (Some discharge will occur.)


Comments
Post a Comment