How To Replace A Brake Master Cylinder
Brake Master Cylinder Replacement
Helpful Information
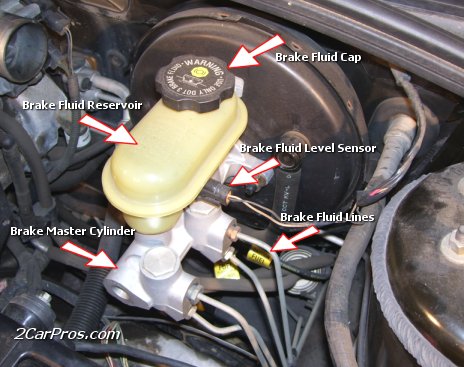
The brake master cylinder is the manual hydraulic pressure part of the brake system. The brake master holds hydraulic brake fluid that is used to actuate the brake system. Brake fluid flows through brake system components and then to the front brake caliper under pressure to slow the vehicle. When a master cylinder fails a low brake pedal is experienced. The master cylinder is divide into two separate sections, a primary and secondary pressure system. This safety system was created inside the master cylinder: if one half of the brake system fails you will still have the remaining half to help slow the vehicle. Inspect for brake fluid leakage around the master cylinder and check for proper fluid level regularly. If leakage is present replace master cylinder immediately.
Common Problems
- Master cylinder fails, illuminating the brake warning light.
- Master cylinder leaks fluid, illuminating the brake warning light.
- Master cylinder actuator rod is adjusted out too far, not letting the brake master plunger to return creating residual brake pressure causing the brakes to drag.
- Always use brake fluid from a closed container to avoid moisture contamination.
- Check brake shoe adjustment (drum brakes only).
Step by step guide on how to replace a brake master cylinder, This article pertains to most cars.
Difficulty Scale: 3 of 10
Tool and Supplies Needed

Brake Master Cylinder
Step 1 - Begin by removing brake fluid reservoir cap and insert brake fluid removal tool (turkey baster), remove as much brake fluid as possible, then reinstall cap.

Brake Fluid Removal
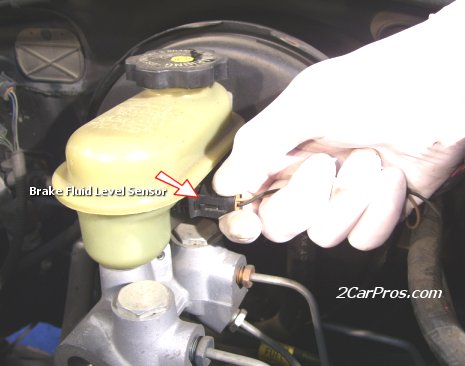
Step 2 - Remove the electrical connector to the fluid level sensor. Most connectors have safety clips that need to be released before they will disconnect.

Removing Brake Fluid Warning Light Connector
Step 3 - Install a line wrench firmly on the brake fluid lines departing from the master cylinder. A line wrench is a special wrench that holds five points of the fitting as opposed to two points like a normal wrench, which gives this style wrench more power without damaging fittings like a normal wrench. Apply force to the wrench in a counter clockwise motion to loosen and remove fitting and line in the master cylinder. Repeat operation until all fluid lines are removed. (Note: Brake fluid will leak from brake lines when removed.)

Removing Brake Fluid Lines
Step 4 - Insert socket wrench onto master cylinder mounting bolts. After mounting bolts are removed, lift the master cylinder off the mounting studs and out of the vehicle.

Brake Master Mounting Bolts
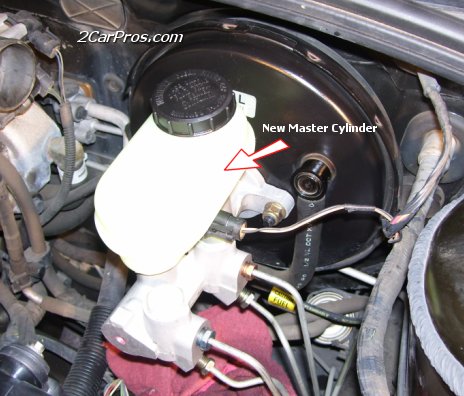
Step 5 - Reinstall master cylinder, tighten master cylinder mounting bolts and reconnect the fluid lines and fluid level sensor. Refill the master cylinder with new fluid most cars use DOT3 or DOT4. Once the master cylinder is full loosen all four brake fluid bleeder screws on the brake calipers or wheel cylinders. Next, press the brake pedal down completely, while holding the brake pedal down have a helper close all four brake bleeder screws. Then, allow the brake pedal to return to normal position slowly, this will draw new fluid into the master cylinder body. Continue this procedure until the brake fluid is clean with no air bubbles out of each bleeder, close all bleeders and refill the master cylinder with brake fluid to the proper level. Do not drive vehicle if normal brake pedal operation is not present. Visit - Brake system bleed

Reinstall New Brake Master Cylinder
- Replacement brake master cylinder
- Brake fluid
- Line wrench set
- Show towels
- Socket set
- Protective gloves and eyewear

Brake Master Cylinder

Brake Fluid Removal
Step 2 - Remove the electrical connector to the fluid level sensor. Most connectors have safety clips that need to be released before they will disconnect.

Removing Brake Fluid Warning Light Connector

Removing Brake Fluid Lines

Brake Master Mounting Bolts

Reinstall New Brake Master Cylinder
Comments
Post a Comment