Brake Shoe - Wheel Cylinder - Drum Replacement
How To Replace Brake Shoe - Wheel Cylinder - Drum Brake
Helpful Information
In general, if a vehicles parking brake doesn't hold, or travels to the end of its throw, the rear brake shoes need to be checked for replacement.
Drum brakes generally cost less to produce than disc brake systems and are less efficient than their counterpart, this is why there are featured on the rear only. Each brake shoe replacement varies, and some applications require a spring removal tool. Drum style brakes are more susceptible to moisture which can decrease braking ability. Brake components are manufactured using an asbestos style of material which can be hazardous when inhaled, using an air filter mask can help avoid accidental ingestion.
When replacing brake shoes check spring hardware (return and mounting), and replace if damaged or broken, on larger applications replacing the spring hardware is necessary. When changing brake shoes, disassemble one side at a time to preserve a reference copy on the opposing side. Some brake systems must be adjusted after assembly, these systems generally provide an adjustment slot which is used to manually turn an adjuster wheel to obtain proper "shoe to drum" clearance.
CAUTION: DO NOT MOVE VEHICLE UNTIL NORMAL BRAKE PEDAL OPERATION IS PRESENT
Common Problems
- Low brake pedal due to improper adjustment.
Step by step guide on how to replace an automotive rear brake shoe and wheel cylinder, this information pertains to most brake shoe style systems.
Difficulty Scale: 5 of 10
Tools and Supplies Needed
Before beginning work, park the car on level ground while blocking (4 four blocks) front wheels to prevent wheel roll in either direction, parking brake should be released.
Step 1 - Once the car is lifted safety in the air, remove the wheel cover which will expose the lug nuts. (Note: If a lug wrench or breaker bar is used, perform this, and the next step while the vehicle is still on the ground.)

Remove Wheel Cove
Step 2 - Using an air impact wrench, breaker bar or a lug wrench loosen and remove the lug nuts that hold the tire. (Note: Only loosen lugs one turn while on the ground, remove after the car has been lifted.)

Removing Lug Nuts
Step 3 - Once the lug nuts have been removed, grasp the wheel and lift it from the wheel studs.

Removing Tire
Step 4 - After the wheel has been removed, use a small chisel with a hammer to remove the bearing dust cap.

Removing Bearing Dust Cap
Step 5 - Then, remove the bearing dust cap and the axle bearing retainer nut will be exposed.

Bearing Dust Cap Removed
Step 6 - Next, choose the right size socket and remove the axle bearing retainer nut.

Removing Axle Nut
Step 7 - Then, grasp the drum and pull while turning the drum which helps release the unit from the axle.

Rear Brake Drum Removal
Step 8 - Once the brake drum has been removed, hang a bucket on the axle which will be used for a catch basin.

Water Bucket
Step 9 - After the basin is in place, use water to rinse away harmful dust particles and allow to dry, wipe away water from the axle.

Rinsing Brakes
Step 10 - Then, inspect the brake shoe thickness to the new brake shoes, each shoe is different and requires comparison.

Brake Shoe Thickness
Step 11 - When a brake shoe is overheated, it can crack which indicates failure that requires replacement.

Brake Shoe Crack
Step 12 - To check the wheel cylinder, use a large screwdriver and pull back the rubber cups to check for the presence of brake fluid, which is an indication of failure.

Inspecting Wheel Cylinder
- Replacement brake shoes and wheel cylinder
- Side cutters or dikes (used to grip springs only)
- Large socket set
- Screwdriver set
- Breaker bar
- Wrench set
- Brake fluid
- Shop towels
- Water
- Hammer
- Small chisel
- Safety eyewear, gloves and respirator.
- Hydraulic jack
- Jack stands
Before beginning work, park the car on level ground while blocking (4 four blocks) front wheels to prevent wheel roll in either direction, parking brake should be released.
Remove Wheel Cove
Step 2 - Using an air impact wrench, breaker bar or a lug wrench loosen and remove the lug nuts that hold the tire. (Note: Only loosen lugs one turn while on the ground, remove after the car has been lifted.)
Removing Lug Nuts
Removing Tire
Removing Bearing Dust Cap
Bearing Dust Cap Removed
Removing Axle Nut
Rear Brake Drum Removal
Water Bucket
Rinsing Brakes
Brake Shoe Thickness
Brake Shoe Crack
Inspecting Wheel Cylinder
Step 13 - After completing the brake shoe and wheel cylinder inspection, identify the primary brake shoe spring. (Note: Some brakes utilize two primary springs.)

Primary Brake Shoe Spring
Step 14 - Using a pair of side cutters, grasp the spring and pull towards the brake shoe until released.

Remove Primary Spring
Step 15 - Once the spring has been released the opposite side will be easily removed.

Primary Brake Spring Removed
Step 16 - Next, use a pair of needle nose pliers to release the brake shoe hold down clips, one on each shoe.

Release Brake Shoe Hold Down Clips
Step 17 - After both shoe hold down or anchor clips have been released, grasp both brake shoes firmly and pull slightly outward which will allow the shoes to separate from the backing plate and wheel cylinder.

Remove Brake Shoes
Step 18 - Once the brake shoes are free from the backing plate, pull the parking brake cable spring downward and release the cable from the parking brake arm.

Release Parking Brake Cable
Step 19 - Now, the brake shoe set will become free from the backing plate.

Brake Shoes Removed
Step 20 - After the brake shoes have been separated from the backing plate, the wheel cylinder is now ready to be removed.

Wheel Cylinder
Step 21 - When replacing the wheel cylinder, use a line wrench to avoid damage to the fitting while removing the brake line. (Note: Brake fluid will be present.)

Remove Brake Line
Step 22 - Once the brake line has been removed, brake fluid will drip out of the line until the brake master cylinder is empty, a vacuum cap should be used to prevent the loss of fluid from the master.

Vacuum Cap
Step 23 - Next, use a wrench or socket to remove the wheel cylinder mounting bolts.

Remove Wheel Cylinder Mounting Bolts
Step 24 - After removing the wheel cylinder mounting bolts, grasp the unit and separate it from the backing plate.

Wheel Cylinder Removed
Step 25 - Once the old wheel cylinder has been matched up to the new part, insert the new unit into the backing plate and secure the mounting bolts.

New Wheel Cylinder
Primary Brake Shoe Spring
Remove Primary Spring
Primary Brake Spring Removed
Step 16 - Next, use a pair of needle nose pliers to release the brake shoe hold down clips, one on each shoe.
Release Brake Shoe Hold Down Clips
Remove Brake Shoes
Release Parking Brake Cable
Brake Shoes Removed
Wheel Cylinder
Remove Brake Line
Vacuum Cap
Remove Wheel Cylinder Mounting Bolts
Wheel Cylinder Removed
New Wheel Cylinder
Step 26 - Then, using a wrench or ratchet tighten the wheel cylinder mounting bolts.

Tighten Wheel Cylinder Mounting Bolts
Step 27 - After tightening the wheel cylinder mounting bolts, remove the cap which was previously installed and thread the brake line fitting into the cylinder by hand, this practice prevents damage to the threads.

Thread Wheel Cylinder Brake Line Fitting
Step 28 - Once the fitting has been threaded, use a line wrench to tighten the brake line onto the wheel cylinder.

Tighten Brake Line
Click the Link Below For Part 2:
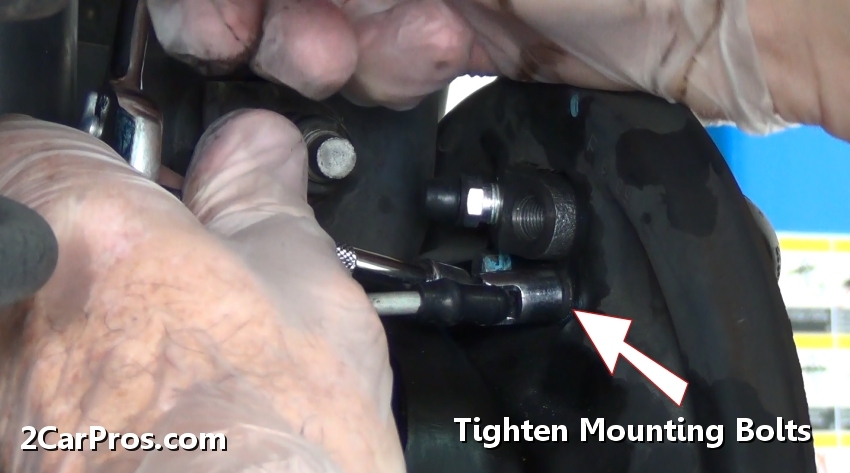
Tighten Wheel Cylinder Mounting Bolts
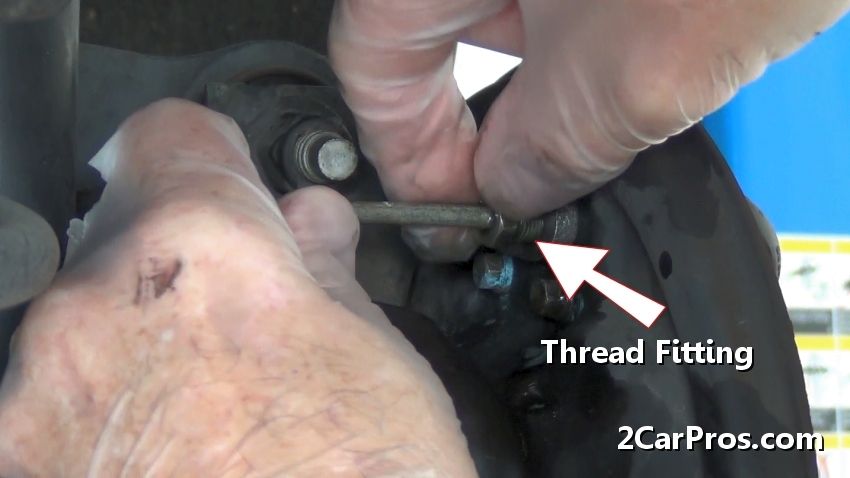
Thread Wheel Cylinder Brake Line Fitting
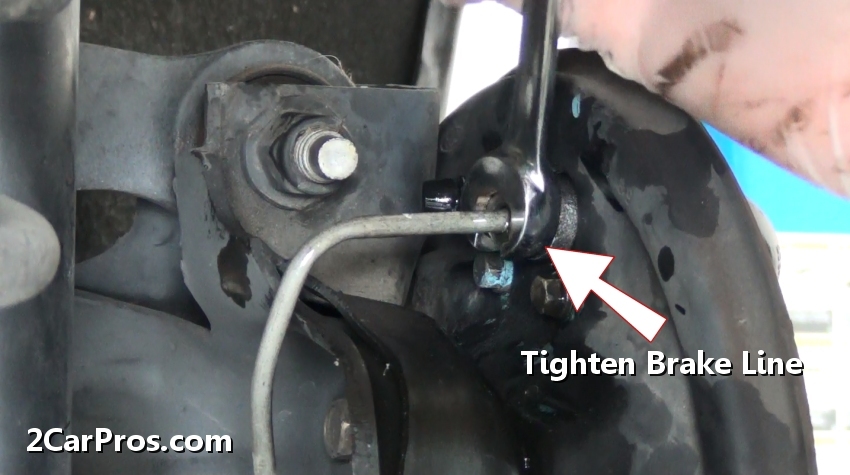
Tighten Brake Line


Comments
Post a Comment