how to replace front brake pads and rotors fwd
BRAKE PAD AND ROTOR REPLACEMENT - FRONT
Do you need to replace the front brakes on your car, truck or SUV? You came to the right place. We are a group of ASE certified master mechanics which have created this free and easy to follow step by step instruction guide on the replacement of your front brake pads and rotors for both front wheel and rear wheel drive vehicles which use a bearing hub or old style serviceable wheel bearing set ups.
An indication for brake replacement is a squeaking noise when you hit the brakes, a chirping sound when the vehicle is rolling without the brakes being applied or a brake system warning light on which indicates the brake fluid is low. Low brake fluid is an indication of needing brake pads because the fluid displaces the missing pad material in the calipers.
Brake replacement is one of the repair industries most lucrative jobs and if you learn how to do it for yourself, family and friends you can save a considerable amount of money while having the satisfaction of doing the job right.
This guide shows anyone how to do their own brakes use a floor jack, jack stands and basic tools. You will need replacement parts before you begin such as pads, rotors and brake fluid. Most of these parts are pretty inexpensive and can be purchased atAmazon or the local parts store. A word of advice is not the buy the cheapest ones you can find because they tend to squeak and wear out more rapidly.
Check your supplies before you begin, most of the tools you will need are in your dad's or grandfather's garage. If you don't have your own tool set start one, saving money and doing the job yourself while working with your hands is a great value. Let's get started!
Here is a video to help you visualize the brake job basics from the job below. Once you are done watching read the added tips and brake repair basics to do the job right.
Tools and Supplies Needed
Begin with the vehicle on level ground, this helps stabilize the car when it's being lifted, set the emergency brake.
After breaking the lug nuts loose jack the front of vehicle in the air enough to allow the tires to be off of the ground, support the car safely using jack stands. Learn more on how to jack up your car safety.
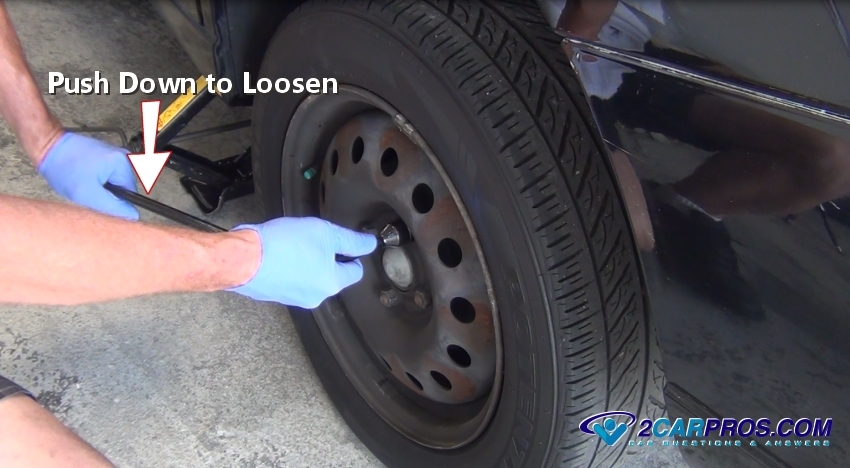
 Before the car is lifted loosen all lug nuts about 1 full turn, the tire needs to be on the ground at this point to help hold it from rotating. Always push downward on the lug wrench or breaker bar which helps give you leverage by using your body weight. If you try to pull upward you can pull your back out which takes the fun out of the job.
After the lug nuts have been loosened go ahead and lift the car up off the ground and then continue to remove the lug nuts until the tire is loose. Then grasp the tire with both hands and lift off. Once the tire is off lay it flat and slide it under the car for added safety, do not hit the jack stands.
Before the car is lifted loosen all lug nuts about 1 full turn, the tire needs to be on the ground at this point to help hold it from rotating. Always push downward on the lug wrench or breaker bar which helps give you leverage by using your body weight. If you try to pull upward you can pull your back out which takes the fun out of the job.
After the lug nuts have been loosened go ahead and lift the car up off the ground and then continue to remove the lug nuts until the tire is loose. Then grasp the tire with both hands and lift off. Once the tire is off lay it flat and slide it under the car for added safety, do not hit the jack stands.
 When pushing the piston back into the caliper this contaminated fluid can cause problems for the ABS valve, motor and master cylinder which can cause these components to fail.
This step is to allow the brake fluid that has entered the brake caliper in place of the worn brake pads to be removed. Only remove one caliper and complete the brake replacement on one side at a time.
When pushing the piston back into the caliper this contaminated fluid can cause problems for the ABS valve, motor and master cylinder which can cause these components to fail.
This step is to allow the brake fluid that has entered the brake caliper in place of the worn brake pads to be removed. Only remove one caliper and complete the brake replacement on one side at a time.
 Use a small wrench, in most cases 10mm, and fit it over the bleed valve. Next attach a piece of rubber tubing or hose over the bleeder valve while the other end of the hose is sitting in a fluid container. Push the wrench counterclockwise to open the valve (rubber tube optional).
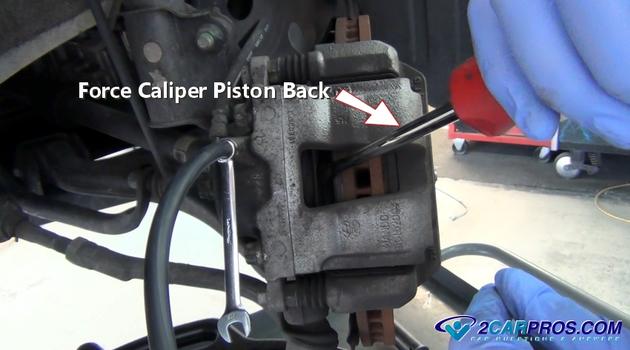
 Once the bleeder is open use a small pry bar or large flat blade (standard) screw driver and wedge it between the rotor and old brake pad. Then start applying pressure back and forth to widen the gap while pushing the piston back into the caliper, fluid will start to flow from the tube and into the container.
Continue this operation until you cannot push the piston any further back into the caliper. While holding pressure on the piston close the bleeder valve then remove the hose and wrench.
On some calipers is it difficult to get to the rotor and pads in the fashion so this step will need to be done after the caliper has been removed using a large C clamp or channel locks. If channel locks are used install an old pad to help protect the caliper piston.
Once the bleeder is open use a small pry bar or large flat blade (standard) screw driver and wedge it between the rotor and old brake pad. Then start applying pressure back and forth to widen the gap while pushing the piston back into the caliper, fluid will start to flow from the tube and into the container.
Continue this operation until you cannot push the piston any further back into the caliper. While holding pressure on the piston close the bleeder valve then remove the hose and wrench.
On some calipers is it difficult to get to the rotor and pads in the fashion so this step will need to be done after the caliper has been removed using a large C clamp or channel locks. If channel locks are used install an old pad to help protect the caliper piston.
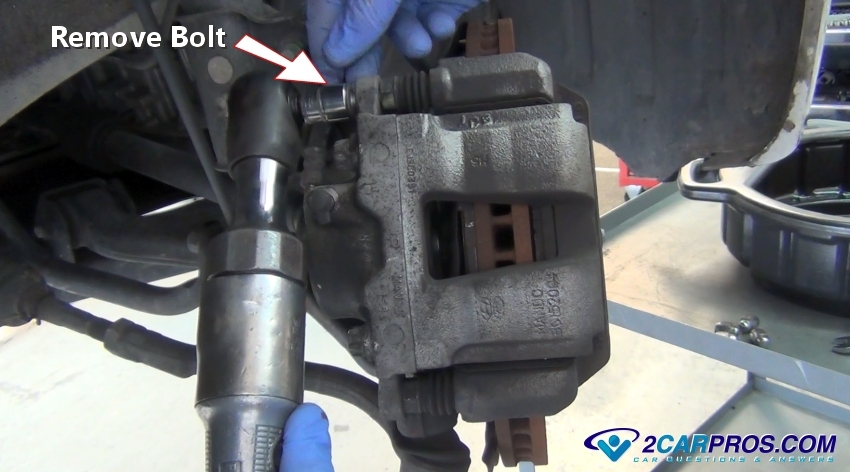
 Next, locate the caliper mounting or slide bolts on the inside of the caliper. The bolt head sizes can either be 14mm, 15mm, 18mm, 8mm hex drive or 35 torx bit in most cases. Use a ratchet or wrench to loosen and remove both bolts by turning them counterclockwise.
You might need an additional wrench to hold the caliper slide from turning but this is not typical. Once removed inspect the condition of the threads and replace them if worn.
Next, locate the caliper mounting or slide bolts on the inside of the caliper. The bolt head sizes can either be 14mm, 15mm, 18mm, 8mm hex drive or 35 torx bit in most cases. Use a ratchet or wrench to loosen and remove both bolts by turning them counterclockwise.
You might need an additional wrench to hold the caliper slide from turning but this is not typical. Once removed inspect the condition of the threads and replace them if worn.
 Now the caliper will be loose, grasp the caliper and remove it from the brake pads and the caliper mounting bracket. If the caliper has not been retracted you may need to rock the caliper back and forth a little to remove it.
Once the caliper is free from the pads set it securely on the lower control arm, strut bulk head or use a zip tie to hold it out of the way. Be careful not to bend, kink or allow the caliper to hang from the brake flex hose.
Thoroughly inspect brake caliper and brake hose for leakage, cracks or chaffing and replace it if needed.
Now the caliper will be loose, grasp the caliper and remove it from the brake pads and the caliper mounting bracket. If the caliper has not been retracted you may need to rock the caliper back and forth a little to remove it.
Once the caliper is free from the pads set it securely on the lower control arm, strut bulk head or use a zip tie to hold it out of the way. Be careful not to bend, kink or allow the caliper to hang from the brake flex hose.
Thoroughly inspect brake caliper and brake hose for leakage, cracks or chaffing and replace it if needed.
 Sometimes the pads will get stuck on the caliper upon removal which you can then pop them out from the caliper to remove.
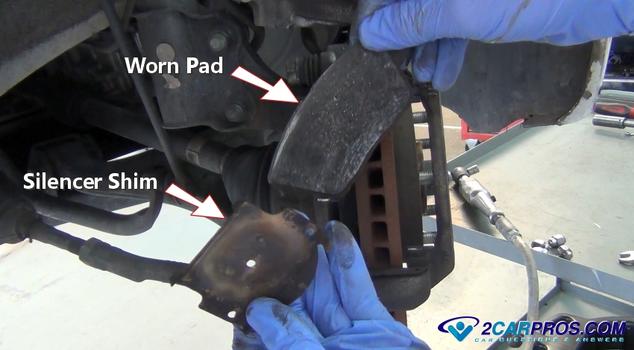
 Inspect the worn pad and silencer shim, look for uneven wear which is an indication of a seized caliper slide that will need to be serviced. We will show you how to do this later on in this guide.
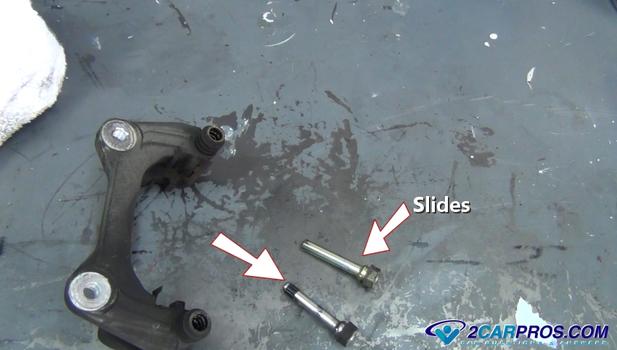
 When removing the last bolt, the mounting bracket will become loose so keep your hand on it so it doesn't fall. This bracket will contain the caliper slides which will need to be removed and cleaned before reassembly. These slides help the caliper "float" to ensure that both inner and outer brake pads wear evenly.

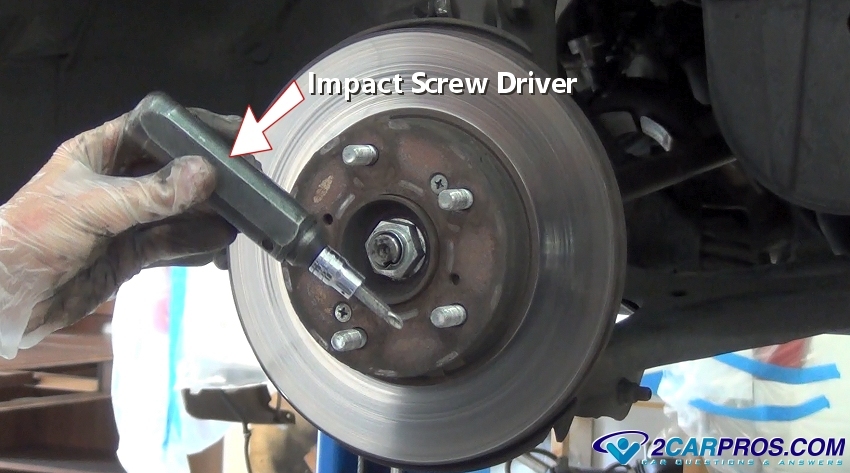
 These mounting screws can be on there pretty tight in which case you must use an impact screwdriver which look like this and is available from Amazon.
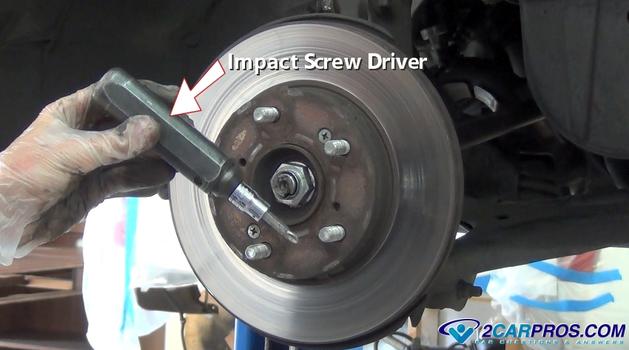 While wearing safety goggles, use a hammer and strike the end of the impact screwdriver which will unlock the screw and make it more easily removed. The impact screwdriver has two settings, tighten and loosen so make sure you have it on the correct setting.
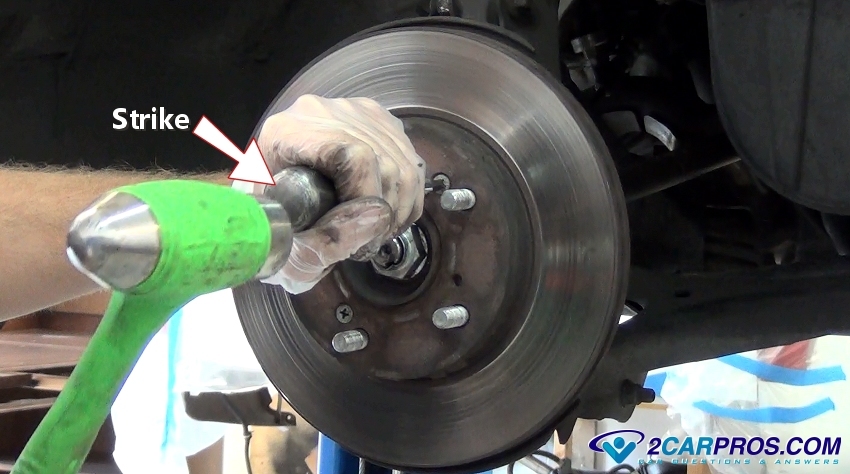
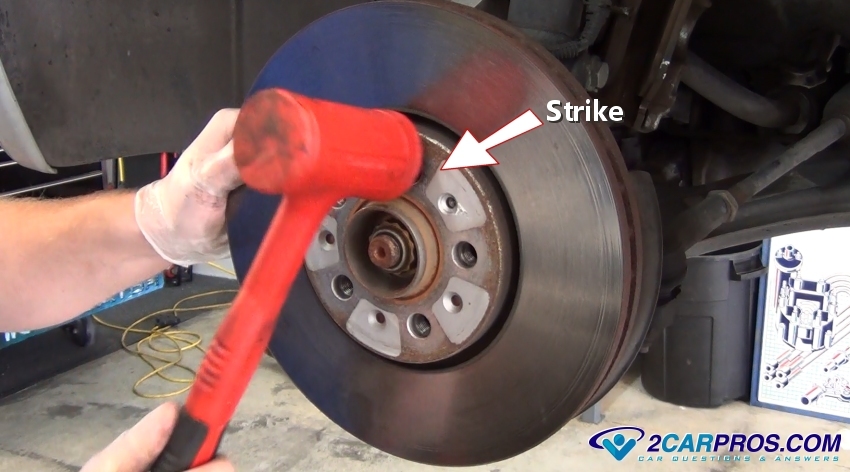
 After removing any mounting screws or clips the rotor should be loose. Sometimes the rotor can be stuck due to rust and the fact the wheel is tightened against it and the bearing hub. While still wearing safety goggles use a plastic or regular hammer to shock the rotor loose for removal. This can take some force so don't be afraid to give it a good strong strike of a steel hammer.
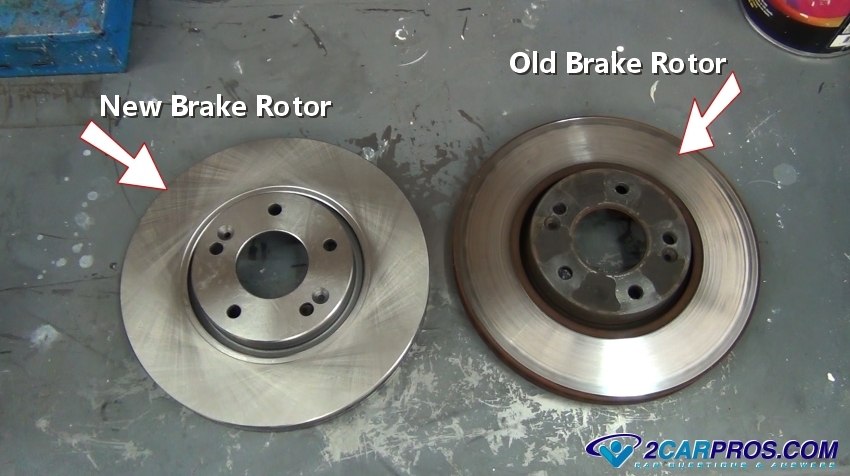
 Once the old brake rotor has been removed, match it to the new rotor, check the outer diameter and mounting offset along with the wheel stud location, they should be an identical match. Some people like to re-machine rotors using a brake lathe, we recommend new ones because the re-machined rotors will have less metal to dissipate heat with which can make them warp. This condition will make the steering wheel shake when you hit the brakes.
It's not a good idea to install new brake pads on an old brake rotor because the braking surface will be uneven and will diminish the brakes ability to stop the car which will make the car pull one way or the other when braking. This is known as "slap pads on it" and is the very cheapest way to do a front bake job.
Once the old brake rotor has been removed, match it to the new rotor, check the outer diameter and mounting offset along with the wheel stud location, they should be an identical match. Some people like to re-machine rotors using a brake lathe, we recommend new ones because the re-machined rotors will have less metal to dissipate heat with which can make them warp. This condition will make the steering wheel shake when you hit the brakes.
It's not a good idea to install new brake pads on an old brake rotor because the braking surface will be uneven and will diminish the brakes ability to stop the car which will make the car pull one way or the other when braking. This is known as "slap pads on it" and is the very cheapest way to do a front bake job.
 Use a shop towel and wipe off the mounting surface of the bearing hub and make sure it's free from dirt and grease. This will allow the new rotor to sit squarely on the bearing hub.
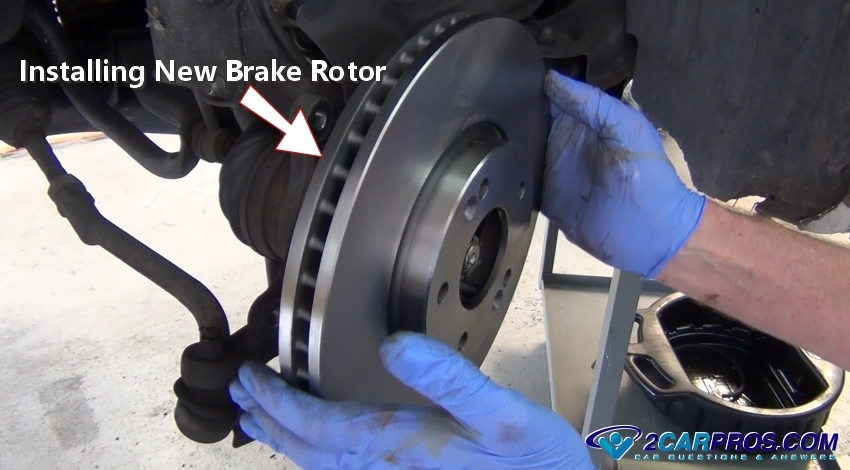
Once the old rotor has been matched to the new unit, align the wheel studs and rotor mounting screws. Then slip the rotor onto the bearing hub.
Use a shop towel and wipe off the mounting surface of the bearing hub and make sure it's free from dirt and grease. This will allow the new rotor to sit squarely on the bearing hub.
Once the old rotor has been matched to the new unit, align the wheel studs and rotor mounting screws. Then slip the rotor onto the bearing hub.
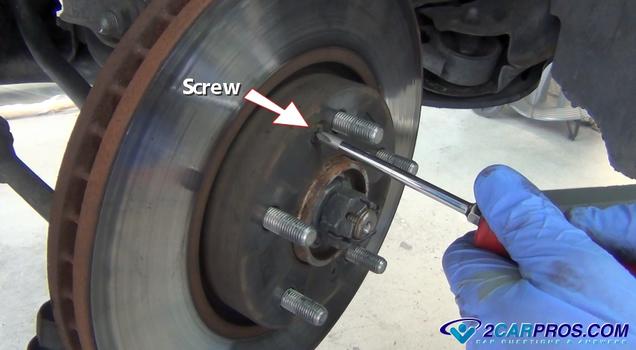
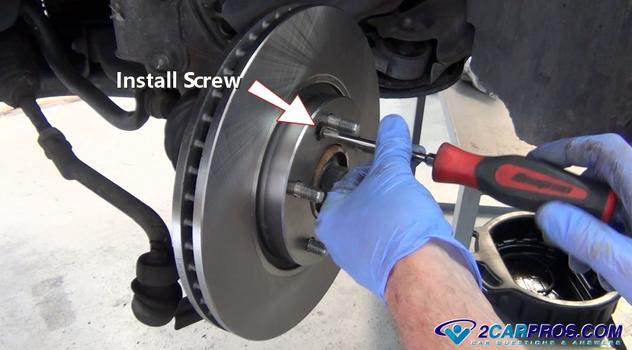
 Next, install the rotor mounting screws and tighten. You do not need to use the impact screwdriver to make the screws super tight at this point because the rotor will be held on by the wheel and lug nuts.
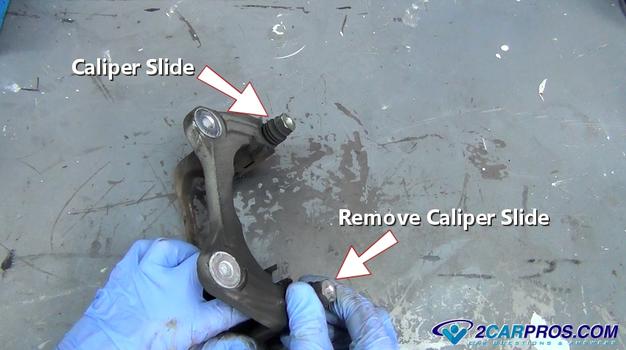 Grasp the slides and pull them outward while twisting, this will help break the dust boot seal loose. Continue to work the slides outward until they come free from the mounting bracket.
If a slide is stuck or seized in the bracket use a vise to hold the bracket and a pair of pliers to work it loose by moving it back and forth while pulling them outward.
Use a shop towel, carburetor or brake cleaner and a wire brush to clean all rust and corrosion from the slides.
Grasp the slides and pull them outward while twisting, this will help break the dust boot seal loose. Continue to work the slides outward until they come free from the mounting bracket.
If a slide is stuck or seized in the bracket use a vise to hold the bracket and a pair of pliers to work it loose by moving it back and forth while pulling them outward.
Use a shop towel, carburetor or brake cleaner and a wire brush to clean all rust and corrosion from the slides.
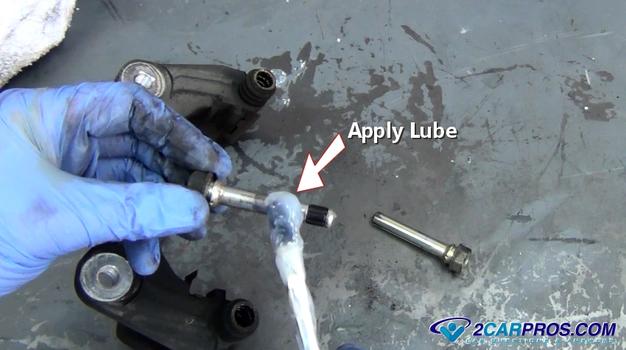
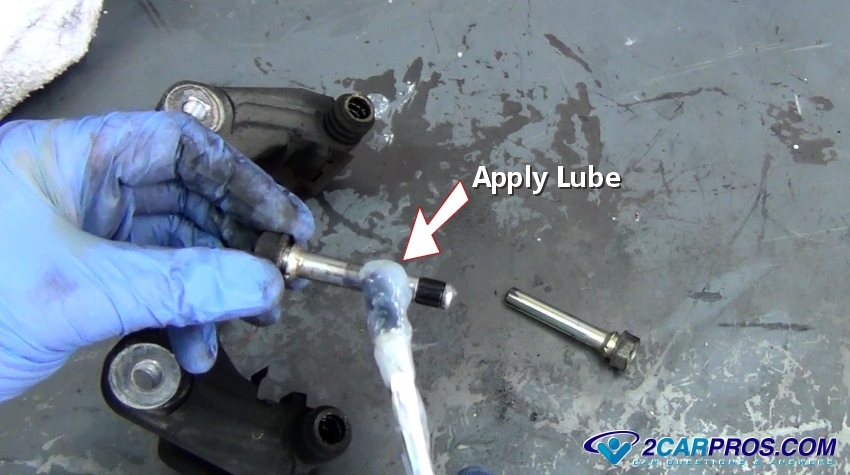
 Once the slides have been cleaned apply a thin layer of silicone brake lube to both slides. Some slides will have a dampener on one end be sure to not get these mixed up, install them into the hole they came out of.
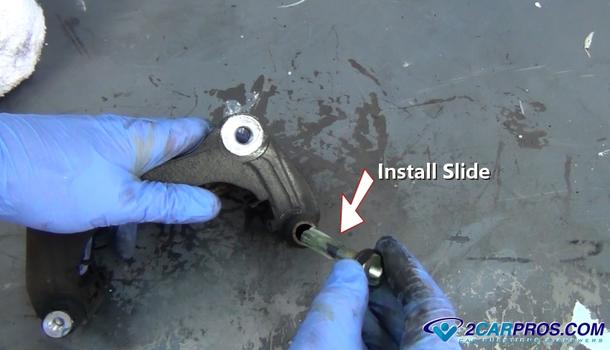
 Install the caliper slides into the caliper mounting bracket with a twisting motion and make sure the slides move easily in the out. If not, remove the slide for more investigation.
These slides can become worn and have groves in them, in which case they will need to be replaced. Slide pin grooves can cause the caliper to "hang" which will create uneven pad wear and braking characteristics.
Install the caliper slides into the caliper mounting bracket with a twisting motion and make sure the slides move easily in the out. If not, remove the slide for more investigation.
These slides can become worn and have groves in them, in which case they will need to be replaced. Slide pin grooves can cause the caliper to "hang" which will create uneven pad wear and braking characteristics.
 Before reinstalling the caliper mounting bracket, clean the threads of the bolts by using a small wire brush. Then hand thread in both mounting bolts into the bracket, tighten the bolts evenly to manufacturers specifications which is usually between 70 and 90 foot pounds. A small amount of thread lock can be used to ensure the bolts do not come loose.
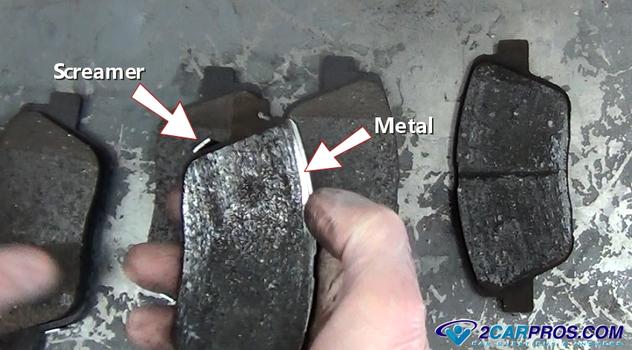
 At the upper side of the pad you can see metal which coins the phrase "my brake are metal to metal", meaning the backing plate of the pad which is made of metal is contacting the rotor which is metal as well. When brakes are in this condition the stopping power is greatly compromised.
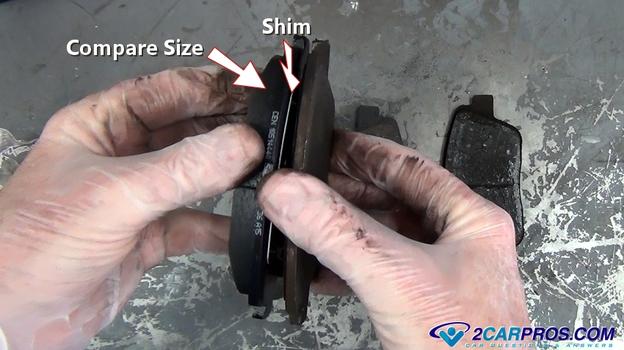
 Compare the old pad to the new unit, pay special attention to the size of the pad's backing plate tang, these are what hold the pad in place. If the tang is too large it will not fit into the caliper mounting plate, and if the tang is too small the pad will rattle and click when driving or stopping. Also the screamer warning tab needs to be in the same place as the old pad when installed back into the mounting bracket.
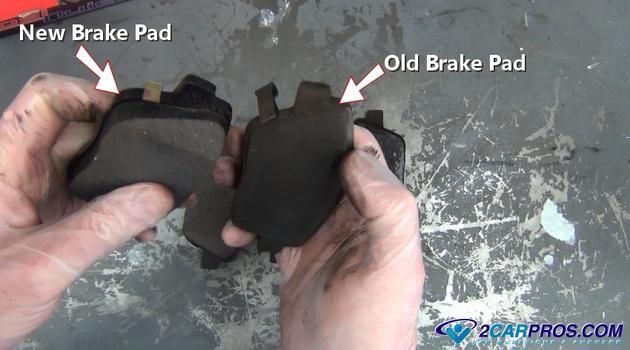 Match the old pad backing plate size to the new pad. Some new pads have an anti-squeak vibration shim already attached to the back of it so no additional measures to stop brake squeak is needed before installation. In older application an anti-squeak spray or coating was used but usually had little to no effect on stopping brake noise.
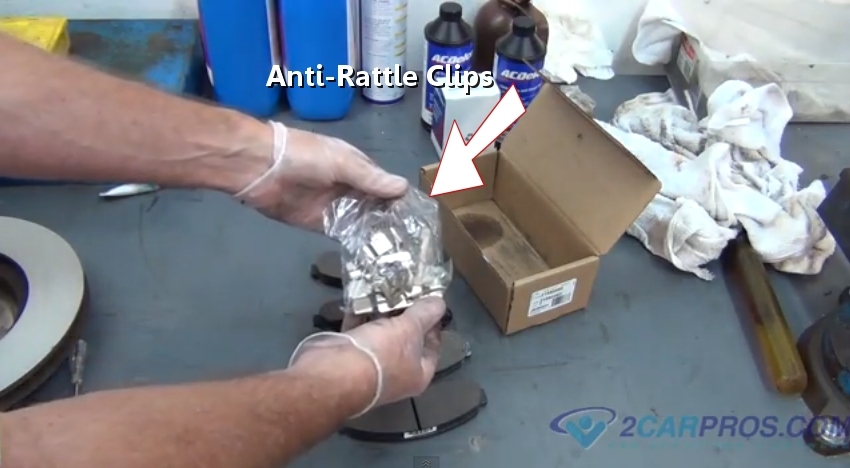
 In some applications new an anti-rattle clip sets are supplied with the pads. Remove the old retainer clips and install the new ones onto the caliper mounting bracket.
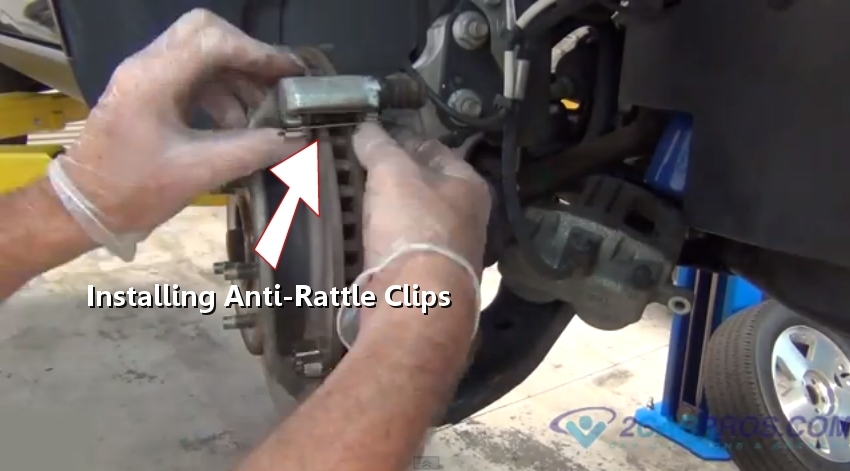
 When installing pad anti-rattle clips into the caliper mounting bracket make sure the orientation of the clips are correct.
 Install the new pads one at a time, push down on the spring retainer clip and nose the top of the pads inward to rest squarely against the rotor.
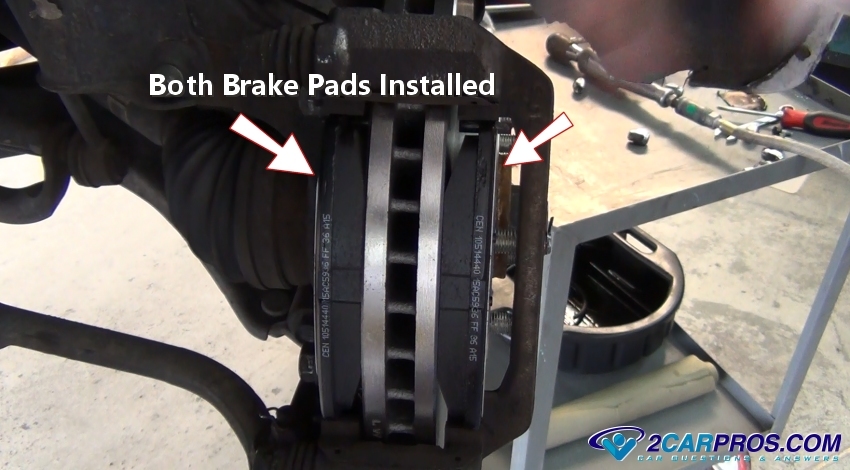
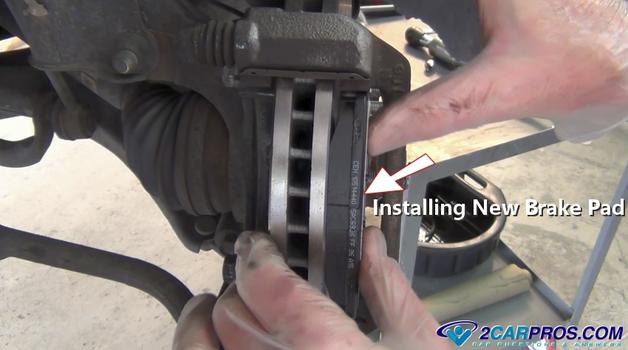 This is what it looks like when both pads are correctly installed against the brake rotor, make sure the pads move freely in the bracket with no access play, now the caliper is ready to be reinstalled. The pad with the sensor is usually in the inboard position.

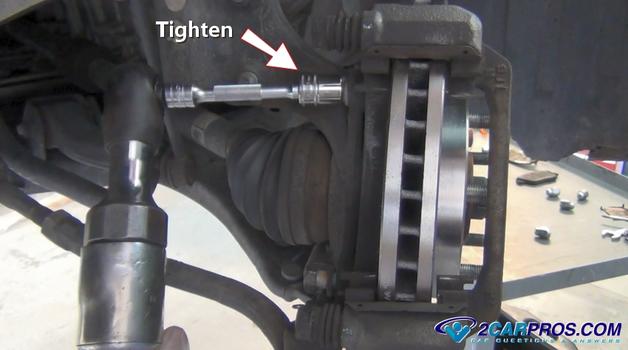
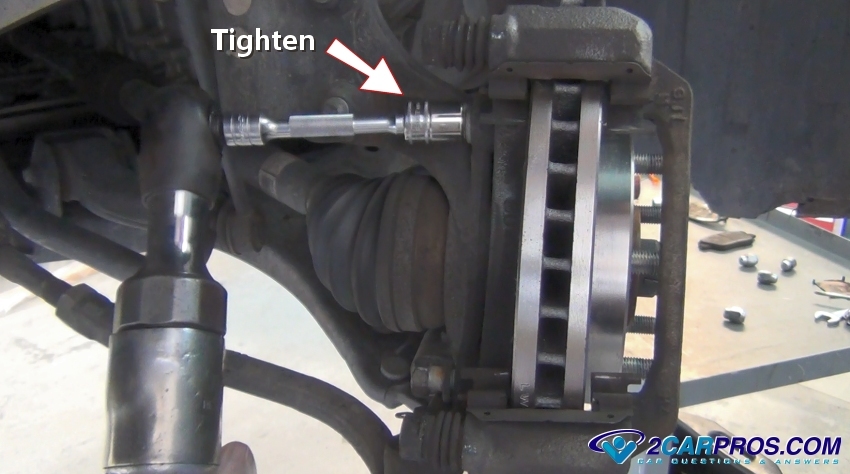
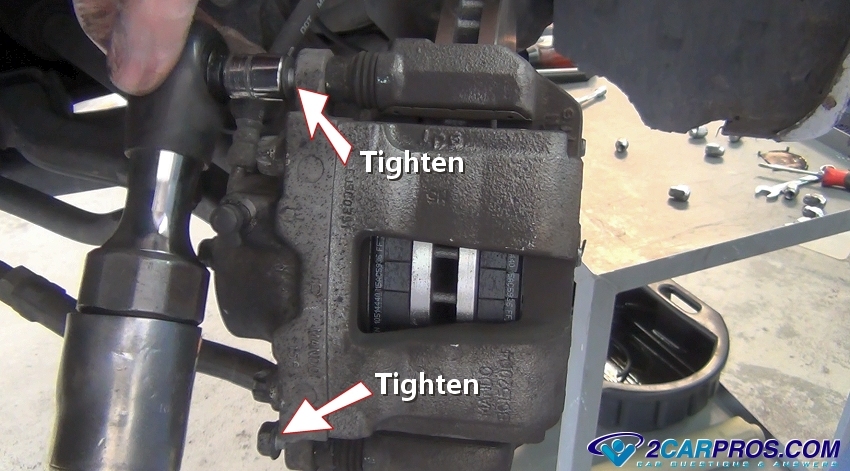
 Once the caliper is successfully over the pads and slides, install both mounting bolts by hand one at a time. Then tighten the bolts to manufacturers torque specification which is usually 35 to 45 foot pounds. Some slides have a hex where a wrench can be used to hold the slides from turning while tightening the bolt. Now completed repeat this brake job procedure for the opposite side of the car.

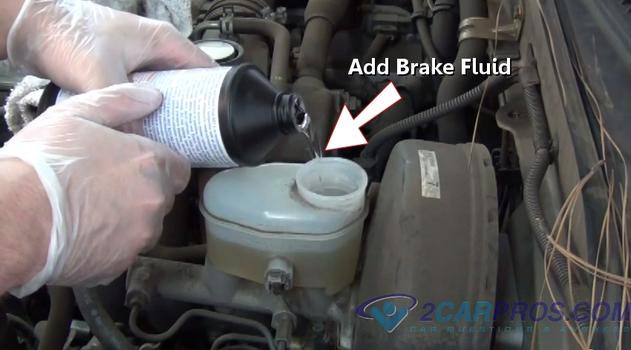
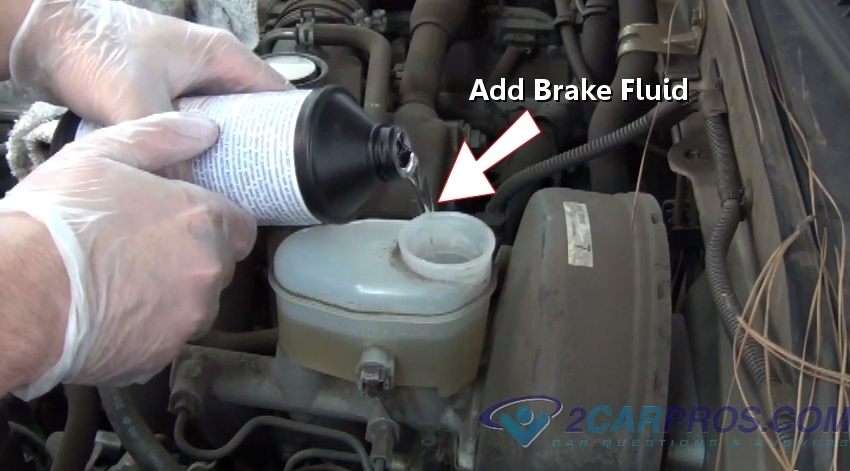
 Add brake fluid from a sealed container until the level meets the "FULL" line on the reservoir.
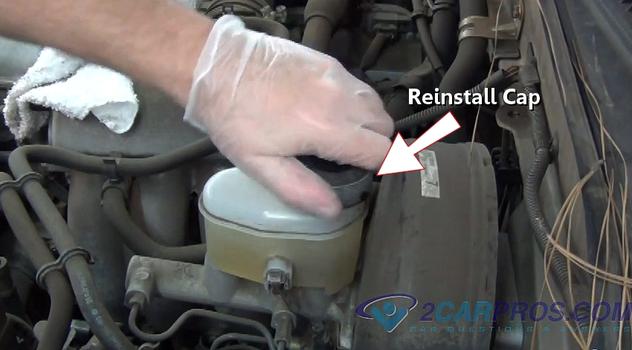
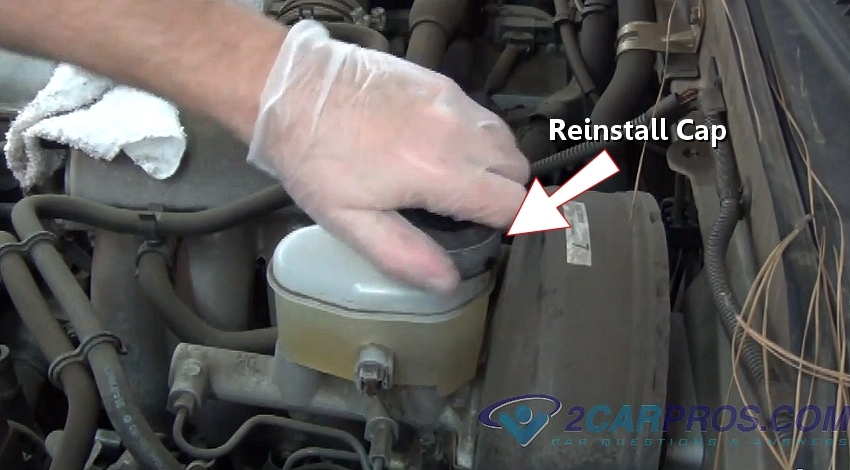
 Once the fluid has been installed to its proper level, reinstall the lid and wipe an excess brake fluid with a shop towel. After the brake pedal has been pushed down and proper brake pressure has been obtained, recheck the fluid level and re-add if needed.
 This operation is forcing the brake pads to travel to the brake rotors while taking up the air gap between the pad, rotor and caliper piston. Do this until normal brake operation has returned (the brake pedal is in its normal position). Moving the pedal slowly helps prevent air bubbles being trapped in the system which alleviates bleeding. If the pedal seems spongy air is trapped and the system needs bleeding.

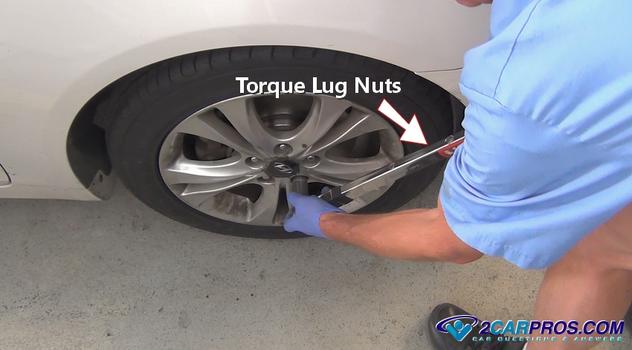
 Use a torque wrench to finish tightened the lugs nuts in the star pattern, these nuts should be tightened to manufacturer's specifications which is usually 80 to 100 foot pounds. Reinstall any lug nut covers or hub caps that were previously removed and you are ready for a test drive.
 When first using new brakes they will not work as well because they have not been broken in yet, this means the pads have not mated to the rotor. To do this properly take the car for a test drive, use the brakes gently while doing easy stops, then releasing the pedal monetarily and then reapply it while stopping.
This will break in the pads while allowing them to cool and release any brake material disbursed in the process. Repeat this procedure 5 to 7 times at this point the brakes are ready for the open road and the brake pedal operation should be normal.
If you hear any strange noises or the pedal is soft or spongy recheck the job by re-jacking the car up and removing the wheels of inspection or re-bleeding the system. Never continue to drive a car without normal brake pedal operation.
Disc brakes have an increased braking power advantage over drum/shoe style brakes. Some disc brakes utilize cooling fins in-between the braking surfaces of the rotor to maximize their cooling efficiency.
Replacing brake rotors can vary depending on the make and model of car, two or four wheel drive, front or rear wheel drive. Always replace brake rotors with top quality or OEM (original equipment manufacturer) brake rotors, some less expensive brake rotors can squeak and may not dissipate heat or perform as well because of their inferior metal quality.
The same applies to the brake pads; they should be high quality (OEM) to ensure proper performance. When a grinding brake rotor is neglected, it will cause the brake system to fail due to the separation of the rotor hat (center) from the outer web (braking surface). Additional problems the can occur including the brake pad falling out completely and the brake caliper will blow out a piston, either of these conditions will cause brake failure.
Vehicles brake pads can wear out at different rates depending on design, driving habits, brake pad quality, stop and go traffic and freeway conditions, etc. Hydraulic pressure is supplied to the brake caliper forcing the pads against the brake rotor causing friction to slow the vehicle. Most brake pads have some kind the sensing device that will warn if the brake pads are getting low.
Either a brake warning light, or a noise sensor the will create a high pitched squeal when the pads have worn down beyond manufactures recommendations. Brake service usual occurs between 25,000 and 30,000 miles.
Best Practices
If you feel more comfortable getting specific instructions by using an online repair manual or a hard copy we have the best sources for you.
Hard Copy: Amazon
Online Manual: Mitchell1
We hope we helped you with your brake job and saved you a few dollars in the process. If you have any questions please check out our mechanics forum where we have solutions to thousands of brake problems.
When first using new brakes they will not work as well because they have not been broken in yet, this means the pads have not mated to the rotor. To do this properly take the car for a test drive, use the brakes gently while doing easy stops, then releasing the pedal monetarily and then reapply it while stopping.
This will break in the pads while allowing them to cool and release any brake material disbursed in the process. Repeat this procedure 5 to 7 times at this point the brakes are ready for the open road and the brake pedal operation should be normal.
If you hear any strange noises or the pedal is soft or spongy recheck the job by re-jacking the car up and removing the wheels of inspection or re-bleeding the system. Never continue to drive a car without normal brake pedal operation.
Disc brakes have an increased braking power advantage over drum/shoe style brakes. Some disc brakes utilize cooling fins in-between the braking surfaces of the rotor to maximize their cooling efficiency.
Replacing brake rotors can vary depending on the make and model of car, two or four wheel drive, front or rear wheel drive. Always replace brake rotors with top quality or OEM (original equipment manufacturer) brake rotors, some less expensive brake rotors can squeak and may not dissipate heat or perform as well because of their inferior metal quality.
The same applies to the brake pads; they should be high quality (OEM) to ensure proper performance. When a grinding brake rotor is neglected, it will cause the brake system to fail due to the separation of the rotor hat (center) from the outer web (braking surface). Additional problems the can occur including the brake pad falling out completely and the brake caliper will blow out a piston, either of these conditions will cause brake failure.
Vehicles brake pads can wear out at different rates depending on design, driving habits, brake pad quality, stop and go traffic and freeway conditions, etc. Hydraulic pressure is supplied to the brake caliper forcing the pads against the brake rotor causing friction to slow the vehicle. Most brake pads have some kind the sensing device that will warn if the brake pads are getting low.
Either a brake warning light, or a noise sensor the will create a high pitched squeal when the pads have worn down beyond manufactures recommendations. Brake service usual occurs between 25,000 and 30,000 miles.
Best Practices
If you feel more comfortable getting specific instructions by using an online repair manual or a hard copy we have the best sources for you.
Hard Copy: Amazon
Online Manual: Mitchell1
We hope we helped you with your brake job and saved you a few dollars in the process. If you have any questions please check out our mechanics forum where we have solutions to thousands of brake problems.
FRONT BRAKE PAD AND ROTOR REPLACEMENT GUIDE
This section covers non-serviceable wheel bearing vehicles which are most of what you will find on the road today. We have an added guide to show you how to service the axle bearing correctly if you have an older vehicle.- Brake pads
- Brake rotors
- Tool set
- Shop towels
- Gloves
- Torque wrench
- Protective eye wear
- Large "C" clamp or channel locks
- Brake fluid
- Jack stands
- Hydraulic floor jack
- Breaker bar or lug wrench
- Thread lock
- Wire brush
- Brake cleaner
- Brake lube (some pads set include small portion)
STEP 1: REMOVE THE TIRE
Before beginning the job the tire must be removed, this can be by first removing the hubcap, lug nut cover or in some applications the lug nuts are exposed and are ready to be removed. You can break both front wheel nut nuts loose but only disassemble and remove one tire at a time.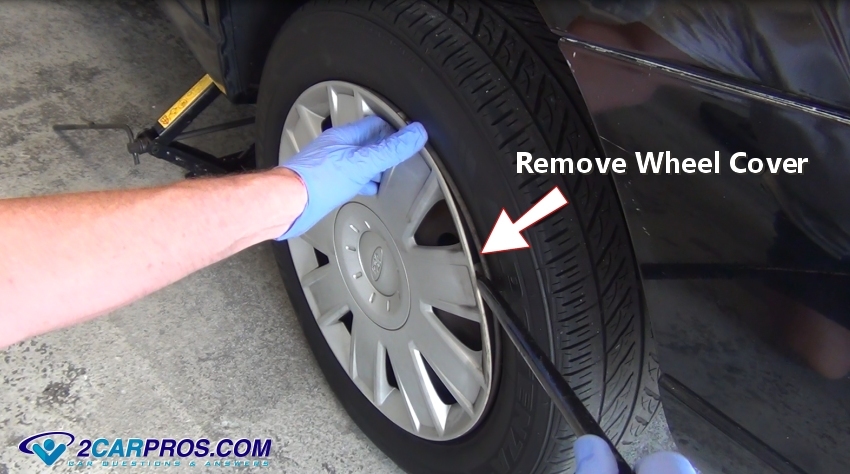
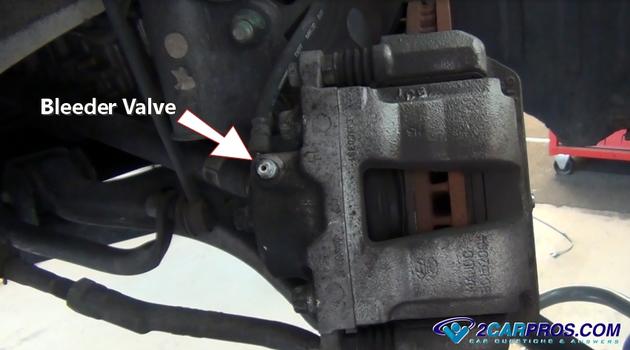
STEP 2: RESETTING THE CALIPER
To start, grasp the caliper and turn it outward to gain access to the mounting bolts. Then locate the brake caliper bleeder screw which is toward the top and remove the dust cap. The fluid that is in the caliper is dirty and may contain small metal particulates and rust.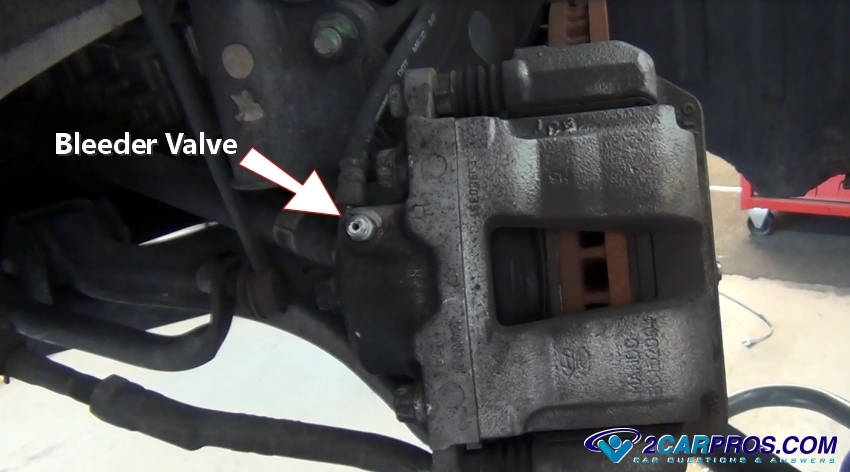


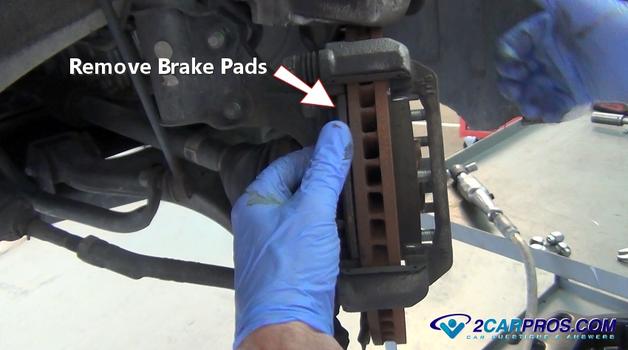
STEP 3: REMOVE THE BRAKE PADS
After the brake caliper has been removed, grasp the inner and outer pads and slide them outward from the rotor and out of the caliper mounting bracket. You can use a standard screw driver and wedge it between the pads and the rotor to help in the removal.
STEP 4: REMOVE THE CALIPER MOUNTING BRACKET
The caliper mounting bracket must be removed to replace the brake rotor in most cases. To do this, locate the mounting bolts on the inner part of the bracket. The bolt head size will be larger than the caliper mounting bolts such as 17mm, 18mm or 19mm in most cases. These bolts can be held in with thread lock so make sure the socket or wrench is securely on the bolt head before applying pressure counterclockwise to remove them.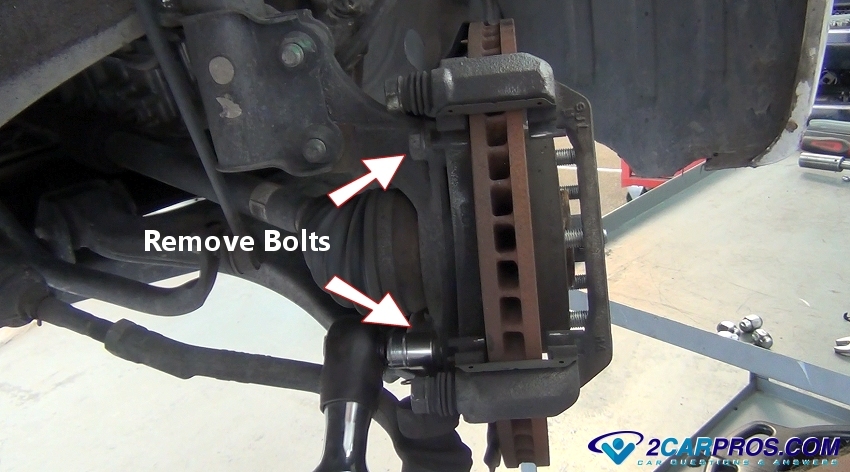
STEP 5: REPLACE THE BRAKE ROTOR
Some brake rotors are held to the bearing hub with a mounting screw or sheet metal clip on the wheel stud. Use a screwdriver or impact screwdriver to remove the screws. There also may be sheet metal clips that can be removed with a pair of side cutters (dikes).

STEP 6: SERVICE THE CALIPER SLIDES
The caliper sides are designed to allow the caliper to "float" while being bolted to the mounting bracket which allows the brake pads to wear evenly. When these slides become stuck due to rust and corrosion the car can pull while braking which causing one pad to wear excessively compared to the opposite pad in the caliper.


STEP 7: INSTALL NEW BRAKE PADS
Now you are ready to install the new brake pads, begin by inspecting the old brake pads. In the example below you can see the pad "screamer" which is what creates the squeaking or chirping noise when your brake pads are getting low. This safety device is to warn you the brake pads need replacing.


STEP 8: REINSTALL THE BRAKE CALIPER
While holding the caliper slides inward gently set the caliper over the brake pads. If you have difficulty getting the caliper in place double check to make sure the piston is fully retracted into the caliper and the slides are pushed into the mounting bracket. Double check the piston position with a large C clamp or channel locks and push the piston inward.
STEP 9: ADDING BRAKE FLUID
Open the hood and locate the brake master cylinder which is usually on the drivers side near the firewall. Use a shop towel and clean the brake master cylinder reservoir and lid to ensure no dirt falls into the fluid, then remove the lid so fluid can be added.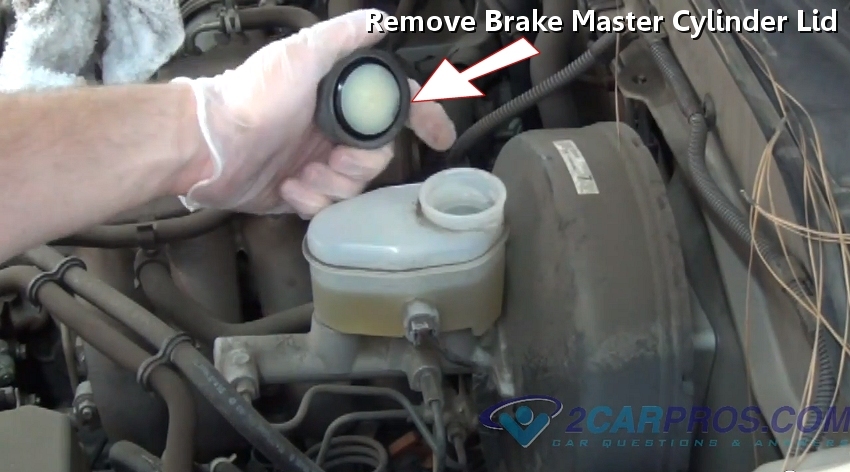
STEP 10: PUSH DOWN ON THE BRAKE PEDAL SLOWLY
Double check your work to make sure all bolts are on, and tight. Once completed slowly push the brake pedal downward (the pedal will go to the floor), then allow it back up slowly, never pump the brakes quickly. Repeat this operation until you feel the brake pedal become normal and have pressure, this can take four to six cycles.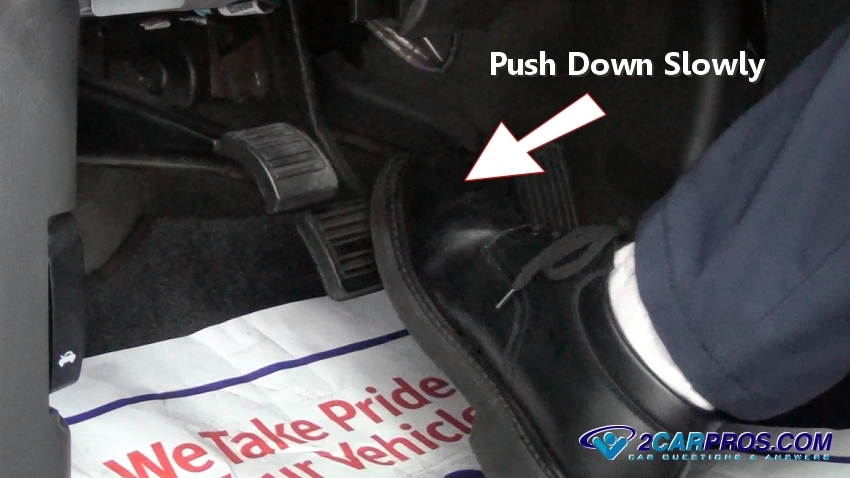
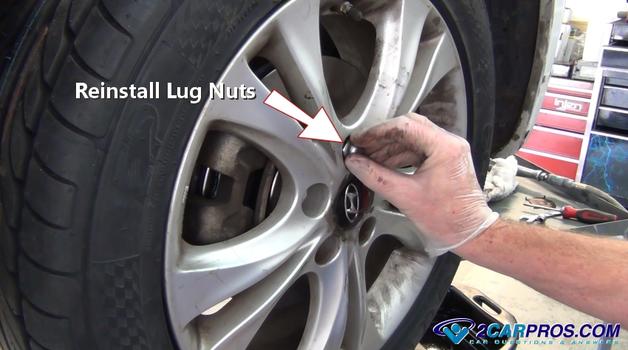
STEP 11: REINSTALL THE WHEEL
Once the repair job is complete lift the tire onto the wheel lugs and set the tire on. Then, hand thread each of the lug nuts onto the studs and tighten while holding the tire by hand, the lugs will be snug. Once both sides of the brake job are completed lift the car off of the jack stands and remove the stands from underneath the car, lower the jack just too where the tires just touch the ground.

STEP 12: BREAKING IN THE BRAKES
After a brake service has been performed and the car is safety on level ground, recheck the brake pedal operation. This should be done with the car running and in park to aid the power brake system.BRAKE SYSTEM FACTS
Front brakes provide up to 70% of a vehicles stopping power. In general, front brake pads wear out twice as fast as rear brakes, roughly a 2 to 1 ratio on a standard disc-drum brake combination. This will be slightly different on a disc-disc arrangement due to the efficiency of a rear disc brake versus drums.- Clean and inspect wheel studs, replace if any that are damaged.
- Inspect the ABS sensor wheel for cracks or damage
- Bleed the brake system after replacing brake components.
- Use high quality pads and rotors when replacing brake components.
- Lubricate caliper slides
- Clean surface between the rotor and axle flange to ensure proper operation.
- Slide the tires under the vehicle for added safety while carefully avoiding jack stands.
- Always perform brake replacements on one wheel at a time to avoid confusion.
1A Auto shows you how to repair, fix, change or replace your own worn, squeaky, fading old front brake pads and rotors on a Buick Century. This video is similar for Buick Lesabre, Chevy Venture, Oldsmobile Intrigue and Silhouette, Pontiac Bonneville Grand Prix and Transport models. You'll first learn how to remove your existing front disc brake pads and then the rotor, and then install a new brake rotor and replacement brake pads.
To watch this repair being done, please watch the full video below:
Video Source: http://www.1aauto.com/content/video/how-to-change-front-brake-pads-and-rotors-on-a-buick-century
Tools Needed:
Flat Blade Screwdriver
15mm & 19mm Socket and Ratchet
Torque Wrench
Jack and Jackstands
Large C-Clamp
To watch this repair being done, please watch the full video below:
Video Source: http://www.1aauto.com/content/video/how-to-change-front-brake-pads-and-rotors-on-a-buick-century
Tools Needed:
Flat Blade Screwdriver
15mm & 19mm Socket and Ratchet
Torque Wrench
Jack and Jackstands
Large C-Clamp
Step 1: Raise and secure vehicle

Raise and secure the vehicle with a jack and jack stands.
Step 2: Remove wheel cover, center cap, etc

Remove wheel cover, center cap, etc. Depending on your vehicle this may require using a screwdriver to pry off the center cap then loosening up the plastic caps over the lug nuts, or you may only need to remove the plastic caps.
Step 3: Remove the lug nuts, wheel and tire

Using a 19mm socket and ratchet (or lug wrench), remove the lug nuts and remove the wheel and tire.
Step 4: Remove the two bolts on the back of the brake caliper

To make accessing the bolts on the rear of the brake caliper easier, turn the wheels (all the way right for the right front wheel and all the way left for the left front wheel). With a 15mm socket and ratchet, remove the two bolts on the back of the caliper. These two bolts are your slider bolts so you should clean them up and put a little bit of grease on them before reinstalling them.
Step 5: Pry off brake caliper and remove old brake pads

Using a flat blade screwdriver, pry the brake caliper up and off. You can hang the caliper up on the strut to get it out of the way. The old brake pads should slide out easily. That is how to remove brake pads on this Buick Century.
Step 6: Remove the two 15mm bolts holding the brake pad bracket, remove bracket, and then remove brake rotor

To remove the rotor, you must first remove the brake pad bracket which is held on at the rear with two 15mm bolts. Remove these two bolts using the 15mm socket and ratchet. Remove the bracket. Remove the brake rotor by pulling it with your hands. Removing the brake rotor may require some wiggling back and forth.
Step 7: Slide new brake rotor on and reinstall brake pad bracket

Now that we have shown you how to remove a brake rotor on this Buick Century, we are now going to show how to install a new rotor and replacement brake pads. First, slide the new rotor on, being careful to only touch the edges. You don't want any oil or dirt from your fingers to get onto the surface of the new brake rotor. Put the brake pad bracket into place and start the bolts by hand. Tighten the bolts with the 15mm socket and ratchet. Using a torque wrench torque the bolts to 75 ft-lbs.
Step 8: Install the new brake pads into the bracket

Install the new brake pads into the bracket. They should push in fairly easily by hand, though they may require a bit of force to get fully seated. Hitting them with the end of a socket is usually enough to get them in. When installing the brake pads you want to make sure that the wear marker (the small tab that contacts the brake rotor as the pads start to get thin) is closest to the rear of the vehicle.
Step 9: Reinstall brake caliper

Before reinstalling the brake caliper you will need to force the piston, located on the inside, back into the cylinder. Fit the large c-clamp over the piston and cylinder and tighten the clamp until the piston is back inside the caliper. Fit the caliper back over the brake pad bracket. Put a little bit of wheel bearing grease on the two brake caliper bolts that you cleaned up. The lower bolt has a bushing on the end, so make sure they are installed in the correct place. Tighten these bolts gently with the 15mm socket and ratchet. Torque the two bolts to 75 ft-lbs.
Step 10: Mount wheel and tire back up and tighten, lower vehicle and secure

Mount the wheel and tire back up on the vehicle. Put lug nuts back on and tighten in star pattern. Lower the vehicle and torque the lug nuts to 75 ft-lbs.
Step 11: Reinstall wheel cover, center cap, etc

Once you have secured the wheel and tire to the vehicle, put the wheel cover, center cap, etc., back on as well.
Step 12: Test the brakes to make sure they are functioning properly

Pump the brake pedal several times with the car off, then take vehicle out for a road test. Begin the road test on a driveway or parking lot away from traffic. First put foot on brake as you shift the vehicle into gear to make sure the brakes hold the vehicle when idling. Then begin moving slowly (5 mph to start) checking the brakes at different speeds. When you are sure that the brakes are functioning properly then proceed onto roadways.
That is how to repair front brake pads and rotors that need to be fixed on Buick Century, Buick Lesabre, Chevy Venture, Oldsmobile Intrigue and Silhouette, Pontiac Bonneville Grand Prix and Transport models.
That is how to repair front brake pads and rotors that need to be fixed on Buick Century, Buick Lesabre, Chevy Venture, Oldsmobile Intrigue and Silhouette, Pontiac Bonneville Grand Prix and Transport models.
================== = == ==== = == = == = = = = = = = = == = = = = ==
How to Replace Front Brake Pads and Rotors (FWD)
Front brake pads provide up to 70% of a vehicles stopping power. In general, front brake pads wear out twice as fast as rear brake pads, roughly a 2 to 1 ratio on a standard disc/drum brake combination, this will be slightly different on a disc/disc arrangement due to the efficiency of a rear disc brake versus drums. Disc brakes have a definite braking power advantage over drum style brakes and performance is not compromised as much when wet or hot. Some disc brakes utilize cooling fins in-between the braking surfaces of the rotor to maximize cooling efficiency. Replacing brake rotors can vary depending on the make and model of car or truck, two or four wheel drive, front or rear wheel drive. Always replace brake rotors with top quality or OEM (original equipment manufacturer) brake rotors, some less expensive brake rotors can squeak and may not dissipate heat or perform as well because of their inferior metal quality. The same applies to the brake pads; they should be high quality (OEM) to ensure proper performance.
Step 1: Identify Front Disc Brake Components

Front Wheel Drive Brake Assembly
Most front disc brake components include: brake rotor, brake pads, brake caliper, caliper mount and brake flex hose. Brake service usual occurs between 20,000 and 40,000 miles depending on driver habits, road conditions and brake pad/ rotor materials used.
Step 2: Remove Brake Caliper to Replace Pads

Removing Brake Caliper Mounting Bolts
Locate primary caliper mounting bolts; apply wrench pressure counter-clockwise (When looking at the head of the bolt) to remove the bolts, upper and lower. Make sure the bolt threads are in good shape and replace if necessary.
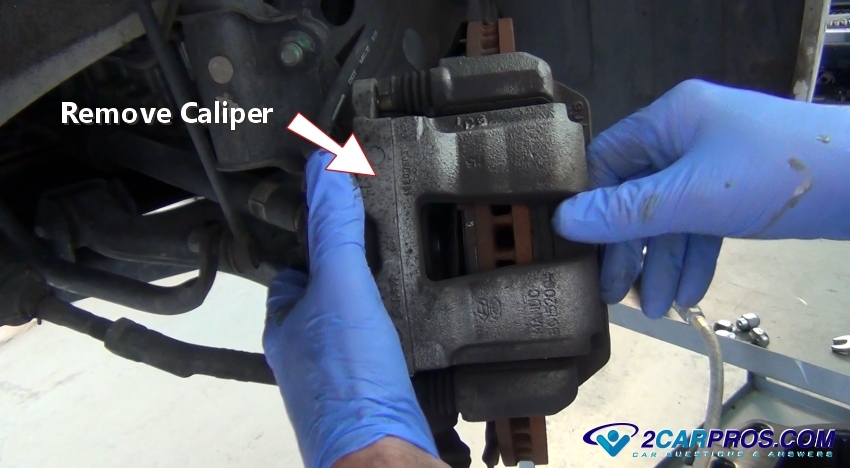
Step 3: Remove Front Brake Caliper

Remove Front Brake Caliper
After removing the primary caliper mounting bolts lift the brake caliper off of the rotor and then tie or secure to the side, being careful not to bend or kink the brake caliper flex hose. Thoroughly inspect brake caliper and brakehoses for leakage, cracks or chaffing and replace as needed. Next remove the brake pads (If not mounted in the caliper) and secondary caliper mounting bolts. Notice how great protective gloves work, most technicians use them on the job today.
Step 4: Remove Brake Pads

Remove Front Brake Pads
Once the brake pads have been removed, make sure if there is anti rattle hardware to transfer to the new brake pads. Some brake pad manufacturers will include the proper lube (Caliper slides) and anti-rattle hardware to ensure proper performance of their product.
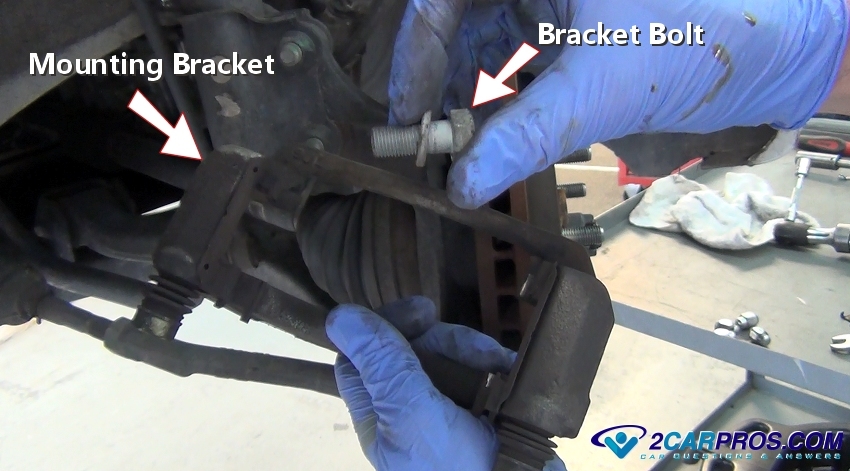
Step 5: Remove Caliper Mount

Remove Caliper Mount Bracket
Finish removing secondary caliper mount bolts and remove caliper mount. Note: clean and lube caliper slides and pad friction surfaces of all foreign material or build-up.
Step 6: Remove Brake Rotor

Remove Brake Rotor
With the caliper mount out of the way you can now remove the brake rotor. Sometimes it can get stuck so you may need to tap it with a hammer or use penetrating oil to free it up. Some manufacturers use small screws to hold the rotor on as well. Clean and inspect wheel studs, replace if any are damaged. Also clean bearing hub rotor mount surface to ensure the proper mounting of the new brake rotor. Inspect the ABS sensor wheel for cracks or damage and replace as needed.
Step 7: Depressing the Brake Caliper

Resetting Brake Caliper
To install the new brake pads you must retract the brake caliper piston. Remove the master cylinder lid or open the brake caliper bleeder screw to allow excess brake fluid to be released if necessary. Install C clamp tool and gently tighten clamp until caliper piston is fully depressed. Note: use old brake pad to protect the caliper piston. Close the bleeders once the piston is retracted completely
Step 8: Installing New Brake Rotor

Install Brake Rotor
Install new brake rotor, the new rotor is manufactured with a protective film over the rotor to keep it from rusting, remove protective film with brake cleaner before installing; also after the brake job is complete you may experience a small amount of smoke from the rotor when first used. This is normal and will go away after the first couple of uses.
Step 9: Installing New Front Brake Pads

Installing New Brake Pads
Reinstall the front brake caliper mount, and then install front brake pads. Make sure the pads are seated properly in the caliper mount; it must be a close fit to work properly..
Step 10: Reinstall Front Brake Caliper

Re-Install front Bake Caliper
Reinstall front brake caliper and reinstall caliper-mounting bolts, recheck all mounts and mounting bolts. Check the caliper slides to be sure there is no bind and that the caliper moves freely back and forth on the caliper slides. Bleed brake system per manufacturer's specifications to relieve any air trapped in the system. Before driving the vehicle, push the brake pedal down and let it up slowly, repeat until normal brake pedal operation resumes, this operation is forcing the brake pads to travel to the brake rotors. DO NOT DRIVE VEHICLE UNTIL PROPER BRAKE PEDAL OPERATION IS PRESENT. When test driving the vehicle listen for any unusual noises during the operation of the brakes, Note: Brake pad operation may be slightly impaired until the surfaces mate together (About 30 miles)
Source: http://www.2carpros.com
Replacing Ford F150 Front Brake Pads And Rotor
When your brakes start looking like those below you should change them out asap. These pads and rotors were OEM with only around 20,000 miles on them. Looks like one of the pads was defective and it tore up the rotor. You will want some kind of breaker bar to give you more force when removing some of these bolts. Everything is straight forward and there is plenty of room to do the work. Enjoy the tutorial!

Removing Brake Components
1. Once you have the wheel removed begin by removing the caliper bolts (13mm). With the bolts gone, move the caliper out of the way.

2. If you are changing just the pads then remove the spring clips and slide the pads out. Follow the rest of the article to remove the rotor. 
3. Next step is to remove the anchor bracket. It's held by two 18mm bolts. 
4. If you have a high mileage truck then it's a good idea to remove the slide pins and lightly coat them with some bearing grease. Don't forget to remove the slippers. 
Installing The Brake Components
1. You will have to compress the brake piston back into its bore. This tools comes in handy but you may also use a C-Clamp and one of the brake pads to do the same job. 
2. Install the rotor and then install the anchor bracket. Tighten the bolts to 148 lb-ft.
3. Install the new pads, spring clips, and slippers. I like to apply a little grease to the slippers as well. 
4. Install the brake caliper and tighten the bolts to 47 lb-ft.
5. Install the wheel and tighten the fasteners to 150 lb-ft.
================= ================ ================ ========== = = = =Installation Steps
Like all good things, your car’s brake rotors aren’t designed to last forever. So, when you smelly something hot and funky at the bottom of a hill, feel your brake pedal shake each time you touch it, or hear nasty grinding noises while driving your car, it might be time to install a new set of brake rotors. Having your car’s brakes serviced at a shop is expensive, so we put together these easy-to-follow steps so you can replace your rotors in your driveway and save a few bucks in the process.
- Find a flat surface to work on your car
- Look for a driveway or garage with a concrete floor
- Lift your car by the chassis with a floor jack and firmly rest in on jack stands
- Once it’s supported, gently attempt to rock your car—if you can move it, move the jack stands to better locations on the chassis
- Pro Tip: Before you raise your car, slightly loosen the lug nuts (do not remove them). Otherwise, you’ll have to keep the tire from spinning while removing each lug, which isn’t easy
- Remove the lug nuts and wheels
- Use your fingers to remove loose lug nuts (if you followed my hint), or if they’re still tight, a star wrench or an impact wrench
- Once the lugs are removed, the wheels can easily be pulled off of the wheel hub
- Pro Tip: Watch your toes when removing big truck tires. They’re surprisingly heavy and it’s easy to drop them when you remove them from your truck
- Inspect the condition of your brake pads
- If they’re thinner than the minimum specified thickness, missing chunks of material on the edge or the backing is severely rusting, get a new set. You can replace your old pads after you remove the brake caliper
- Remove the brake caliper assembly
- It should be held in by a few bolts or spring clips. Remove them and slide the caliper away from the rotor
- Compress the brake caliper piston fully (If you’re replacing brake pads)
- Slightly loosen the brake bleeder screw on the back of the caliper, until fluid starts to leak out
- Retract the caliper pistons using a disk brake compressor or a large C-clamp. You’ll lose some fluid from the bleeder screw, but this method makes it far easier to compress the caliper. It also prevents you from damaging the caliper’s seals
- Once you fully compress the caliper, tighten the bleeder screw and remove the clamp
- Pop out your old brake pads by hand or with a small prying tool (don’t use a screwdriver)
- Mount the included shims or use anti-squeal compound on the back of the new pads and install them in the caliper. Avoid touching the friction surface
- Remove your brake rotors
- Most rotors can simply be pulled off of the wheel studs at this point. Otherwise remove any bolts connecting the rotor to the wheel hub, and pull it free
- If it’s been a while since your last brake service or you live in a wet area, your brake rotors might not come off easily. Some rotors feature threaded holes on the rotor hat, so you can screw bolts into them, pushing the rotor away from the wheel hub. If no holes are present, tap the rotor hub lightly and near the wheel studs with a hammer. This will loosen any rust that might be holding the rotor in place
- If your vehicle has a rotor & hub assembly, remove the dust cap in the center of the rotor and the large nut under it. Your rotor & wheel bearings will easily slide off of the spindle. This is a perfect time to pack your bearings with fresh grease
- Install your new brake rotors
- Make sure the wheel hub clean—dirt, mud and rust on the hub won’t allow the rotor sit flush
- Check the condition of your wheel studs. If you find pitting or other types of corrosion on the studs, replace them
- Place your new rotors on the wheel hubs, being careful not to touch the friction surfaces. Install any hold-down bolts you previously removed
- Grease the caliper
- Apply a light coating of high temperature brake grease to the caliper’s pins and slides. If the slides look worn, replace them. Lubricate shiny spots on the caliper’s body as these are noise-causing friction points. Also, once adequately greased, you car’s caliper will slide smoother, allowing the pads to wear evenly
- Avoid touching the friction sides of brake pads & rotors. If you get some grease on them, use brake cleaner to blast away the crud. Brake pads are harder to clean though, so be extra-careful when handling them
- Reinstall your calipers
- This is the easy part. Simply slide the brake caliper & pad combo over the rotor
- Reuse the caliper bolts and pins you removed or install new hardware
- Bleed your braking system
- The goal here is to get any residual air out of the brake lines. Any time you open a bleeder screw, air can creep in. Bleeding your brakes ensures your hydraulic braking system will work properly
- There are many methods and tools to bleed a brake system. If you’re familiar with brake bleeding continue. Otherwise, be sure to read our guide to bleeding brakes
- Check your brake fluid level and refill if necessary
- Let the rubber meet the road
- Reinstall your wheels and tighten each lug by hand until snug
- Using your floor jack, slightly raise the vehicle and remove the jack stands under it
- Carefully lower your car onto its wheels
- Tighten each lug nut to specification in a star pattern with a torque wrench only
- Bed-in your brake pads according to the pads manufacturer’s recommendations or our guide onHow to Bed-In Brake Pads
- Stop your car confidently and quietly
We dread taking our cars to the shop for repair, but with this guide, you can tackle one of the easier aspects of automotive repair at home, a brake job. And, most cars, trucks and SUVs, regardless of make use a basic, hydraulic braking system, so the steps above will work great for most of them. You’ll also need a good idea of what a performance set of rotors will do for your ride and what style is the best choice. But no worries, we’ve got you covered with our guide on How to Shop for Brake Rotors. And to top it off, our brake rotor customer reviews showcase the quality of our accessories, so you know you’re bolting on nothing but the best.
------------
04 volvo s80 front and back rotors and brake replacement
how do i change the rotor and brake pads on a 04 volvo s80 front and back.
Here are directions. Note: you will need a special caliper tool to turn the rear caliper pistons clockwise to retract them.Tool is available to rent or buy from Autozone and Advanced Auto Parts.
FRONT BRAKES:

- Before servicing the vehicle, refer to the Precautions section.
- Remove the front wheels.
- Remove the spring.
- Remove the pad retaining pins.
- Remove caliper from the carrier.
- Remove the brake pads.
To install:
- Press the piston back into the caliper cylinder using a large C-clamp.
- Lubricate the caliper guide pins with silicone grease.
- Insert the brake pads and slide the caliper on over them.
- Tighten the guide pins to 22 ft. lbs. (30 Nm) and replace the dust caps.
- install the spring
- Install the wheels
With caliper off, front rotor just slides off. If it doesnt, then there is corrosion between the rotor and hub face holding. Use a hammer to hit the backside of the rotor to pop it free.
REAR BRAKES:

- Remove the wheel.
- Remove the retaining clip and the brake hose from the support.
- Remove the upper bolt from the locating pin for the brake caliper.
- Twist the brake caliper backwards. Remove the brake pads.
NOTE Do not depress the brake pedal while the brake pads are removed.
To install:
- Check the rubber sleeves on the locating pins. Replace if necessary. If necessary, lubricate the locating pins using silicon grease. Insert the locating pins in the rubber sleeves. The locating pins must slide into the sleeves easily.
- Block the brake caliper against the brake disc. Use special tool(NNN) NNN-NNNNor equivalent.-
- Turn the plate (A) forward over the shaft and insert the tool
- Install the lugs (B) in the cut-out in the brake piston
- Turn the shaft (C) so that the plate (A) presses against the brake caliper
- Turn the axle (D) to the right and press the piston back while turning the shaft (C) to the right so that the plate (A) is in contact with the brake caliper
- Turn the brake piston back fully and remove the tool.
- Install the wear indicator on the under side of the inner installed brake pads. Install the brake pads.
- Position the brake caliper. Install the new locking bolt. Tighten to 25 ft. lbs. (33 Nm).
- Install the brake hose in the support. Install the retaining clip
using special caliper tool to turn caliper piston in:

Fig. Compressing the piston into the cylinder
With calliper off, rear rotor just slides off. If it doesn't, then there is corrosion between the rotor and hub face holding. Use a hammer to hit the backside of the rotor to pop it free.
==
2006 buick rendezvous: the front disc brake pads and rotors..fwd
how do you change the front disc brake pads and rotors on a 2006 buick rendezvous fwd.
here are the pad replace directions the rotors just slide on you may need to take a hammer to them to knock them loose they tend to stick to the wheel bearing
Front Disc Brake Pads Replacement
Removal Procedure
Inspect the fluid level in the brake master cylinder reservoir.
If the brake fluid level is midway between the maximum-full point and the minimum allowable level, then no brake fluid needs to be removed from the reservoir before proceeding. If the brake fluid level is higher than midway between the maximum-full point and the minimum allowable level, then remove brake fluid to the midway point before proceeding.
Raise and support the vehicle. .
Remove the tire and wheel. .
Install two wheel nuts in order to secure the rotor.
Object Number: 177027 Size: SH
Install a C-clamp (2) over the top of the brake caliper and against the back of the outboard brake pad.
Tighten the C-clamp (2) until the brake caliper piston pushes into the brake caliper bore enough to slide the brake caliper (1) off of the rotor.
Remove the C-clamp from the brake caliper.
Object Number: 695060 Size: SH
Remove the lower brake caliper bolt.
Object Number: 695055 Size: SH
Rotate the brake caliper upward in order to access the brake pads.
Remove the brake pads from the brake caliper bracket .
Remove the brake pad retainers from the brake caliper bracket .
Object Number: 728143 Size: SH
Important: Insert a block of wood or the old brake pad brake between the C-clamp (1) and the brake caliper piston in order to prevent damage to the brake caliper piston and the brake caliper piston boot.
Install a C-clamp over the brake caliper and against the block of wood or the old brake pad (2).
Tighten the C-clamp until the brake caliper piston pushes completely into the brake caliper bore.
Remove the C-clamp from the brake caliper.
Object Number: 695066 Size: SH
Inspect the brake caliper bolt boots (4) for the following conditions:
• Cuts
• Tears
• Deterioration
• Replace the brake caliper bolt boots if damage exists. Refer to Front Brake Caliper Bracket Replacement .
Object Number: 177051 Size: SH
Inspect the brake caliper piston dust boot (1) for the following conditions:
• Cuts
• Tears
• Leaking
• Deterioration
• Replace the brake caliper piston dust boot if damage exists. Refer to Front Brake Caliper Overhaul .
Inspect the brake caliper bolts for corrosion or damage. If corrosion is found, use new parts, including bushings, when installing the brake caliper. Do not attempt to polish away corrosion.
Installation Procedure
Important: Use denatured alcohol to clean the outside surface of caliper boot before installing new brake pads.
If you are installing new brake pads, use a C-clamp in order to compress the piston to the bottom of the caliper bore. Use the old brake pad, a metal plate or a wooden block across the face of the piston in order to protect the piston and the caliper boot.
Object Number: 695055 Size: SH
Install the four brake pad retainers to the caliper bracket.
Important: Ensure that the wear sensor is positioned at the leading edge (upward) of the inner pad during forward wheel rotation.
Install the brake pads over the brake pad retainers and onto the caliper bracket .
Thoroughly clean and apply Threadlocker GM P/N 12345493 (Canadian P/N 10953488) or equivalent to the threads of the brake caliper pin bolts.
Notice: Use care to avoid damaging pin boot when rotating caliper.
Pivot the caliper down onto the pads.
Object Number: 695060 Size: SH
Install the lower caliper bolt.
Tighten
Tighten the caliper bolt to 35 N·m (26 lb ft).
Remove the two wheel nuts securing the rotor to the hub and bearing.
Install the tire and wheel. .
Lower the vehicle.
Pump the brake pedal (3/4 of a full stroke) as many times as necessary to obtain a firm brake pedal.
Fill the master cylinder to the proper level.
Burnish the pads and the rotors.
TIP: --- if you remove the caliper mount bolts and slide the caliper of the rotor and then the 2 bolts in the mount bracket the bracket will come off and then the rotor most new pads have a anti squeal on them i don't recommend the use of more.
Tighten the brake caliper bracket bolts to 185 N·m (137 lb ft).
caliper bolts Tighten the bolts to 54 N·m (40 lb ft).
=================================================
front brakes began growling audibly after replacing the rotors and pads.
It sound to as the front brakes are doing all the work. Now this is usually caused from the rear brakes being too far out of adjustment and dont apply, so the brunt of the forward momentem is all up to the front brakes.
There is a possibility that the master cylinder itself isnt applying fluid to the rear wheel cylinders, but is less likely.
Once you get the rears working, you will probably end up replacing the front pads and resurfacing the rotors, because when they get hot, the rotors glaze, and the pads become heat stressed and brittle, and may continue to growl.
You should be fine just using light semi-metallic or even organic pads.
You should first check the linings, and then if they are ok, you can adjust the star wheel through the backing plate.

If the rears are adjusted then you will have to determine if the master is sullping enough pressure back there.....easy to test is to pinch both front caliper hoses and drive it just a short distance and see if they apply. If they do, you can eliminate the rears completely.
You didn't mention if you replaced the front calipers, but they are really about the only other thing other than the master that could cause this.....have you tried the organic pads, if not you might want to give them a shot before replacing anything else, the pedal feels different than semi metallic, but we have noticed they make far less noise and dont get as hot.
I rechecked my rear shoe adjustment and they were indeed looser than I thought I left them. We'll see what it does for now; after driving around for a half hour with hard and soft braking, If it does return, I'll just go ahead and change out the master AND calipers.
=======================
whistle like noise on right front brake while stopping and at slow speeds.
Replaced Front brake pads and rotors on 2007 Mercury Mountaineer AWD. Three weeks
later start hearing a whistle like noise on right front brake while stopping and at slow speeds.
Mechanic pulled tire off visually rechecked pad and rotor and saw no problem. But noise continues.
brake noises after pad/rotor replacement can be a headache sometimes. there are several things to help eliminate the problem. The problem can originally develop due to pad quality, clips, design, machining oil left on rotor face etc.. I do not know what type pads were used nor if they replaced the retaining clips but when a noise like this develops we go back and change the clips if not done, be sure rotor is real clean. use a special additive that is applied to back of pads to help with noises and in last case, we will sand or gring the outer sharp edges of all the pads to take the sharp edges off. Squeal or whistle noises are normally caused by the edge of the pads not having a little bevel or spring clips that are weak. The mechanic should go back and swap out clips if not done so, recheck to see if anti sequel additive was applied to back of pads, be sure rotor is real clean(sometimes we resend them by hand) and then maybe sand the sharp edges of the pads some. grade of pads has alot to do with noises as well,. Cheaper pads tend to make louder noises. Very hard pads can do this as well. so we usually go with medium upper brand, 99% of the time noises like you describe can be cured with a little effort, Most shops know all the tricks to do so. 3 weeks after repair and still noise? this is NOT pads just trying to reseat.
========
What causes brakes to pulsate right after rotor and pad replacement?
I've done countless brake jobs at the shop I worked at; without hearing/seeing the car here are some things that can cause noise/pulsating:
Non-burnished brakes - like others have stated after putting fresh pads and rotors on a car you need to 'break them in.' I worked in a shop for a while and we didn't always do everything by the book, but when putting new pads and rotors on a car we would take some sandpaper to the pads and rotors, we'd call it 'roughing them up.' Then I would take the car for a test drive for a little and speed up to 20-30 mph and then hit the brakes with 'more than typical' force for a 10-20 times, depending on how much of a rush I was in.
Knocked off a wheel weight when taking off the tire; it happens. I would suspect this would be the case if the pulsating feeling only happens at certain speeds and not at others, but it would not explain any loud noises.
Something got caught up inside the wheel. I have had this happen on my own vehicle. A stick or rock gets caught in the right spot and it sounds like my car is SCREAMING something metallic and scratchy. Taking off the wheel and removing the object has fixes this in the past (also some erratic driving has as well other times).
Imperfect / warped rotor - sometimes you can get a bad rotor. You can measure the rotors with a micrometer.
Rotor not seated properly on hub. When you took off the old rotor did you take a wire brush to the hub to make sure to remove any debris/rust so that the new roots(s) sit nice and flush on the hub?
It's not your new brakes, it's your rear or something else like a hub, bearing or cv joint (I would think it was any of those three since they often make noise at all speeds).
Also, remember that just because you just did your brakes it does not 100% mean that this a brake related issue. I've patched tires on cars and had the customer complain because "as soon as he got home" his water pump went so it must have been something I did...sometimes it is just coincidental (but in this case it does sound repair related).
The shimmy feeling that comes from brakes is usually due to uneven friction material build-up on the rotor. This transfer from pad to rotor is supposed to happen, indeed it makes the brakes work better, which is why brakes function better after break-in. However when it happens unevenly, it produces a shaking or shimmy feeling. Why does it build up unevenly? There are three major reasons.
Rotors were eccentric when new. It takes time for the pads to wear a bit and the friction materal build-up to occur. What's more there is lubricant on the pad ears, pad backs, caliper pins, etc., that happily allow movement on a new brake job (hopefully), but this lubricant gets washed off over time.
Rotors were of uneven thickness when new. The results are the same as #1.
Improper break-in. Typically this involves heating the brakes up, then coming to a hard stop and leaving the brakes on hard. This puts a "pad imprint" on one part of the rotor, that will continue to catch more pad material and build up... creating the shimmy feeling.
Since learning all this, I have eliminated all brake shimmy in my personal fleet by doing the following:
Checking all rotor widths with a micrometer, and all installs with a dial caliper for runout.
Proper and complete lubrication of all contact points. I use Sil-Glyde, but there are other purpose made lubricants that will work.
During break-in, avoid leaving the hydraulic brakes on after a hard stop. Coast, use the handbrake for the final stop, whatever it takes. (It is the front rotors that do all the work and heat the most).
This will help.Thanks.


Comments
Post a Comment