WINDOW SWITCH TEST AND REPAIR
WINDOW SWITCH TEST AND REPAIR
Customer Noticed Problems related to power window switch and asked following questions:
How To Test And Repair Power Window Switch?
How to Fix a Power Window Switch?
power window switch price?
power window switch not working?
5 pin power window switch wiring diagram?
power window switch or motor?
power window switch works intermittently?
power window switch kit?
power window switch online?
universal power window switch?
While the actual changing of a power window switch is extremely easy, accessing it to change it out can be challenging. The interior door trim panel needs to be removed in order to be able to remove the switch. This is held in place by a combination of hidden screws and snap-in clips. Be careful when removing the panel, so as to not damage it or the spring clips.
Before deciding that the switch needs to be replaced, make sure to troubleshoot the problem. The same symptoms can indicate more than one problem. If the symptoms are not properly understood, then what is thought to be a switch problem may be something else entirely.
Switches become dirty over time, causing them to fail. If the switch is not melted or physically broken, it can often be cleaned, saving the cost of a new switch. Cleaning can consist of blowing the switch out with an air compressor or using contact cleaner on it.
Easy step by step repair guide on how to test and replace an automotive window switch, though appearances may vary the process is similar for most vehicles.
Difficulty Scale: 4 of 10
Begin with the vehicle on level ground, in park, with the engine off.
Tools and Supplies Needed
Test light
Metal scribe or equivalent
Test wire leads w/clips
Screwdriver set
Protective gloves and eye wear
Torx driver set
Power windows are a tremendous convenience. Whereas these systems were available only on luxury cars as recently as 20 years ago, today almost every car made comes with that little switch to make the windows go up and down. Of course, it is one more thing that can go wrong on a car; fortunately, these systems are fairly robust and do not break easily.
When power windows do stop working, the switch can be a bit of a hassle to repair. Even experienced shade-tree mechanics are not usually used to fixing power window problems, mostly because they are so rare. However, forearmed with a little bit of knowledge, a power window switch is not too difficult to fix.
Troubleshooting the Problem
The first step to repairing a power window switch is to make sure it is the switch that is at fault. While the switch is the most likely culprit, it is not the only component that can go bad in the power window circuit. A few simple tests can help one narrow the problem down quickly.
The initial steps in any troubleshooting process are to define the problem clearly and to determine under which circumstances the problem exists. Test the window in question, and the other windows as well, to see if they operate and under which circumstances they operate or do not operate. Listen for any noise that is made when the switches are operated and look to see if the window moves at all. Remember that the vehicle's power must be on to operate a power window.
Symptoms
Possible Failures
To Check
Neither window moves; no sound from motors
Fuse or window relay
If the fuse is good, check the relay by switching it with another one
One window does not move; no sound from motor
Switch or motor
If the switch is good, the problem is the motor or the wiring; check for power at the motor
One window does not move; sound from motor
Track or mechanism
If the motor can be heard, the switch and motor must be working
Window moves slowly
Motor or lack of lubrication
Lube the mechanism; if the problems persists, the motor is wearing out
While possible, wiring problems are rare. A multimeter or 12-volt test light is needed for checking the various components of the system. If power (voltage) is arriving at the door switch, but does not leave the switch when actuated, this indicates a problem with the switch. If power leaves the switch, the next place to check is at the motor. If the power does not arrive there, it indicates a wiring problem. However, if the power does arrive at the motor and the motor does not turn, then the motor is bad.
Please note that although the window relay is mentioned in this chart, not all cars have window relays. Many are wired directly from the switch to the motor.
Checking the Switch
To test the switch itself, use a multimeter or test light to verify that vehicle power is arriving at the switch. If a schematic for the vehicle is available, it shows which wire (by color) is receiving the 12-volt power from the fuse. If a schematic is not available, the switch can still be checked. With the vehicle power on (key on) and the switch in its neutral position, 12-volt power should only be available at one terminal on the switch. Be sure to attach the other lead of the test light or multimeter to ground in order to complete the circuit.
If there is power to the switch, actuate the switch. While holding it actuated, check for power at the other terminals. Only one of them should show power. When the switch is released, the meter should return to zero. Repeat the test, actuating the switch in the opposite direction.
If the switch is showing good in all three positions, the problem is not the switch. Move the meter to check the power entering the motor connector. The probes of the multimeter can be put into the back side of the connector, without disconnecting it, to make contact with the connector pins.
Repairing a Power Window Switch
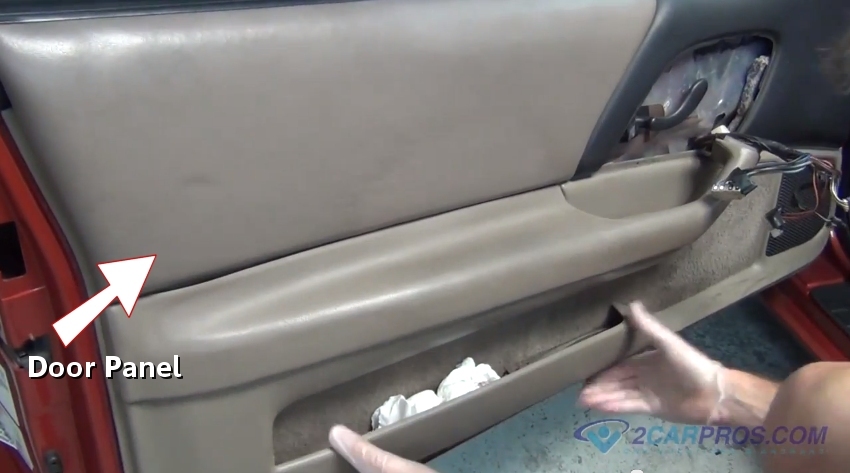
Removing and replacing a power window switch is simplicity itself. The hard part is accessing the switch so that it can be removed. That requires removing the inner door panel. The panel is held in place by a combination of screws and spring clips. All of them need to be removed in order to remove the door panel.
The screws are almost always located in hidden locations. Under the armrest, inside the door latch cutout, and inside the door handle are common locations. These screws can be removed with a Phillips-head screwdriver. The spring clips can be either metal or plastic. Both types are attached to the door trim panel and enter into holes in the inner door panel (metal panel). They run all the way around the perimeter of the door trim panel, with one placed every 4 to 6 inches.
These clips should be pried carefully to get them to release from the door. There is a special door panel removal tool for this, but the task can also be done with a large flat-head screwdriver. Take care as to not lose any of these clips or to damage them beyond use.
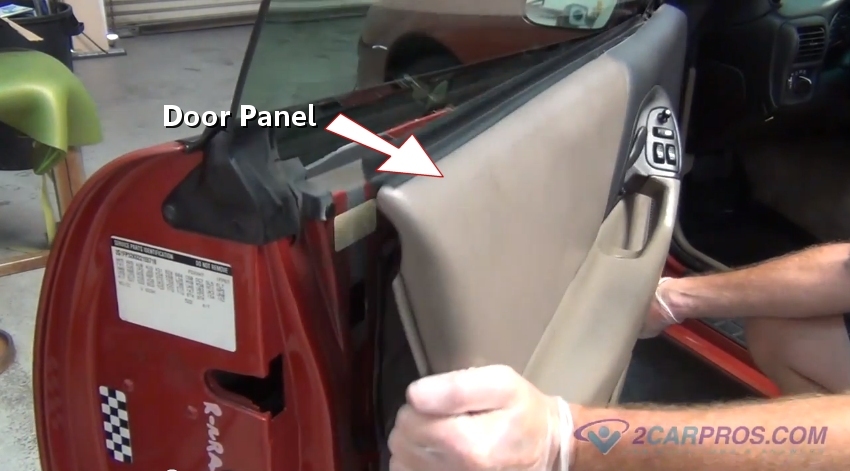
With the clips removed, the only thing holding the door panel in place is the window gasket. Lifting straight up on the door trim panel allows this to unclip from the door. The trim panel must be held out at an angle while lifting so that the spring clips do not get caught on the door.
Removing and Replacing the Switch
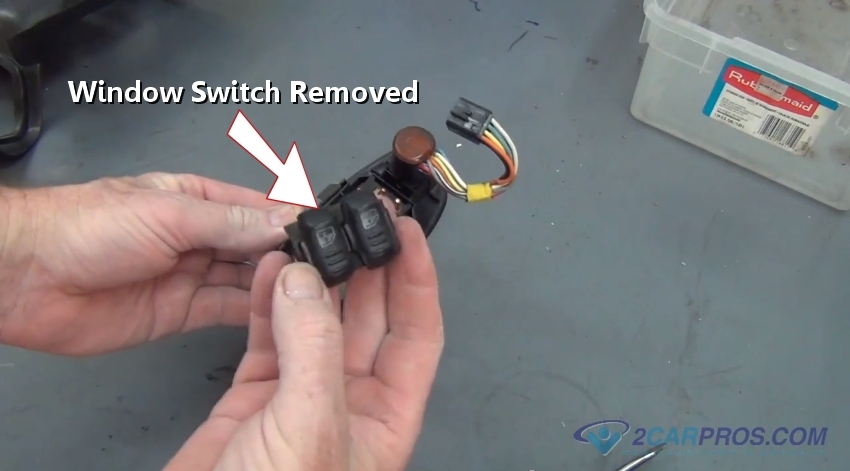
With the door panel removed, it becomes clear that the window switch is mounted to a bezel that holds it in place. In turn, the bezel is held in place either by two screws or plastic spring clips. If clips are used (this is the most common scenario), carefully compress them with a screwdriver to remove the switch. There is also a plug connector that is attached to the bottom side of the switch. This is held on to the switch with plastic tabs. Carefully pry the tabs open with a small flat-blade screwdriver to disconnect the connector.
The new switch is installed the reverse of how the old one is removed. Place it in place and snap it to the bezel with the same tabs that held the old one in place. Attach the connector, ensuring that it fully seats and that the locking tabs are fully engaged.
To reinstall the door trim panel, hook the window seal at the top of the trim panel in place first. Place the panel against the door, popping the spring clips into the holes on the door inner panel. When properly aligned with the hole, these can be seated into place with a light hit from the side of a fist or a rubber mallet. Reinstall any screws that were used to hold the door trim panel in place.
Repairing a Bad Switch
In many cases, the switch does not need to be replaced, but merely reworked a bit. In normal operation, a switch sparks every time a contact is broken. This creates a minute quantity of carbon in the switch. Over time, this carbon builds up on the contacts, causing the switch to go bad. If the switch does not have any visible problems, such as the case being partially melted, the toggle not moving, or the toggle seeming to be broken-off inside, the problem is probably just a buildup of carbon and dirt inside the switch.
The plastic toggle can usually be removed from the switch easily by simply lifting up on it. This provides access to the top of the switch body. Most switches have some sort of small holes in the top of the body, or elsewhere in the case. Spraying compressed air into the switch body while operating the switch may be enough to dislodge any dirt, making the switch operable once again.
Another way to clean the inside of a switch is to use electrical contact cleaner, available in aerosol cans. The can should come with a narrow tube, which allows the cleaner to be sprayed into tight spaces. Spray it into the switch body and operate the switch several times to break up any deposits on the contacts.
Finally, if all else fails, it is possible to take the switch apart to clean it. This must be done with care in order to avoid losing any pieces and to ensure that the switch components stay in proper relation with each other.
There are plastic tabs near the base of the switch that hold it together. In the manufacturing plant, the switch is actually snapped together, with all the internal parts properly located. By carefully prying at these tabs, the switch can come apart.
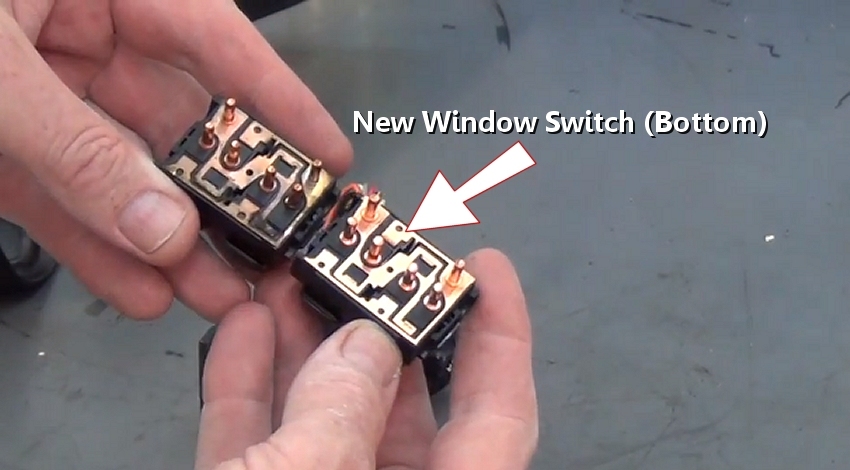
Inside the switch is the moving contact itself, a spring, and the switch base, which has the contacts on it. The moving contact and the contacts on the base need to be cleaned with the same sort of contact cleaner already mentioned. Then all the parts need to be located in the right place and the switch snapped back together. If the movable contacts are not properly located inside the switch, it will not work.
Step 1 - Using a screwdriver remove any plastic covers or bezels. Visit - Complete guide on door panel removal.
 Step 2 - After the plastic covers have been removed, locate and remove all panel mounting screws or clips.
 Step 3 - Once all panel mounting screws are removed, locate and remove door handle mounting screws.
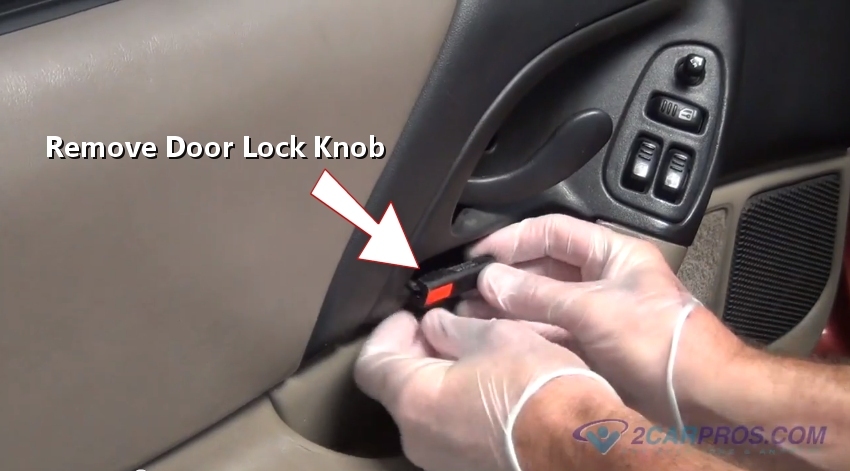
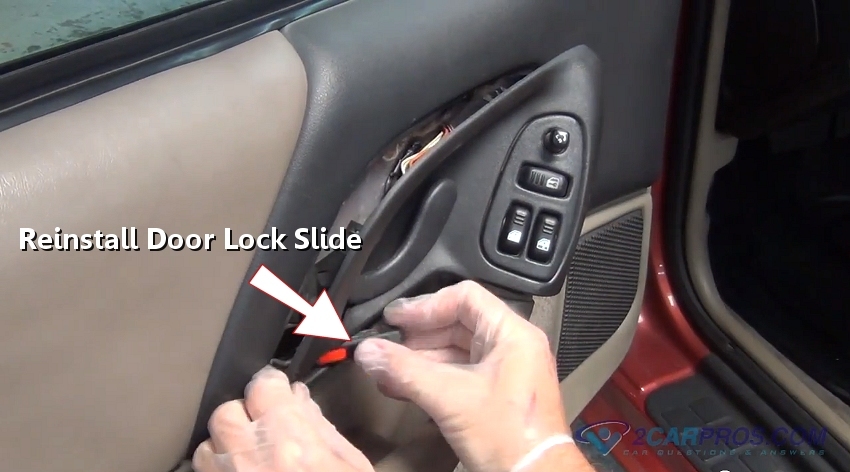
 Step 4 - Undo and disconnect lock knobs or slides to allow removal.
 Step 5 - Inspect the outer perimeter of the panel for push clips and use a wedge tool or screw driver to dislodge and remove, then lift the panel from the door fame.
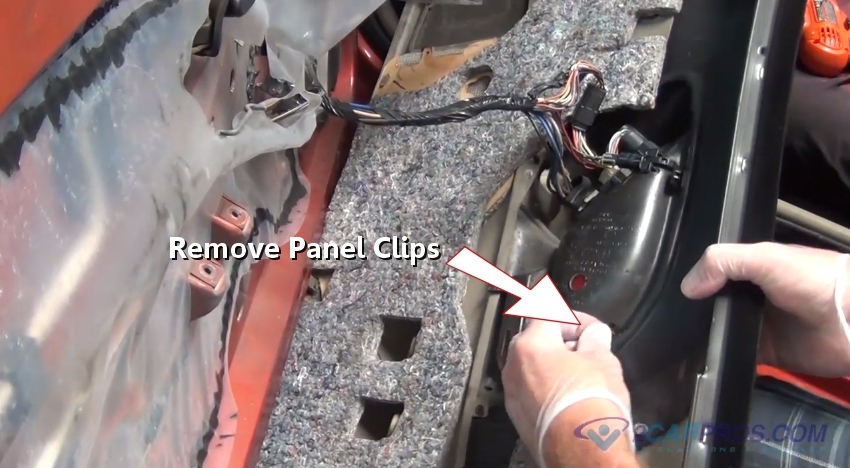
 Step 6 - After the panel is removed, release the panel mounting clips which will cause the switch panel to come free.
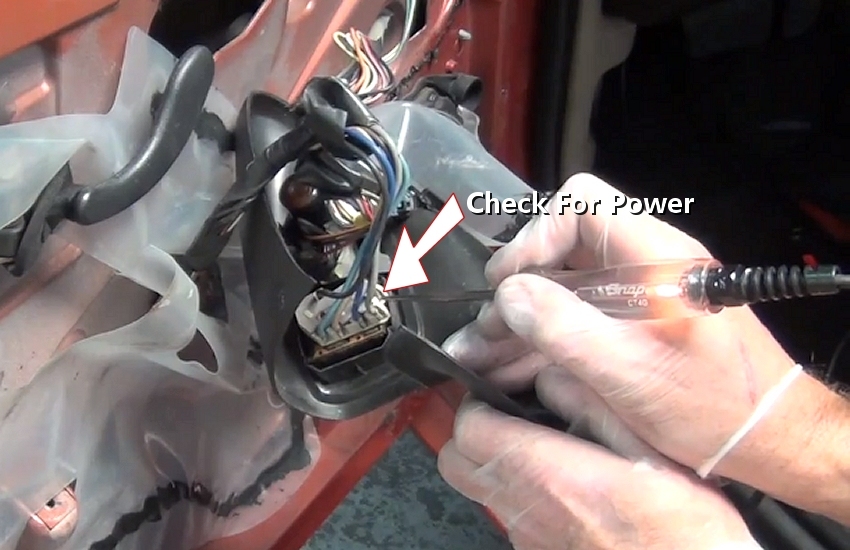
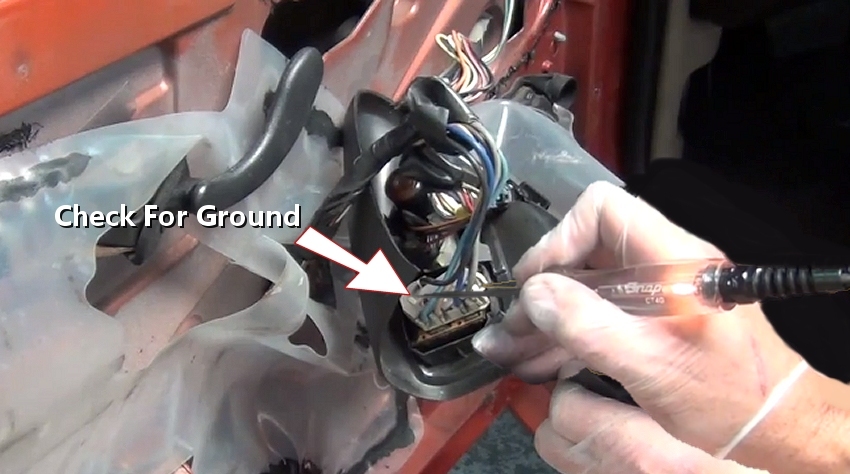
 Step 7 - With the ignition key on and using a grounded test light, probe the switch terminals, one of them should have power.
This test shows the system is powered up and a fuse or relay is not the problem (test light on). If power is not found, check the fuses and relays in the PDC (power distribution center).
Step 7 - With the ignition key on and using a grounded test light, probe the switch terminals, one of them should have power.
This test shows the system is powered up and a fuse or relay is not the problem (test light on). If power is not found, check the fuses and relays in the PDC (power distribution center).
 Step 8 - Then, connect the test light lead to power with an extender wire to the positive battery terminal and test the remaining terminals for ground, this wire is usually black or brown.
One should light up, if not inspect the wiring and harness for damage. Using a wiring schematic, trace the ground circuit and repair.
Step 8 - Then, connect the test light lead to power with an extender wire to the positive battery terminal and test the remaining terminals for ground, this wire is usually black or brown.
One should light up, if not inspect the wiring and harness for damage. Using a wiring schematic, trace the ground circuit and repair.
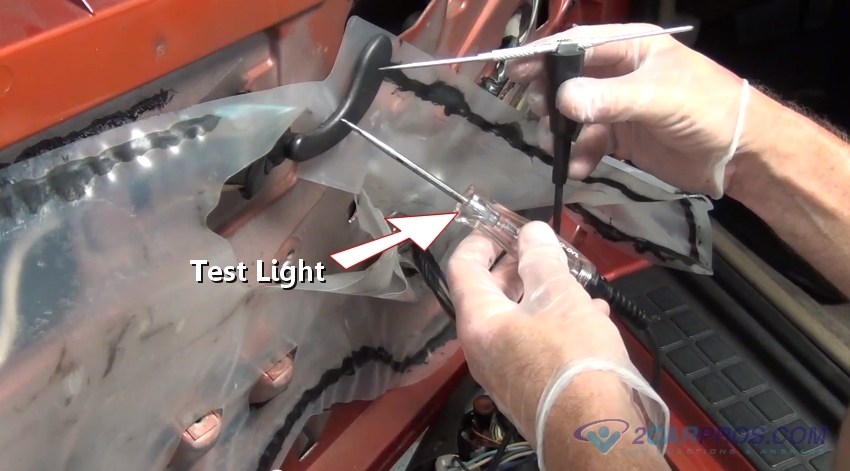
 Step 9 - Next, insert a sharp metal object such as this scribe into the ground clip of the test light, this will be used to test switch circuitry.
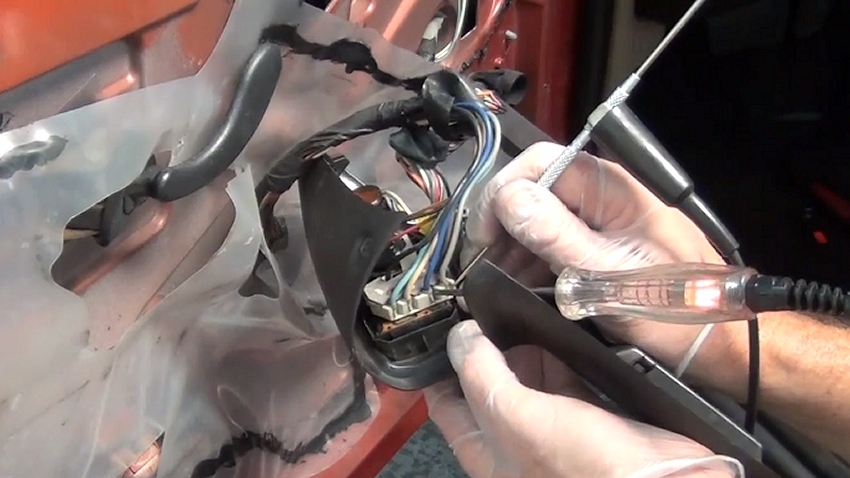
 Step 10 - Using the circuit tester, insert both probe ends into the switch activation terminals. Working the switch back and forth the test light should illuminate in both directions, which determines if the internal switch connections are working. (Note: Do not allow the probes to touch together during test.) If no illumination is detected in one or both directions the switch has failed.
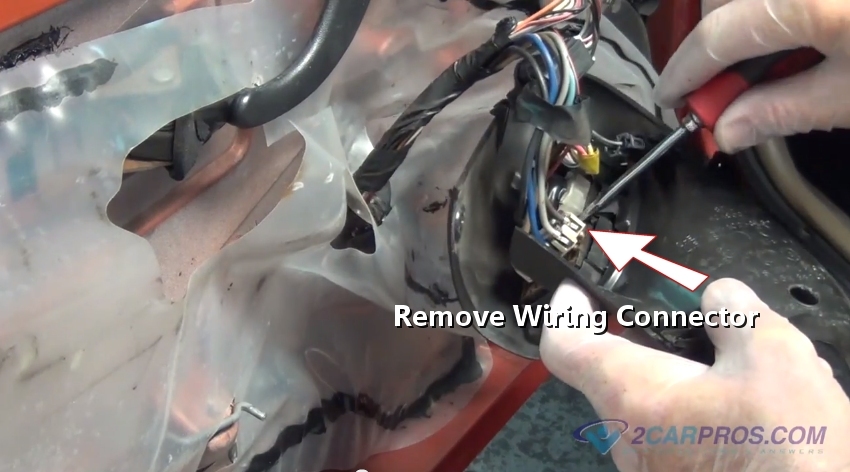
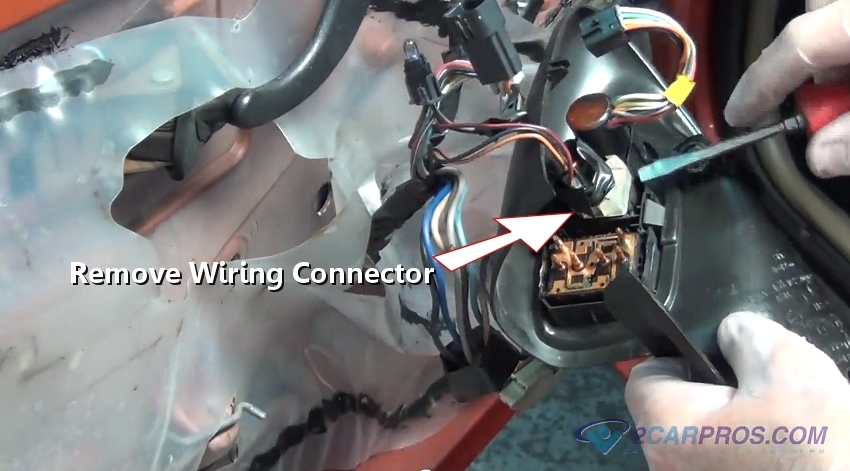
 Step 11 - Once the switch has been tested turn the ignition key off and remove the wiring connector from the switch. (Note: Some vehicles are designed with a wiring harness connector.)
 Step 12 - Remove any additional wiring connectors attached to the window switch panel.
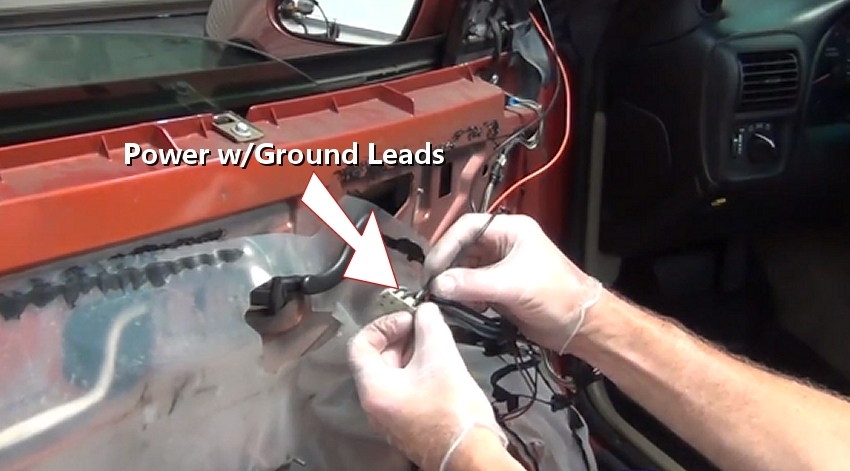
 Step 13 - To test the window motor, run power and ground wire leads from a power source and ground. Then attach them to the connector terminals in each polarity, this will operate the motor in each direction, (up and down.) If the motor does not respond it has failed and needs replacement.
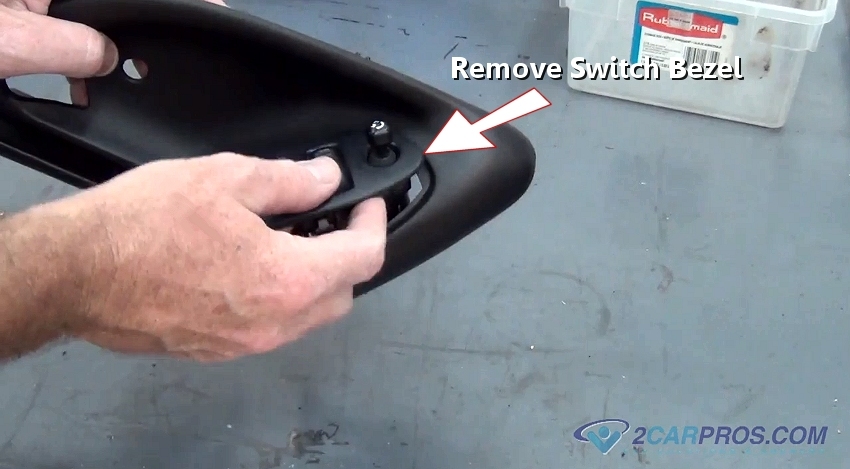
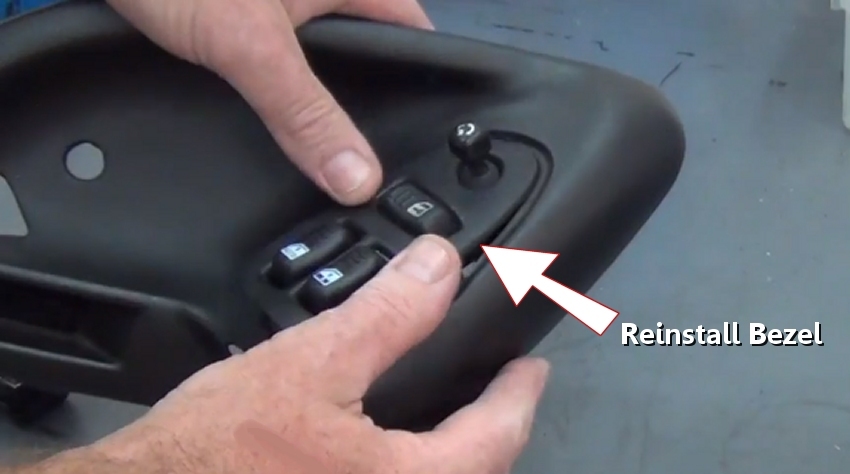
 Step 14 - Remove the window switch bezel by releasing the mounting clips which hold the bezel in place.
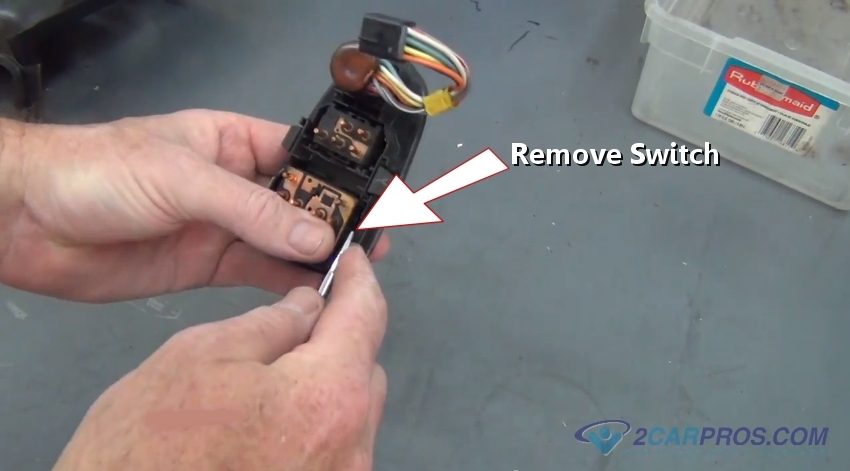
 Step 15 - Once the bezel has been removed, use a small screw driver to release the mounting clips allowing the switch to be separated from the bezel (Some switches the bezel is included with the new switch).
 Step 16 - After the mounting clips have been removed the switch will become free from the bezel.
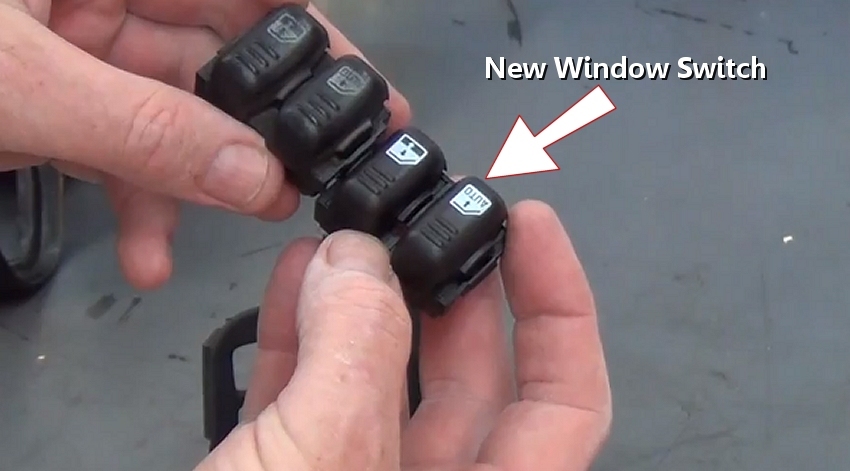
 Step 17 - Remove the replacement switch from the packaging and compare it to the failed switch.
 Step 18 - Also, compare switch terminals.
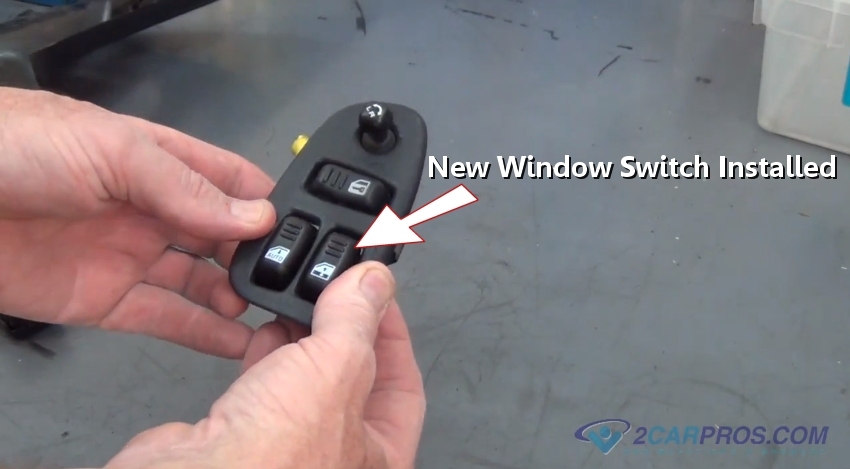
 Step 19 - Press the replacement switch into the bezel which will be accompanied by a click. (Note: Some switches are held in place by mounting screws.)
 Step 20 - After the new switch has been installed, reinsert the bezel plate into the plastic cover plate.
 Step 21 - While feeding the window wiring though the access hole in the door panel, reinstall the door panel by fitting the top into place while pulling downward. Then gently tap the panel into place while engaging mounting fasteners.
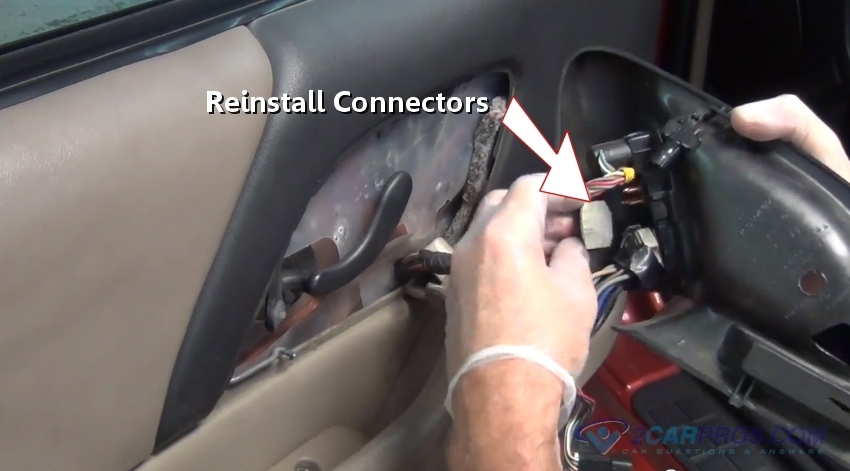
 Step 22 - After the door panel has been installed, refasten the electrical connectors to the back of the switches.
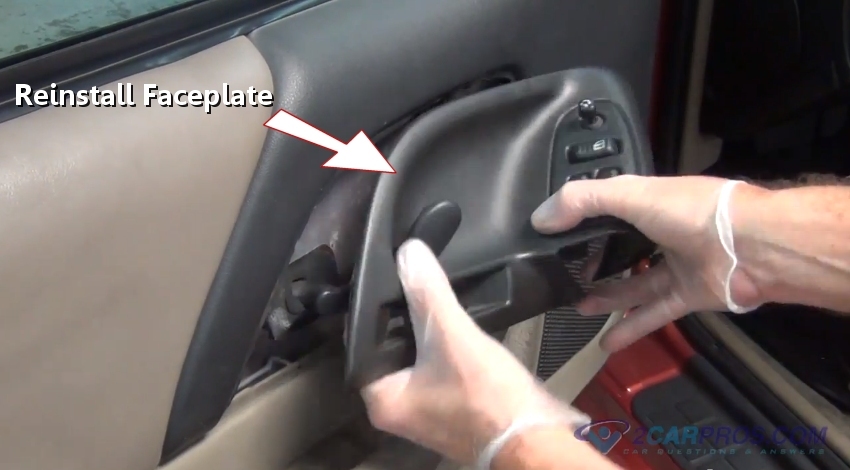
 Step 23 - Once all wiring connectors are in place, re-install the faceplate into position.
 Step 24 - Return all locking hardware including knobs and slides.
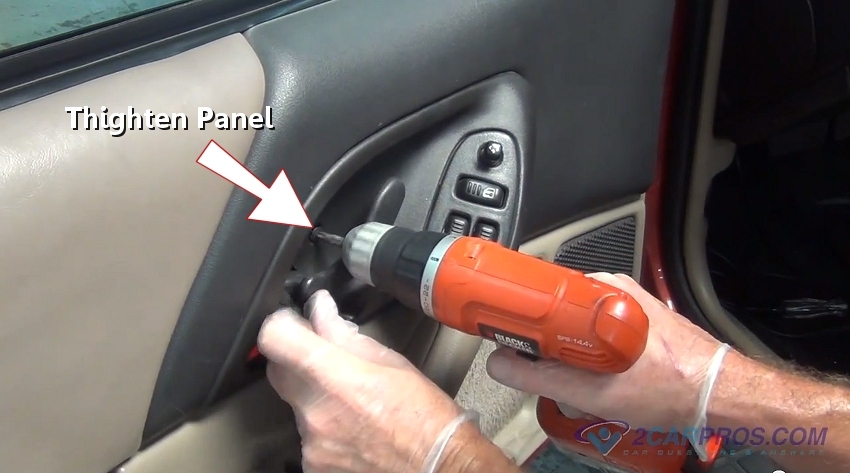
 Step 25 - Reinstall the switch mounting plate, reinstall mounting screws and tighten, also re-install door handle mounting screws.
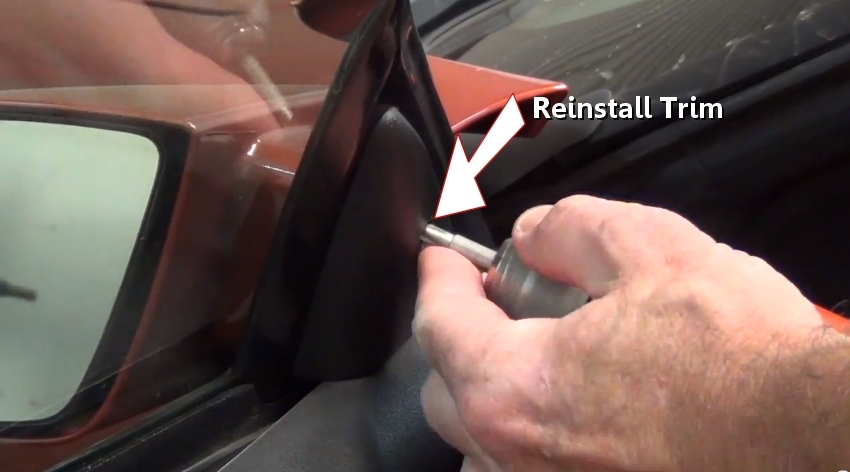
 Step 26 - After the door panel mounting clips and screws are in place, reinstall trim pieces.
 After the repair is complete, test the job by activating the window and checking the operation of the window.
Helpful Information
Electric window systems are common technology which is universal throughout the automotive industry. These systems work from a simple polarity change to activate an electric motor which will turn it one direction or the other. This change is controlled by the switch which utilizes power and ground circuits. These switches can be bypassed by the BCM on some vehicles which are designed with control relays that activate the motor remotely.Power windows are convenient, until they malfunction. When the window stops working in an up position, it is annoying. A power window that will not close may be even worse, especially in the cold or rain. Diagnosing the problem with power windows is easier with a systematic approach.
After the repair is complete, test the job by activating the window and checking the operation of the window.
Helpful Information
Electric window systems are common technology which is universal throughout the automotive industry. These systems work from a simple polarity change to activate an electric motor which will turn it one direction or the other. This change is controlled by the switch which utilizes power and ground circuits. These switches can be bypassed by the BCM on some vehicles which are designed with control relays that activate the motor remotely.Power windows are convenient, until they malfunction. When the window stops working in an up position, it is annoying. A power window that will not close may be even worse, especially in the cold or rain. Diagnosing the problem with power windows is easier with a systematic approach.
Our Detailed Topic, Checking fuses and relays, gives details on how to best check for a bad fuse or relay. If all fuses and relays are good, we next check for power at the driver door master-switch. Often all power runs through this one switch and failure will stop all windows from working. We will need a wiring diagram for the vehicle to identify the various color codes they use. Without such a diagram, testing the switch is nearly impossible, but we can make sure at least one lead has power, when tested to ground.

Many power window systems have a lock out switch. This switch may cut power to all but the driver's window, to avoid anyone controlling them without permission. Always check to see if there is a switch that locks the power-windows out. Often we may accidentally push the switch and not realize it. It is embarrassing to learn we have depressed the lock-out-switch, after bringing the vehicle in for service on the power windows.
No sound coming from the door, when we press the power window switch, suggests a bad motor or power is not reaching the motor. Hearing the motor running, without the window working, usually shows the power window regulator or clutch are bad.

With a digital volt meter, we can test to see if power reaches the window motor. If the power window motor has two wires, it is an analog system. We can back probethe connector at the motor, to detect if current flows when we press the switch. Please review our article on electrical testing for details on properly probing a circuit. Front probing a connector or piercing the insulation is bad practice and often leads to other problems in the future.
Power window motors, with multiple wires leading into them, are digital and professional diagnosis is best. With analog motors, checking between the two wires should show either 12 volts or -12 volts, depending on the position of the switch. Full current available and a motor that does not run suggests a bad motor. A lack of current flow means power is not reaching the motor and the problem is upstream.

We test for a voltage drop by back probing across the suspected source. Voltage drop testing is always done with the circuit, under a load. Finding a voltage reading that is above 0.1 volts shows high resistance in the circuit. We should remove and inspect the connector for damage, corrosion or a poor fit. The technician can repeat the process until the problem is found.
Power window motors today are better than they were just a few years ago. Permanent-magnet electric-motor technology greatly increases the reliability. These window motors are very small yet powerful. The window motor normally rotates a worm gear attached to the motor armature. This worm gear turns a driven gear at a 90-degree axis.

The driven gear attaches to the regulator-drive gear, often using drive rollers. These rollers allow for any slight misalignment, smooth window travel and quite power window operation. The rollers can also become brittle and break. When the drive rollers break, the motor will run, but the window will not go up or down.

If we see that the regulator-drive gear does not turn, with the motor running, the likely fault is with the drive rollers. We can often replace drive rollers at a much lower cost than the window motor. This is particularly true on many older Ford products.

When we are not using the power window switch, it is in the rest state. This means that no current will flow to the motor on either wire. If we check the connector at the motor, neither lead shows current when we check to ground. Both leads may show continuity to ground, depending on the design of the switch.

Pressing the switch to lower a power window, directs current to one wire and grounds the other wire. Direct current flow in this position causes the motor to rotate and lower the power window. Back probing the connector will show 12 volts between the two wires and -12 volts if we reverse our test leads.

To raise the power window, we push the switch in the opposite direction. This reverses the polarity of current flow within the switch. In other words, the terminal that has 12 volts in the lowering position, has become the ground in the raising position. The lead that grounds the motor when lowering the window, becomes the current source when we raise the window.
By reversing the current flow to the motor, we cause it to rotate in the opposite direction. Turning one way will lower the window and rotating in the other direction will raise the power window.
 Converting the rotation of the motor into vertical window motion is the task of the window regulator. In the past most regulators were usually gear driven with arms. Small wheels roll in the tracks and the arms push the window up. This is a parallelogram design. These regulators were robust and gave very little problems. They are also a bit heavy and expensive to build.

Most manufacturers now use cable type regulators. With the cable regulator, the motor drives a wire cable though the mechanism. A series of plastic pulleys guides the cable. A regulator carriage attaches to the cable and to the window glass and slides on the regulator track.
This system is light and cheap to produce, but is also fragile. Broken cables and pulleys are common. Cable regulators are not repairable and we must replace them as an assembly.
Using bolts to replace the original rivets does not usually work. The bolt may stick out and jamb in the mechanism, causing a repeat failure. Bolts also do not supply the proper tension that engineers design into the special rivets. Always use the same attachment method the manufacturer of the vehicle specifies.
 Felt and rubber channels guide the glass up and down in the opening. Keeping these channels clean and occasionally lubricating with dry silicon spray greatly reduces wear to the motor and window regulator breakage. If the channels get too dry or sticky, the window glass may refuse to move. Cleaning and lubricating the channels with dry silicon will sometimes restore window operation.
Power window repair is a bit tricky and many folks prefer to have it professionally done. AGCO can diagnose and repair any power window issue your vehicle may have. AGCO, it’s the place to go.
Best Practices


All windows quit working simultaneously
When a power window fails to operate, a short checklist helps to narrow the possible causes. If all windows stopped working at once, a loss of power to the system is likely. Many systems use a single relay and power supply for all windows. When all windows quit working simultaneously, first check for a blown fuse or bad relay.Our Detailed Topic, Checking fuses and relays, gives details on how to best check for a bad fuse or relay. If all fuses and relays are good, we next check for power at the driver door master-switch. Often all power runs through this one switch and failure will stop all windows from working. We will need a wiring diagram for the vehicle to identify the various color codes they use. Without such a diagram, testing the switch is nearly impossible, but we can make sure at least one lead has power, when tested to ground.
| TipPulling fuses out of the panel to check them is less effective and can cut power to keep-alive memory needed by the various modules in the vehicle. It is easier and more accurate to electrically test fuses in place. |
Many power window systems have a lock out switch. This switch may cut power to all but the driver's window, to avoid anyone controlling them without permission. Always check to see if there is a switch that locks the power-windows out. Often we may accidentally push the switch and not realize it. It is embarrassing to learn we have depressed the lock-out-switch, after bringing the vehicle in for service on the power windows.
| Tip Windows that have remained in the up position for several months will sometimes stick in the rubber guide. A window cleaner sprayed in the crack between the glass and the guide may free the window. |
One window will not open or close
It is not likely that a fuse or relay will cause a single window to not roll up or down. More likely, the power window motor, door switch or window regulator has failed. Looking for symptoms helps guide us to the most likely cause.No sound coming from the door, when we press the power window switch, suggests a bad motor or power is not reaching the motor. Hearing the motor running, without the window working, usually shows the power window regulator or clutch are bad.
| Tip Try the power window switch at the individual door and the master-switch at the driver’s door, when a window fails to roll up or down. If one switch works, and the other switch does not work, we know the motor and wiring are good. This most often suggests a bad power window switch. |
Before we can test
To gain access to the components of the power window system, it is normally necessary to remove the interior door panel. Vehicle makers use several methods to attach the panel to the door frame. Our detailed topic on removing interior door panels gives several details. Be sure to learn how to remove the panel, before preceding.Testing the power window motor
Checking the power window motor requires us to remove the door panel. Each vehicle has a unique attachment method, but carefully prying the panel from the door removes most.With a digital volt meter, we can test to see if power reaches the window motor. If the power window motor has two wires, it is an analog system. We can back probethe connector at the motor, to detect if current flows when we press the switch. Please review our article on electrical testing for details on properly probing a circuit. Front probing a connector or piercing the insulation is bad practice and often leads to other problems in the future.
Power window motors, with multiple wires leading into them, are digital and professional diagnosis is best. With analog motors, checking between the two wires should show either 12 volts or -12 volts, depending on the position of the switch. Full current available and a motor that does not run suggests a bad motor. A lack of current flow means power is not reaching the motor and the problem is upstream.
Voltage drop testing
Finding current at the motor, below system voltage, suggests high resistance in the circuit. Voltage drop testing is handy for finding the source. For example, voltage at the motor side of the connector may read 11 volts, with the switch turned to on. If system voltage is 12 volts, we have resistance in the circuit. This may cause the motor to run slowly or not at all. High resistance can also cause repeat motor failures.We test for a voltage drop by back probing across the suspected source. Voltage drop testing is always done with the circuit, under a load. Finding a voltage reading that is above 0.1 volts shows high resistance in the circuit. We should remove and inspect the connector for damage, corrosion or a poor fit. The technician can repeat the process until the problem is found.
Power window motors today are better than they were just a few years ago. Permanent-magnet electric-motor technology greatly increases the reliability. These window motors are very small yet powerful. The window motor normally rotates a worm gear attached to the motor armature. This worm gear turns a driven gear at a 90-degree axis.
Window motor drive clutches
The driven gear attaches to the regulator-drive gear, often using drive rollers. These rollers allow for any slight misalignment, smooth window travel and quite power window operation. The rollers can also become brittle and break. When the drive rollers break, the motor will run, but the window will not go up or down.
If we see that the regulator-drive gear does not turn, with the motor running, the likely fault is with the drive rollers. We can often replace drive rollers at a much lower cost than the window motor. This is particularly true on many older Ford products.
Testing analog power window switches
When we are not using the power window switch, it is in the rest state. This means that no current will flow to the motor on either wire. If we check the connector at the motor, neither lead shows current when we check to ground. Both leads may show continuity to ground, depending on the design of the switch.
Pressing the switch to lower a power window, directs current to one wire and grounds the other wire. Direct current flow in this position causes the motor to rotate and lower the power window. Back probing the connector will show 12 volts between the two wires and -12 volts if we reverse our test leads.
To raise the power window, we push the switch in the opposite direction. This reverses the polarity of current flow within the switch. In other words, the terminal that has 12 volts in the lowering position, has become the ground in the raising position. The lead that grounds the motor when lowering the window, becomes the current source when we raise the window.
By reversing the current flow to the motor, we cause it to rotate in the opposite direction. Turning one way will lower the window and rotating in the other direction will raise the power window.
The motor turns, but the power window does not move
Most manufacturers now use cable type regulators. With the cable regulator, the motor drives a wire cable though the mechanism. A series of plastic pulleys guides the cable. A regulator carriage attaches to the cable and to the window glass and slides on the regulator track.
This system is light and cheap to produce, but is also fragile. Broken cables and pulleys are common. Cable regulators are not repairable and we must replace them as an assembly.
Replacing the window regulator
The regulator normally attaches to the door shell with special rivets. To replace the regulator, we drill the rivets out. After we replace the regulator, we use a riveting tool to replace the rivets in the door and window glass.| Tip Purchasing replacement rivets from the OEM supplier is best. Many rivets look alike, but can break the glass or come loose if they are not proper for the application. |
Using bolts to replace the original rivets does not usually work. The bolt may stick out and jamb in the mechanism, causing a repeat failure. Bolts also do not supply the proper tension that engineers design into the special rivets. Always use the same attachment method the manufacturer of the vehicle specifies.
Cleaning the power window tracks
Best Practices
- Keep switches clean and free from debris.
- Plastic door panel pieces can be brittle.
- Lubricate window mechanisms
- Re-install plastic liners


Comments
Post a Comment