how to replace rear brake pads and rotors
BRAKE PAD AND ROTOR REPLACEMENT - REAR
how-to-replace-rear-brake-pads-and-rotors
how do you change front brake pads?
front brakes replacement?
rear brake pad installation?
how to measure your brake pads?
how to fit front brake pads?
how to remove brakes?
how to change back breaks?
rear rotor replacement cost?
Step by step instructions on how to replace automotive rear brake pads and rotors. This article pertains to all rear disc brake vehicles.
Difficulty Scale: 5 of 10
Begin with the vehicle on level ground, in park and the engine off and safely lifted in the air to perform a brake service.
Step 1 - After the vehicle is safely lifted into the air, remove the lug nut covers. (Step does not pertain to every vehicle.)
 Step 2 - Once the lug nut cover is removed, a lug wrench or socket can be used can loosen the wheel lugs.
 Step 3 - Next, loosen and remove the wheel lug nuts. (Note: If air impact wrench is not used, loosen the lug nuts one turn while the vehicle is still on the ground.)
 Step 4 - Then, grasp the tire and lift from wheel studs and axle flange.
 Step 5 - Using a pair of dikes remove the rotor retainer clip which is used in initial assembly and will not be reinstalled.
 Step 6 - Next, use a socket to remove both upper and lower caliper mounting bolts. Use a wrench if necessary to secure the slide.
 Step 7 - Once both upper and lower bolts are removed, grasp the caliper and lift it from the brake pads, the fit can be a little tight. Secure the caliper away from work area, do not allow the caliper be supported from the brake line.
 Step 8 - Next, use a small screwdriver to pry the brake pads from the caliper bracket.
 Step 9 - After the caliper is secure, loosen and remove both upper and lower caliper bracket bolts.
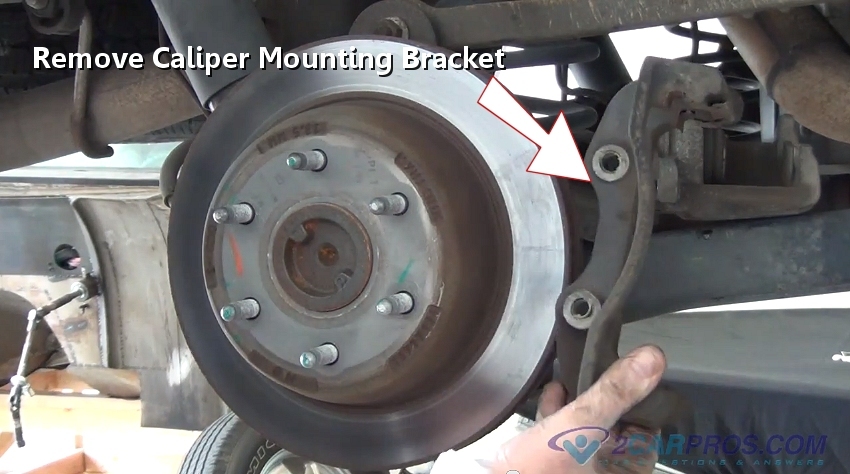
 Step 10 - Once both caliper bracket bolts have been removed, grasp the caliper mounting bracket and lift it from the axle. Inspect the caliper slides on the bracket and add a small amount of brake grease to lubricate.
 Step 11 - Next, use a hammer and strike the rotor near the edge of the axle flange, this will force the rotor free.
 Step 12 - After the rotor has been loosened, grasp it using both hands to remove. (Note: brake rotors can be heavy.)
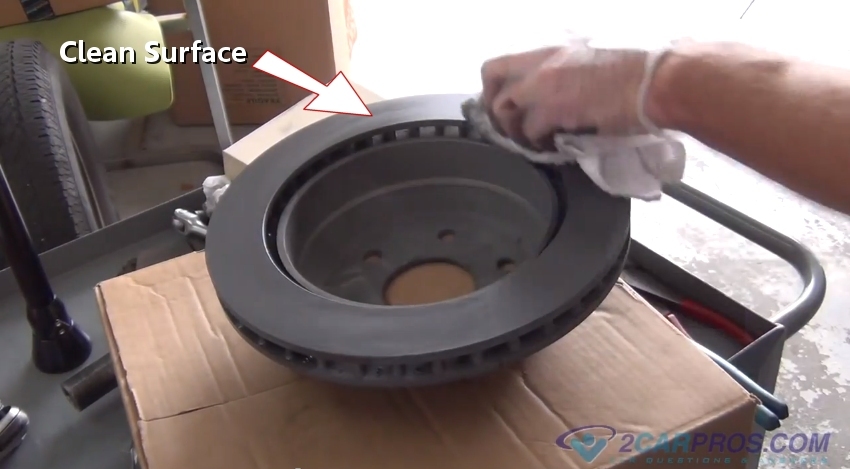
 Step 13 - Match the old rotor to the new one, then clean the brake surfaces using brake cleaner.
 Step 14 - Then reinstall the rotor after cleaning the axle flange surface using a shop towel.
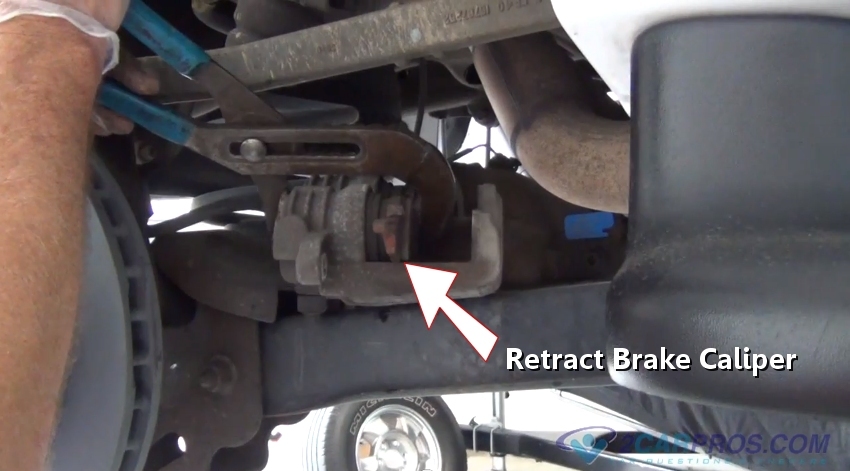
 Step 15 - Install an old brake pad as a buffer between the tool and the caliper piston(s). Using a large "C" clamp or channel locks move the piston(s) inward until fully retracted. If a brake caliper utilizes a parking brake mechanism, a caliper reset tool is needed.
 Step 16 - Once the caliper has been retracted, insert the caliper mounting bracket over the rotor.
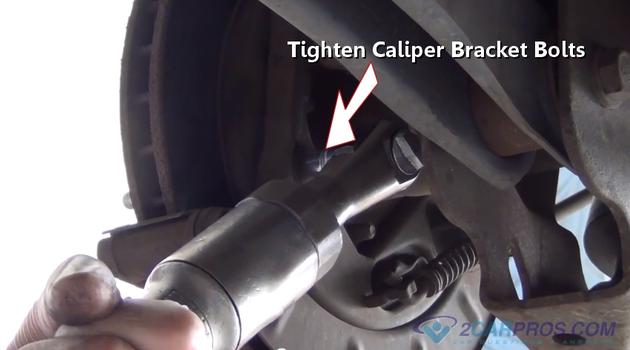
 Step 17 - After fitting the caliper bracket into place, insert the mounting bolts and tighten.
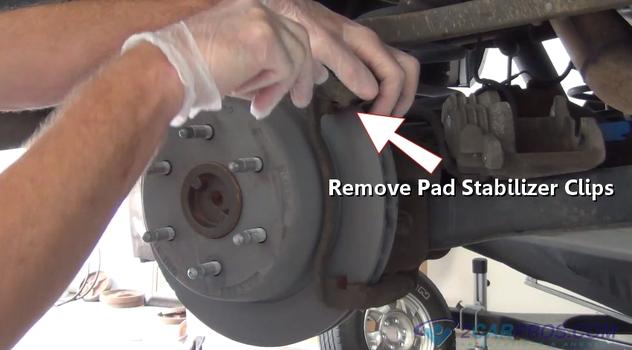
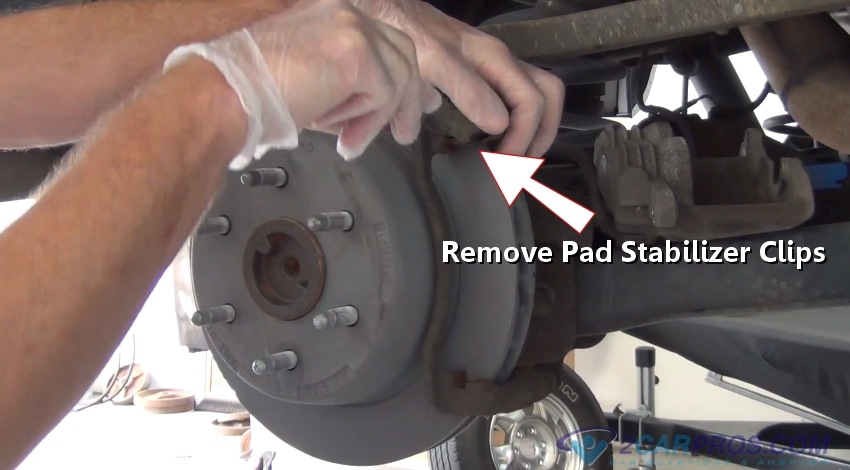
 Step 18 - Next, remove worn pad stabilizer clips from the caliper mounting bracket using a small screwdriver.
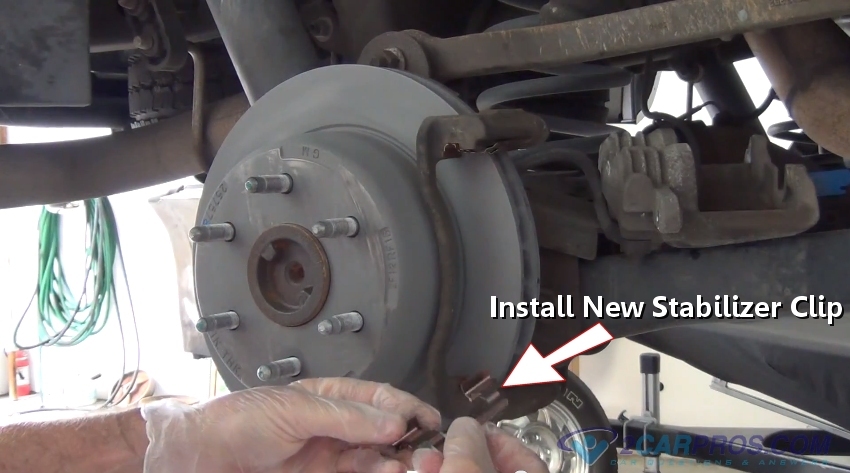
 Step 19 - After removing both upper and lower clips, install new clips, premium brake pad sets include these clips.
 Step 20 - Then, remove the brake pads from the box and match to the worn pads to ensure proper fit.
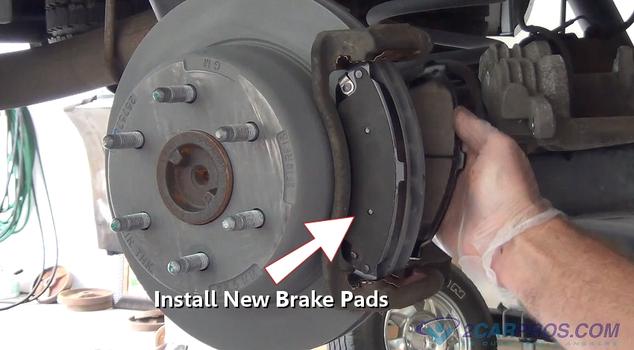
 Step 21 - Install new brake pads into the caliper bracket while keeping the stabilizer clips in place.
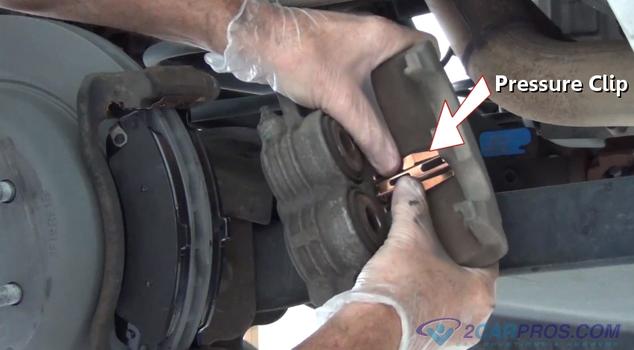
 Step 22 - Some brake calipers utilize a pressure clip which should be replaced if provided or damaged, these clips help hold the brake pads securely while not in use.
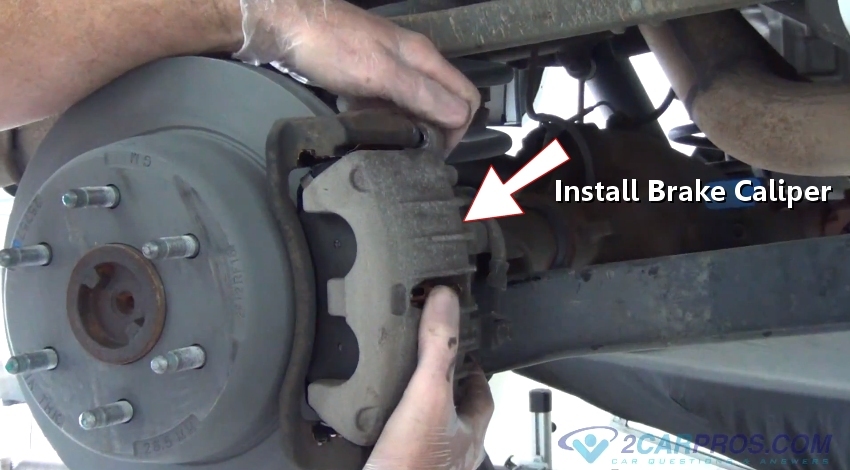
 Step 23 - Next, install the brake caliper onto the brake pads, while retracting the brake caliper slides.
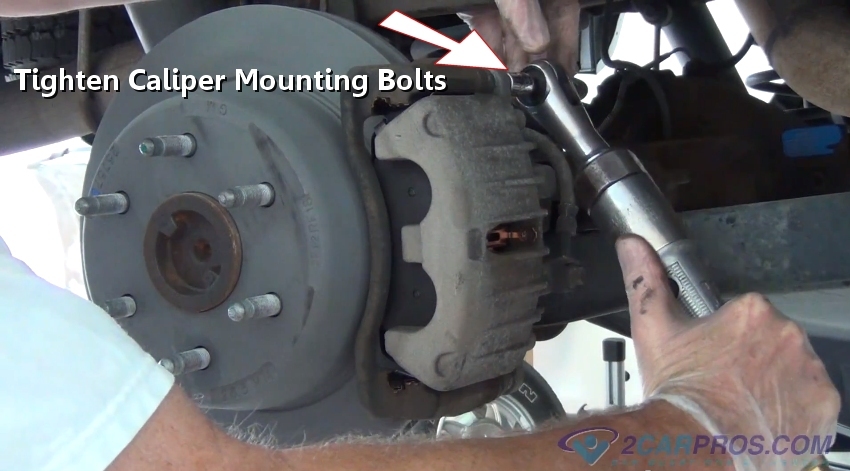
 Step 24 - Once the caliper is in place, reinsert the caliper mounting bolts and tighten securely.
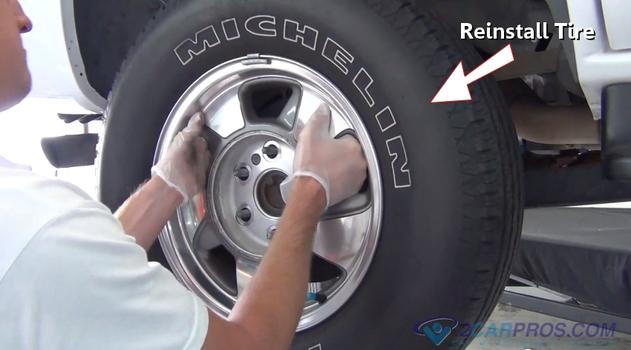
 Step 25 - After the caliper mounting bolts are securely fastened, lift the tire into place.
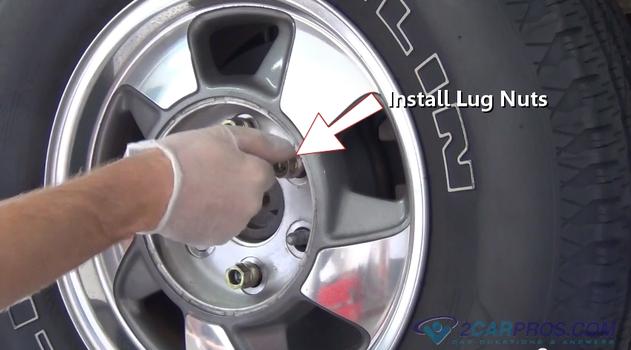
 Step 26 - Then, install lug nuts while checking thread quality, never lubricate lug nuts.
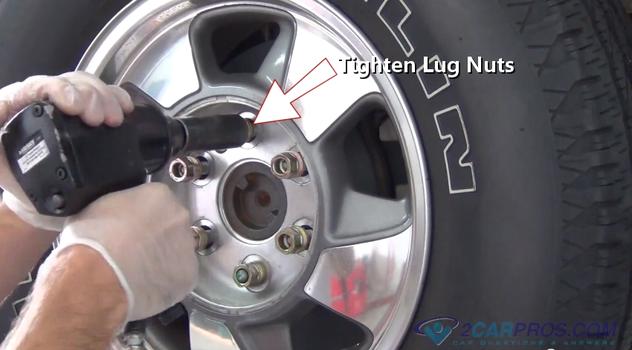
 Step 27 - After install all lug nuts onto the wheel studs, tighten lugs evenly in star pattern to manufactures specifications. (Note: Air impact set to 70 foot pounds.)
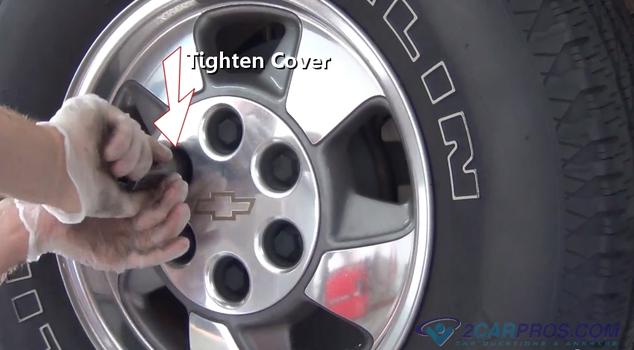
 Step 28 - Once the lug nuts are tight, reinstall the lug nut cover.
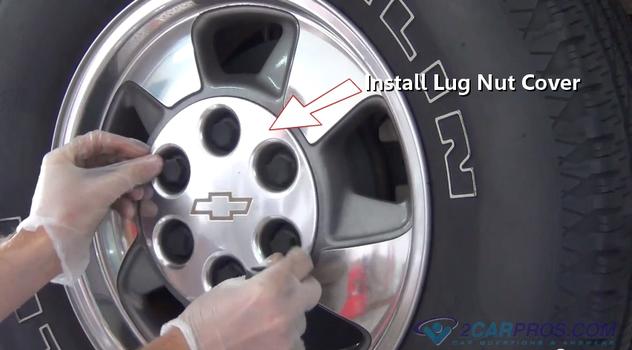 Step 29 - Tighten lug nut cover into place.
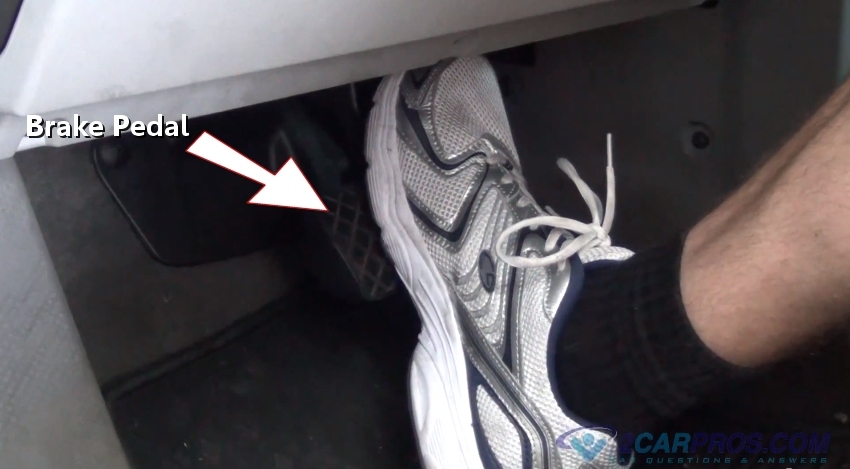
 Step 30 - Slowly press the brake pedal down, then, slowly allow the pedal to return to its original position. This will bring the brake pads to the rotor, initiating contact.
 After completing the job check the brake pedal operation. Because the system was never opened, brake bleeding should not be necessary, but if the pedal is spongy, bleed the brake system. Never operate a vehicle without normal brake pedal operation. While driving the vehicle, listen for strange noises as this is an indication of a problem in which repairs will need to be performed. Inspect brake fluid levels in the brake master cylinder. Brake pad design configuration may vary slightly, but the concept is the same.
Helpful Information
A rear caliper reset tool is necessary for parking brake integrated systems. The reset tool screws the piston back into the caliper. These calipers cannot be compressed with a clamping tool, it can only be reset with the reset tool. A locator slot is used on the inboard piston, which is fitted into a peg located on the backing plate of the pad. Rear disc brake pads offer improved performance and are not affected by moisture like conventionalbrake shoes.
Common Problems
Tools and Supplies Needed
- Socket set
- Wrench set
- Screw driver set
- Replacement pads and rotors
- Shop towels
- Brake grease
- Hammer
- Hydraulic jack
- Jack stands
- Protective gloves and eye wear
Begin with the vehicle on level ground, in park and the engine off and safely lifted in the air to perform a brake service.
Step 1 - After the vehicle is safely lifted into the air, remove the lug nut covers. (Step does not pertain to every vehicle.)


Helpful Information
- Brake pads wear down making a grinding noise.
- Caliper slides lock up, not allowing the caliper move causing premature pad wear.
- Inferior parts squeak, grumble and prematurely wear.
- Bleed brake system after the job is complete.
- Check system brake fluid level.
=========================================================
How To Replace Rear Brake Pads for Disc Brakes
Time For Rear Brake Repair?

Is it time to replace your rear disc brake pads?. Photo Credit: photo by Josh
It's important to know when it's time to replace your rear brake pads. If you have disc brakes in the rear, as do most cars and trucks these days, you can do damage to the discs if you wait to long. That being said, you don't need to replace your rear disc brake pads very often at all. Most of your braking is done with the front wheels, so the rears see very little action comparatively. A visual inspection will tell you whether or not it's time.
Impact Driver-you can get them at Sears or Napa for about 22.99If you're having your brakes worked on by a shop, be sure to check the brakes yourself, or have them shown to you before any repairs or replacements are done.
What You'll Need:
- Set of New Brake Pads
- Can of All purpose grease
- Can of WD-40
- Can of Brakleen
- DOT III or DOT IV Rated Brake Fluid
- A good 3/8 socket wrench
- 14mm socket, 17mm socket, 12mm socket, and a 10mm wrench
- Good Jack and Jack Stands (Safety First)
- Socket to screw your piston back in
2 of 5
Removing the Brake Caliper

Remove the bolts that hold the caiper in place. Photo Credit: photo by Josh
With your car or truck safely supported on jack stands, remove the rear wheels. Loosen the bolts that hold the brake caliper on, but don't remove them completely yet. You should have something handy to hang the brake caliper out of the way. You don't want to have to disconnect the brake line (lots of brake bleeding) but you don't want to let the caliper's weight pull on the line, either. A bungee cord works well as a caliper hanger.

With everything removed, it's a good time to clean all components of the brakes. Dust buildup can affect braking performance, especially when it comes to cooling.
Cleaning also makes the job of removing the old components and installing new ones much easier. It's not always necessary to clean everything you're fixing, but with brakes it makes good sense.
4 of 5
Compressing the Piston and New Pads.

Compress the piston so you have a way to take your dog in!. Photo Credit: photo by Josh
Now you want to take the brake piston tool you bought or own and screw the piston back in all the way. I myself had to loosen the bleeder screw thats why in the parts list I included a 10mm Wrench. So loosen the bleeder screw and turn the piston in all the way. The first couple of turns are probably gonna be really tight but after that its easy. Make sure that you have the piston lined up right so that your pad fits on right!
Once you have that comleted re-tighten the bleeder screw all the way.
Now take your caliper braket and bolt it back up. Remember the 14mm goes on top and 17mm on the bottom! Make sure you have the washers that came off of them.
Once youve done this slide the brake pads onto the bracket. Take the caliper and slide it over the brake pads. This can kind of be a hassle due to the tight fight but just wiggle it on there a little bit, should slid right on. Put the two 12mm bolts back into the caliper and tighten them down.
Be sure to check your brake fluid level after you move everything around.

Double check to be sure everything's tight. Now you can put the wheel back on and you're ready to go! Have you replaced your front brake pads yet?
=======================================================================
Replacing Rear Pads and Rotors On AUDI Models
Replacement of rear rotors and pads is an easy task, even if you've never done it before. Consider replacing both if your rotors have 50,000 miles or more on them. This will prevent you from having to do the job again anytime soon. Plus, you don't have to get the rotors turned, which can be a real hassle if it is not done correctly or you don't have two vehicles.
If the rear brake pads are worn down, the fronts are probably not far behind. Check them while doing the rears. The rears DO NOT have wear sensors. When the brake pad backing plate comes in contact with the rotor and metal to metal contact is heard, you will know it's time to do the rears!
All A8's and S8's had the same rear brakes. This procedure is applicable to all models.
Special Tools Required
- 8 mm Allen wrench to fit to a 3/8" rachet drive (only needed if replacing rotors)
- Large C-clamp to push the piston back in the caliper
- Channel locks or Harbor Freight tool to push the piston back in the caliper
- Metric sockets
- 15 mm open ended wrench
- Caliper lube
- Brake cleaner and rags
Brake Components
The following picture is from the Bently manual. It identifies the major brake components.
The following picture is from the Bently manual. It identifies the major brake components.
Figure 1
Procedure
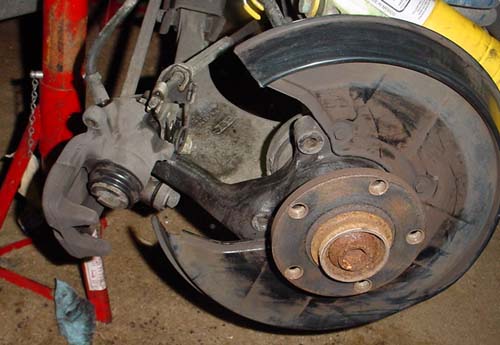
Take lug nut caps off and loosen lug nuts. Jack the car up and put the rear end up on jack stands. Raising the entire rear end makes the job much simpler and safer. Remove wheel.
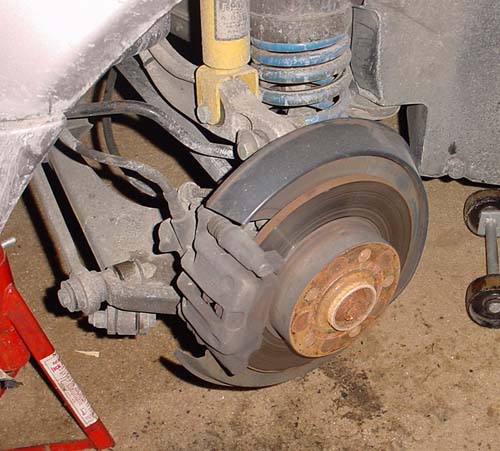
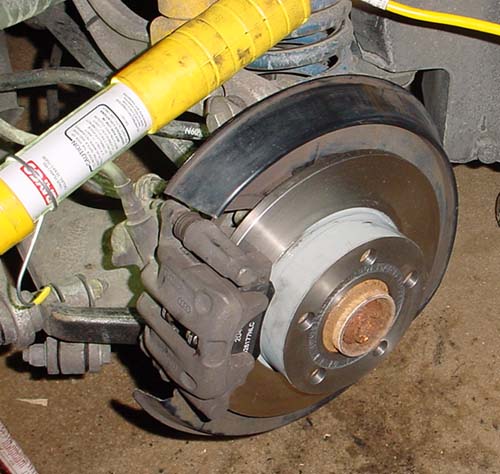
A8 Rear Brake Assembly.
Using a 15 mm open ended wrench, hold the nut shown in the picture below (part of Item 3, Figure 1). Using a 13 mm socket or wrench, loosen the bolt just inboard of it (Figure 1, item 1). Repeat for second bolt assembly.

Use a 15 mm open end wrench to hold the nut from spinning while loosening the bolt just inboard of it. The top bolt has already been unscrewed.
Remove caliper assembly by lifting it up and off. Have wire ready to tie it up or rest it on the suspension arm. Do not allow it to hang from the brake line!
If removing rotors to replace them or to have them turned, remove the two carrier retaining bolts (Figure 1, Item 4) using an 8mm allen head socket. Remove carrier.
Rear caliper and rotor removed. Piston has not been pushed back in cylinder yet.
There are several ways to get the piston back in the caliper. It must be screwed in using a clockwise motion with pressure on the piston. This can be accomplished by using a large C-clamp and channel lock pliers or by buying the caliper tool set for disc brakes from Harbor Freight Tool Company. This tool not only provides the pushing force, but also screws the piston back in at the same time.
Caliper tool set from Harbor Freight Tools.
Part number 40732. This makes the job really easy!
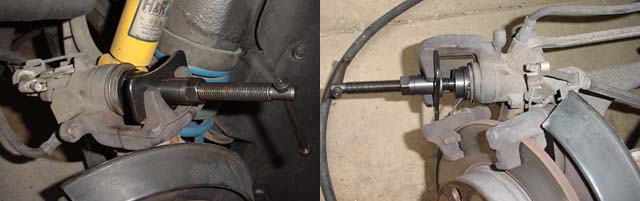
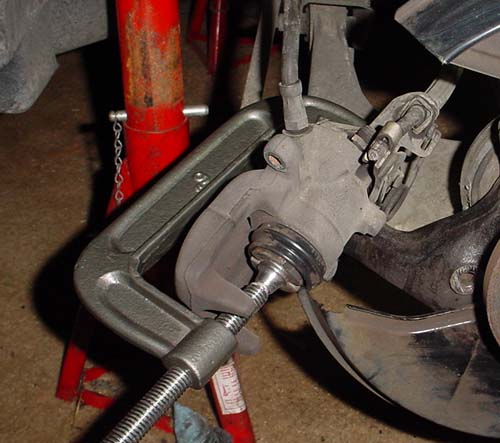
Using a large C-clamp, place slight pressure on the piston.
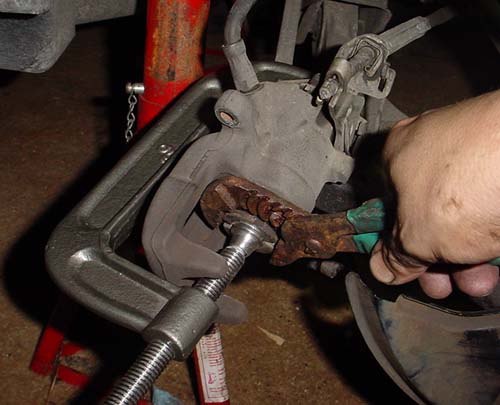
With pressure on the piston from the C-clamp, use channel locks and screw the piston in using a clockwise motion. Ensure the piston rubber boot is not caught up in the channel locks. This can cause it to tear and then you will need a new caliper sooner or later due to piston becoming contaminated.
Turn the piston in about 1/2 turn, then readjust the C-clamp to apply pressure again. Each time the piston is screwed in, the C-clamp must be tightened. It's a real pain to do. With the Harbor Freight tool, it's a breeze. If you plan on doing the rears more than once, it would be a good investment. If using the C-clamp method, make sure you have at least a 6" C-clamp.
Turn the piston in about 1/2 turn, then readjust the C-clamp to apply pressure again. Each time the piston is screwed in, the C-clamp must be tightened. It's a real pain to do. With the Harbor Freight tool, it's a breeze. If you plan on doing the rears more than once, it would be a good investment. If using the C-clamp method, make sure you have at least a 6" C-clamp.
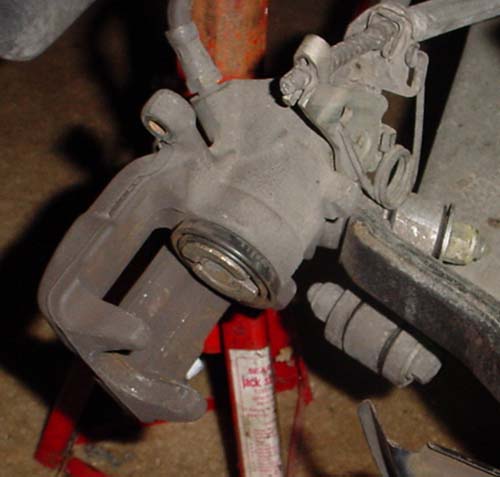
Piston screwed all the way into cylinder. Ensure you screw it all the way in otherwise there will not be enough clearance to get the caliper over the new pads.
Clean all brake components with brake cleaner and rags. Pull the small boot off the caliper assembly (Figure 1, Item 6). Lube the assembly with caliper lube. This allows the brake caliper to float better due to braking forces and brake pad wear.
Installation of New Components
Prior to performing installation, take a break and wash your hands! Remove all grease from them. If you bought new rotors, clean the rotor off of all protective material and paint. Wash your hands again and ensure they are clean before reassembling.

Evan Waterloo, using his Dad's DA sander to clean and
scuff the surface of the rotors (front rotor shown).
Prior to installing the new rotor, take some grease or caliper lube and put it on the hub where the rotor comes in contact. This will prevent the rotor from rusting to the hub assembly.
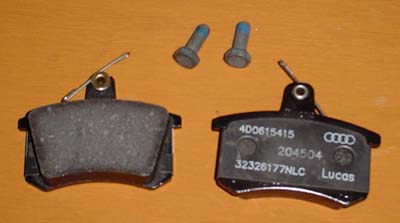
OEM pads. The OEM pads come with new bolts.
Install new rotor.
Install carrier bracket using 8 mm allen head bolts. If using OEM pads, remove backing sticker and place both pads in carrier assembly.
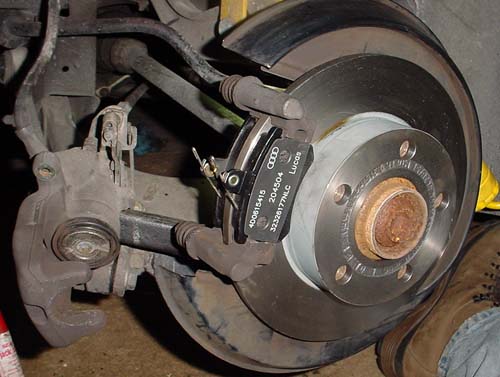
Pads placed in carrier assembly prior to installing caliper.
Install the caliper on the carrier assembly. When doing this, ensure both pad springs are properly seated and the guide pins are pushed in and out of the way. Start the bolt (Figure 1, Item 1) on the top first (don't tighten it, just get a few turns on it) and then compress the springs by pushing down on the caliper and starting the bottom bolt.
Tighten both bolts down, torque to 35 Nm. Always replace bolts with new, OEM pads come with new bolts.
Completed rear brake job. Cleaning all the components
prior to installation is an important step!
====================================================================
HOWTO: Install Mazda3 Rear Brake Pads and Rotors
Source Based on the guide written by sok07 on www.mazda3forums.com
The following is a step by step guide to replacing the rear rear rotors & brake pads on a 2.3L Mazda3 or Mazdaspeed3. Note that both the 2.0L Mazda3 uses different parts than those shown here, so while these instructions can be used as a general guide, things like torque specs or other details specific to this car may not apply.
Tools Needed
Torque Specs
|
Bleeding the Brake System
If you are only replacing the pads and rotors, you will not normally have to bleed the system unless you've found your pedal feel to be mushy and suspect there is air in the lines.
If you are replacing the lines though, or otherwise opening any parts of the system which may let in air (this does not include removing the reservoir cap) then you will have to bleed the lines to purge any air. Generic instructions for doing so can be foundhere.
Preparation
- Ensure that the car is in gear and the parking brake is off.
- Chock the wheels to ensure the car doesn't roll.
- Jack up the side of the vehicle and secure with sturdy jack stands. Never work under a car supported only by a jack.
- It is recommended that you use stands rated for at least 3 tons each.
Rear Rotor & Pad Install / Replacement
- Jack up car and remove wheel. Using a flat-head screwdriver pop off the spring clip. The spring clip will pop/fly off, so beware.


- Find the two plastic dust caps that are just snapped-on the back of the caliper and remove them. Using the 7mm allen/hex key remove the caliper bolt/pin.


- Slide off the caliper and place it somewhere as to not put any excessive strain on the brake line. In my case, I just gently wedged it between the shock and a nearby strip of flanged sheet metal in the wheelwell. If you are swapping brake pads, the pad closest to you is just held by the caliper mounting bracket. The other pad is clipped to the caliper piston.

- To remove the caliper mount bracket, locate the two bolts on the back of the rear upright. Using a ratchet, 14mm socket, and a breaker bar remove the two bolts.


- The rotor should now be free, so just slide off the stock rotor from the hub/upright. If the rotor doesn't come off easily, it is probably just rusted on. Using a mallet, just tap the along the circumference of the center part of the rotor to jar the rotor free from the hub.

- Slide on the new rotor, and hold it in place using a spacer and a lugnut.
Holding it on like this isn't critical, but is convenient if you can do it.
- Reinstall the caliper mount bracket to the upright. Be sure to apply some blue loctite on the bolts.

- Install the brake pad. Simply place the outer pad on the caliper mount bracket. The inner pad needs to be slid into place on the piston. Note the flange on the piston and the clips on the back of the pad.


- Slide the caliper over the outer brake pad and rotor. If you can't slide the caliper on, you may have compress the piston. To do this you will have to either get a special brake tool from and auto parts store, or simply use needle-nose pliers to rotate and compress the piston. On the piston you will see two circular indentions. Place the tips of the pliers in the indentions and rotate the piston clockwise while applying inward pressure to compress it back into the caliper. As with the front, be sure to first take the lid off the fluid reservoir and watch to ensure it doesn't overflow while you compress the piston.Note from Wild Weasel: I've noticed that there is a lot of commentary in the forums about people having difficulty compressing the rear pistons. I want to be very clear about this. If you haven't done rear calipers before and are not familiar with how they work, DO NOT ATTEMPT THIS with needlenose pliars. I know it can be done and have done it myself several times, but it will almost certainly be a very frustrating endeavour. If you don't own a rear caliper compressor tool, go out and buy or rent one. Many auto parts places lend them out for free. The piston has to be pressed and rotated back in. It doesn't push straight in and it doesn't screw in. The tool will press and turn at the same time, and make this job very easy.

- Clean, lube & reinstall the two caliper bolts/pins. Reinstall the dust caps and spring clip. Finally, remove the lugnut and spacer that you used to hold the rotor in place.Note from Wild Weasel: When replacing the rear pads on my own car (after over 100k km's) I had issues with the bottom sliders on both calipers. For some reason, it was only the lower ones. The caliper itself had corroded around the rubber sleeves so the sliders were very difficult to move. To resolve this, I had to remove the rubber sleeves and then grind away the corrosion, which came off as a white powder. If you're not prepared to deal with this situation, then you're probably best off taking it to a shop. If the sliders do not move freely, you will have problems with the brakes going forward.

- After completing the install & remounting the wheels, get into the car and press the brake pedal a few times to build up pressure, and engage and disengage the e-brake a few times. The rear brakes are self-adjusting, and it will calibrate/align the piston by the use of the e-brake.
Note that you can skip the next step if you are not replacing the rotors. The caliper mount bracket does not need to be removed to change the pads.
====================================================================
Murano 2004 4WD Brake Rotor Removal
The rear rotors are not secured by any nut. They are knock off rotors just like the front. Just make sure you have the e-brake off. That 32 mm nut is for the rear drive shaft to the rear knuckle.


Ok, the center area I circled. The center of the hub. Spray that with any type of rust penetrating oil. That oil will seep in to help loosen the rotor. Then with a hammer bang the rotor where I put the X's, just don't hit the studs! To remove the caliper, do not remove the lower 14 mm bolt. Leave the top one out and fold up the caliper to the normal position. Then use a wrench to remove the 19 mm bolts. When the entire caliper comes off, you then pull the caliper off by sliding the pin out of the cradle. Then you can work on getting the rotor off.

unbolt both 19mm bolts when caliper is out of the disk.
What is that hole (covered by rubber) in the rotor for?
E-Brake Adjuster. So you can adjust the E-Brake shoes.
======================================================================
cost to replace rear brake pads and rotors
how much should it cost to replace rear brake pads and rotors on a 2003 VW Passat?
That really depends on where you take it, their shoprate, and if the parts are factory or not. Basically at my shop it's about $250 or so installed, more like $450 installed at the dealer. Most shops mark their parts up to list so usually you're going to be talking $350 - $450 for quality factory parts installed.
I replace them at the same time, it's industry standard because rotors are so thin that if you turn them they warp.
Is that $350 installed? I charge $250 but I'm not the norm, I only charge $60 an hour and barely mark my parts up, definitely not to list.Ok, so if those parts are original parts that's a good price, if they are aftermarket parts then it isn't a great deal but it isn't the worst deal ever.
As far as the ABS sensor if that's the front sensor that's about right, for a rear sensor that's probably a little high, and if your ABS light is on changing the pads isn't going to fix that.
==============================================================
replacing rear brake pads and rotors on my 03 infiniti I35
I replacing my rear brake pads and rotors on my 03 infiniti I35. I have the new rotors and pads on but cannot compress the caliper. What do I need to do to get the caliper compressed and fully reassembled?
The piston retracts by turning the piston clockwise with a special caliper tool(available from any major parts store). Using a C-clamp to try to push the piston in can damage the retraction system.

In a pinch, you can use needle nose pliers, but it is much more difficult:

In a pinch, you can use needle nose pliers, but it is much more difficult:
=================================================================


Comments
Post a Comment