WINDOW MOTOR AND REGULATOR REPLACEMENT
WINDOW MOTOR AND REGULATOR REPLACEMENT
Customers Ask Many Such Question When They Face Problem With Working Of Their Power Windows.
Many a times the reason is faulty power window motor or faulty power window regulator.
How To Replace Car's Power Window Motor And Regulator?
power window regulator and motor assembly?
power window motor replacement cost?
power window regulator repair cost?
power window mechanism?
car window regulator repair kits?
car power window motor?
power window motor specification?
Power Windows Not Working - Repair Power Windows?
How to Fix a Power Window Regulator?
How to Fix a Power Window Motor?
Easy Power Window Repair ?
How to Replace a Power Window Motor?
Diagnosing and replacing a power window regulator & motor?
How To Install Repair Replace Broken Power Window Regulator?
Power windows that go up or down with the flip of a switch are great conveniences for almost any driver to have on their cars, but they can become a mighty inconvenience when something goes wrong and the windows will not budge. When power windows stop working, there may be a variety of culprits at the root of the problem, one of which is a faulty power window motor. There is only one motor and it is attached to a regulator, which is a mechanical device that physically moves the windows up and down. This motor is usually housed on the inside panel of the driver's door. Replacing a power window motor and having a professional install it can be an expensive process, but one way that car owners can save some money is by purchasing the replacement power window motor from a retailer and installing it themselves. This guide provides instructions on how to diagnose and fix a power window motor, and readers will be able to use this information to successfully resolve problems with their power window systems that are due to faulty power window motors.
Before assuming that your car has a defective motor or regulator, a few quick checks are in order. First verify that the fuse or circuit breaker for the windows is OK. Most cars use the same power circuit for all of the windows, so if only one of them isn't working, it's a pretty safe bet that the fuses are OK.
The car we're checking out is a 2002 Pontiac Grand Am 4 door sedan. We'll be looking at the drivers side (left) front window. The cable mechanism used in this vehicle is typical of many late model GM, Ford and Chrysler vehicles as well as most Asian imports. These systems are light weight, extremely adaptable and inexpensive to manufacture making them the system of choice. Unfortunately, high reliability isn't on the top of this list.
Tap the window switch for the bad window and carefully listen for motor noise, etc. in the door. No noise may mean a faulty switch, motor, regulator or wiring. A motor whirring or grinding sounds may indicate a faulty regulator. In either case, we need to pull the door panel and do a little investigative work to be sure of the fault.
Replacing a power window motor is not a complicated process. In fact, it is a simple procedure that can be performed by just about anyone. Here are the steps to help you as you learn how to replace a power window motor.
Easy step by step guide on how to replace an automotive window motor and regulator, though the configuration may vary slightly the process is the same, this information pertains to most vehicles.
Difficultly Level - 4
So one of your power windows doesn’t work. Check the fuse first. If that’s good, the problem is either a bad switch or motor or a broken regulator (the device that actually lifts and lowers the glass). A shop will charge you at least a few hundred dollars to replace the motor/regulator, but you can do the job yourself in about four hours. Regulators are available online or at auto parts stores.
You need a basic set of metric sockets, screwdrivers, a drill and most important, a subscription to an online service manual. That way, you can download instructions and diagrams that are specific to your car. Use our instructions as a rough guide, and refer to your manual for specifics.
Start the repair by removing all the trim panel fasteners to access the switch for testing. Remove the trim panel and peel off the vapor barrier. A trim panel removal tool is inexpensive and saves you a lot of time.
Reach into the door panel and disconnect the power connector to the window motor (wear leather gloves to protect against cuts). Connect the leads of your voltmeter to the two terminals on the connector. Turn the key to the “on” position and toggle the window switch up and down. If the switch is good, you’ll see the voltage reading change from plus-12 volts to minus-12 volts. That means the problem is the motor/regulator. If your meter doesn’t display those readings, you’ve got a bad switch or a broken power or ground wire. Download an electrical diagram and check the power and ground wires leading to the switch to isolate the problem.
Replace the entire regulator assembly, not just the motor. Start by removing the window-to-regulator bolts (have someone hold the glass while you do this).
Then remove the glass by tilting it away from the door and lifting it out. Next, remove the regulator bolts or rivets (drill them out and snake the old regulator out through one of the door panel openings. Reverse the procedure to install the new regulator. Bolt the regulator in place and then reinstall the motor and window switch electrical connectors and the window glass. Test the window for proper operation. If the glass binds, you may have to loosen the bolts and make minor adjustments to the regulator. Then tighten everything and replace the vapor barrier and trim panel.
Begin the vehicle on level ground, engine "OFF" with the parking brake set, using a basic set of tools while wearing gloves and protective eye wear. (Warning; Some older electric window regulators are equipped with a helper spring that can have tension, use caution when disassembling.)
Tools and Supplies Needed
- Test light
- Metal scribe or equivalent
- Test wire leads w/clips
- Screwdriver set
- Protective gloves and eye wear
- Torx driver set
Diagnose the Problem
The first step in the diagnostic process is simple. Test one of the power switches to see if the window that it controls will move. At the same time, listen closely to the door panel. If the window does not move and if no sound comes from the door panel, there is probably a problem with the motor or with the fuse. If the motor is audible inside the door panel, then there is probably a mechanical problem that is unrelated to the motor. Assuming the former, check the car's owner manual to locate the fuse to see if there is any problem. If the fuse is not blown, the problem is likely the power window motor.. To confirm this, measure the voltage at the switch panel with a voltmeter.. Once again, car owners should consult the owner's manuals for their cars to see how to access the switch panel. Most power windows run on 12 volts, so if the voltmeter reads 12 volts switch panel, the problem is likely the motor since the wiring is carrying the proper amount of electricity to it.
Step 1 - To access the window regulator and motor assembly the door panel must be removed. Visit - Complete guide on door panel removal.
 Step 2 - Gently remove the plastic door cover, this cover is used to keep moisture away from the door panel.
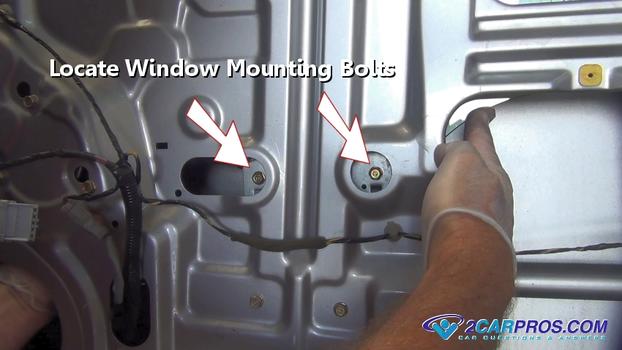
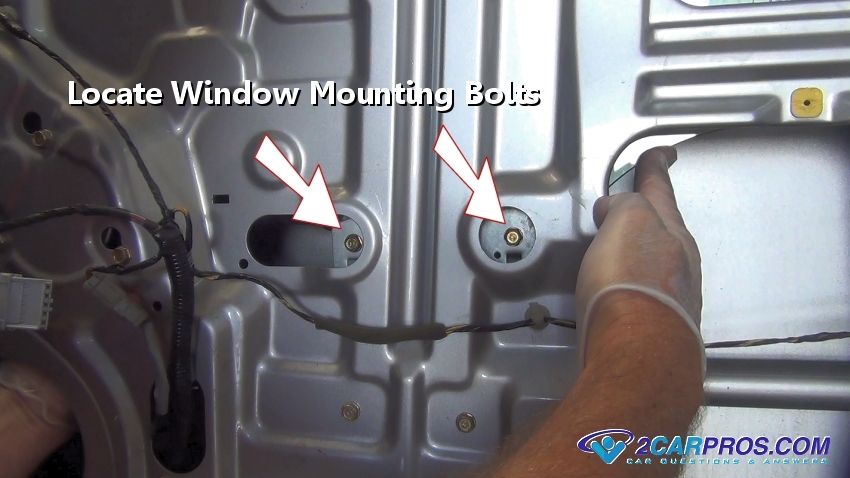
 Step 3 - Locate the window mounting bolts, the window may need to be raised or lowered to access these bolts.
If the window motor is non operational grasp the window to force up or down to gain access, or use a small wrench or socket to remove inside the door frame.
Step 3 - Locate the window mounting bolts, the window may need to be raised or lowered to access these bolts.
If the window motor is non operational grasp the window to force up or down to gain access, or use a small wrench or socket to remove inside the door frame.
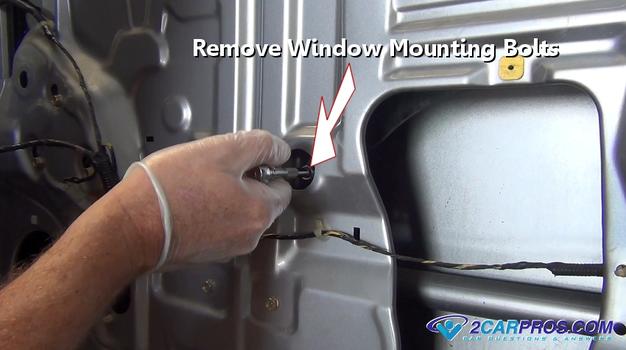
 Step 4 - While having a helper supporting the window, remove the window mounting bolts from the window regulator, once the bolts have been removed the window will become loose in its track and door frame.
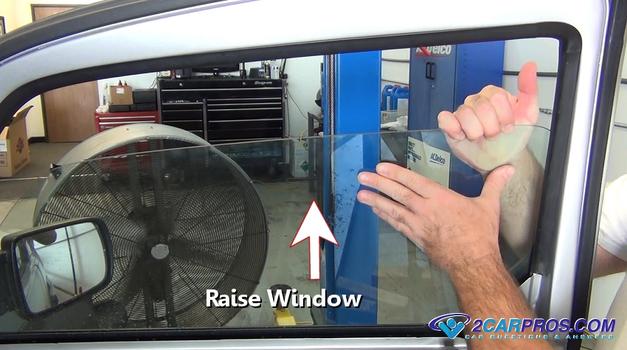
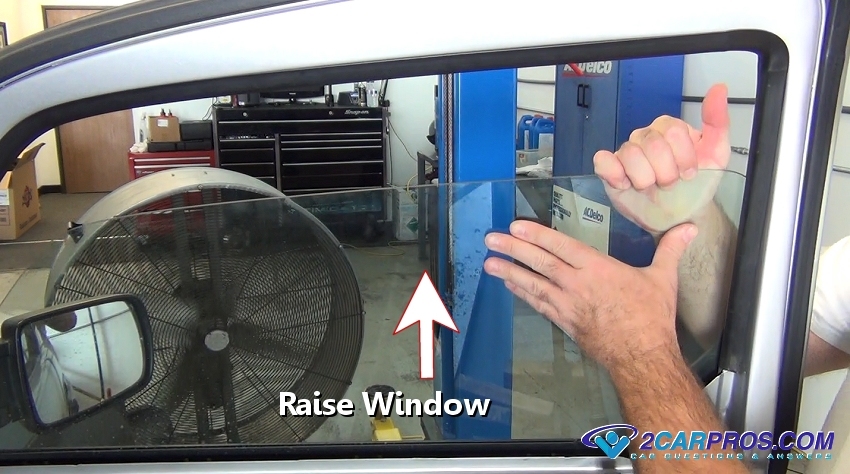
 Step 5 - While the glass is loose in its track, raise the window until it contacts the upper portion of the frame.
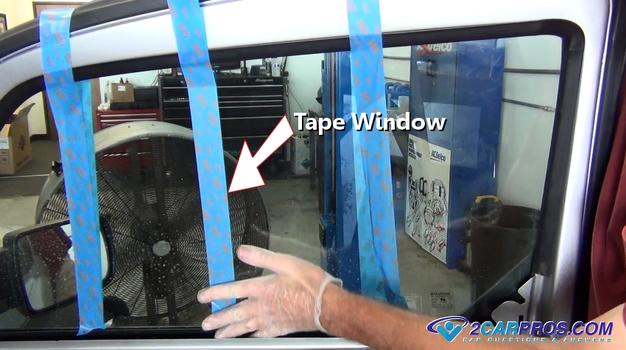
 Step 6 - While holding the window in place, use masking tape to secure the window from dropping down and possibly breaking inside the door.
This step keeps the glass out of the way while removing the regulator and motor.
Step 6 - While holding the window in place, use masking tape to secure the window from dropping down and possibly breaking inside the door.
This step keeps the glass out of the way while removing the regulator and motor.
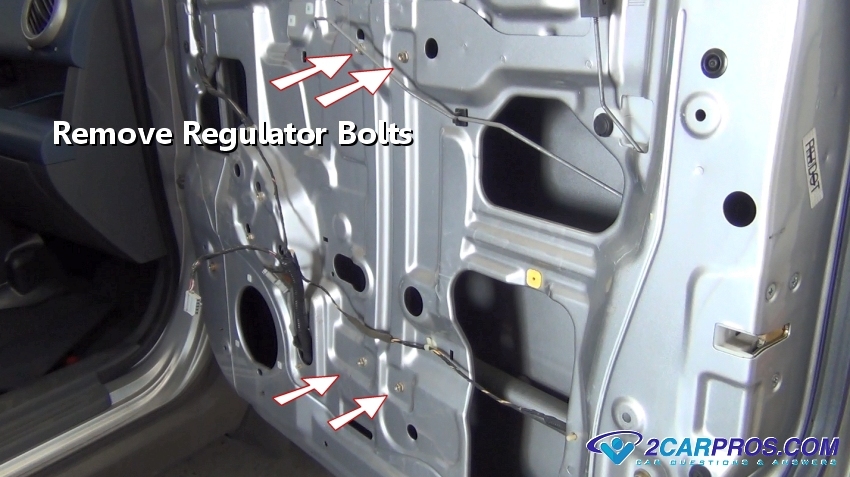
 Step 7 - Locate and remove the window regulator bolts, now gently allow the regulator to sit inside the door until the motor is removed. (Note: They are connected to each other with cables.)
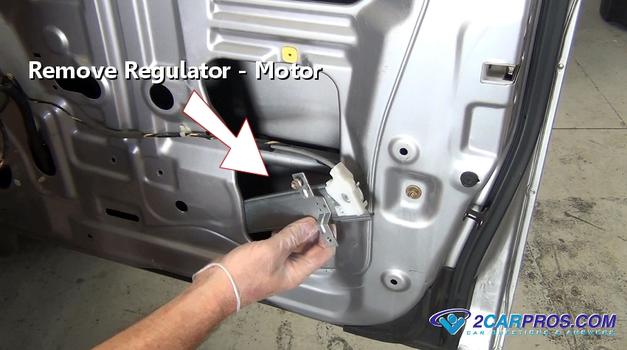
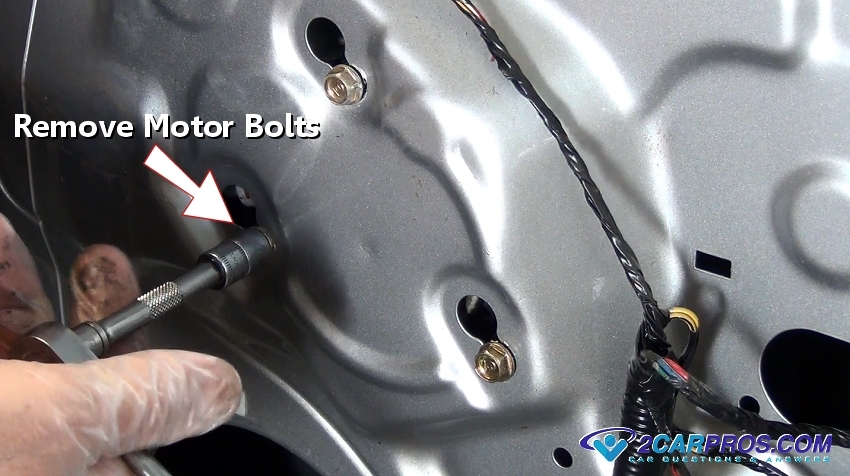
 Step 8 - While the regulator is resting inside the door, locate and remove the window motor mounting bolts. (Note: In this application the bolts can be loosened to remove.)
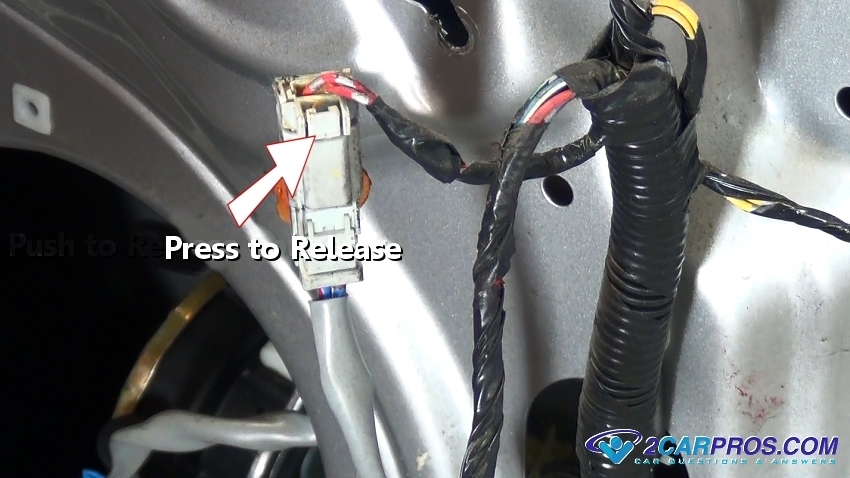
 Step 9 - After both the motor and regulator bolts have been removed, locate the motor wiring harness connector, press the release tab to disconnect.
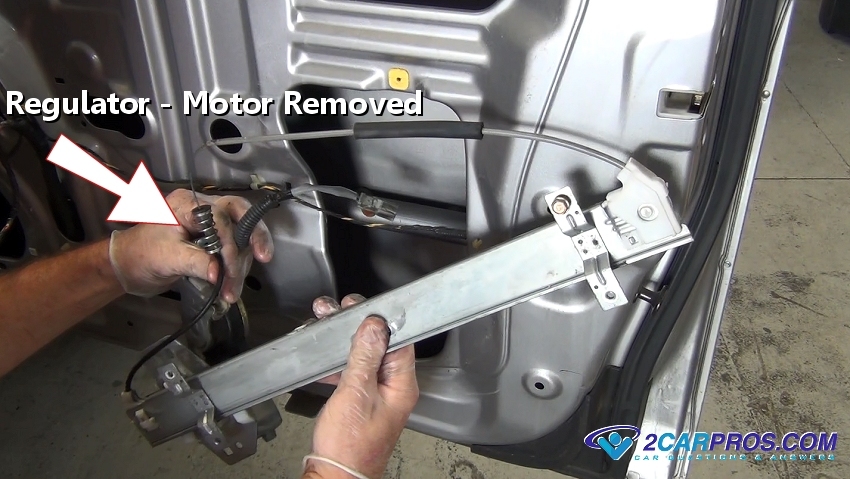
 Step 10 - Remove the regulator and motor assembly through the large access port.
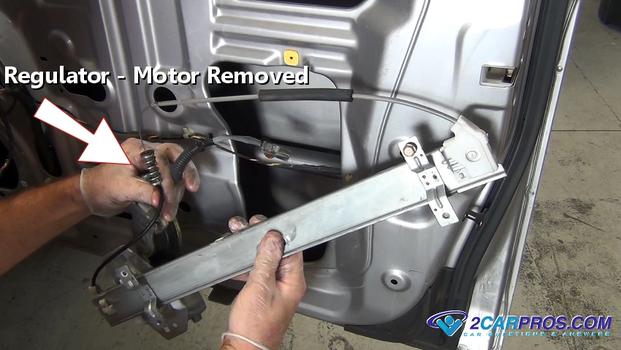
 Step 11 - Window regulator and motor removed.
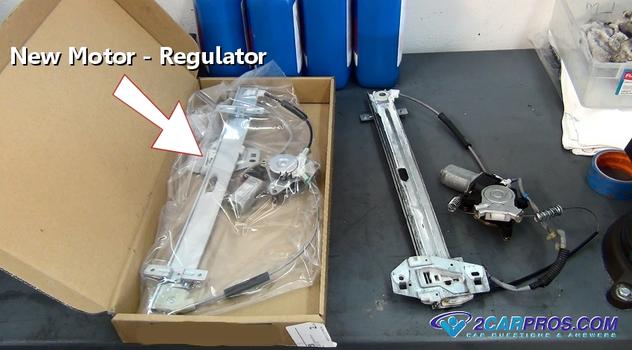
 Step 12 - Match the old unit to the new to ensure a proper installation. (Note: Check the electrical connectors as well.)
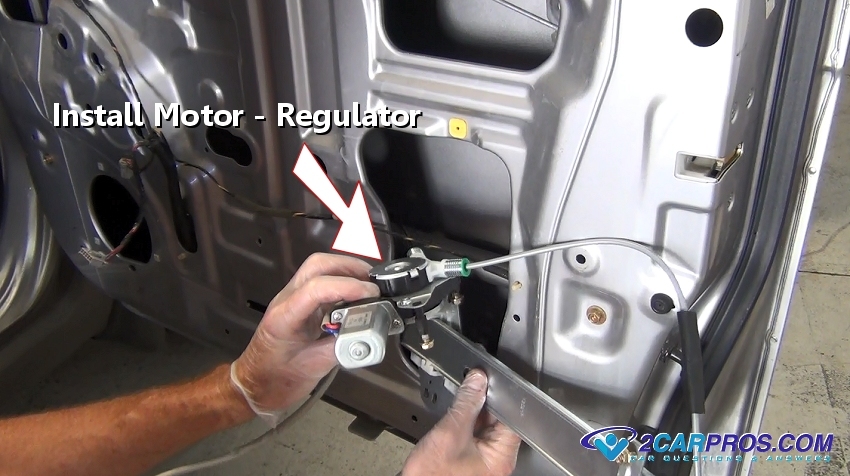
 Step 13 - Gently feed the new motor and regulator assembly back into position, this can be a little tricky so hang in there.
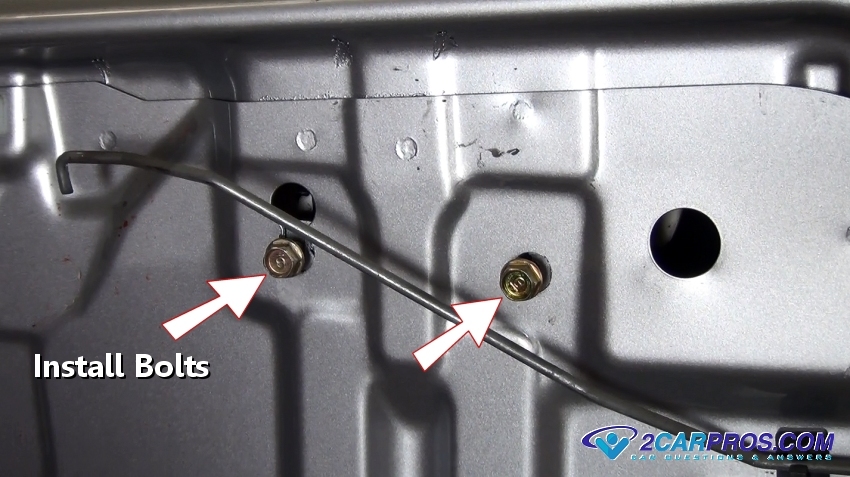
 Step 14 - Once the motor and regulator has been re-positioned, re-install all mounting bolts leaving them loose until all have been installed.
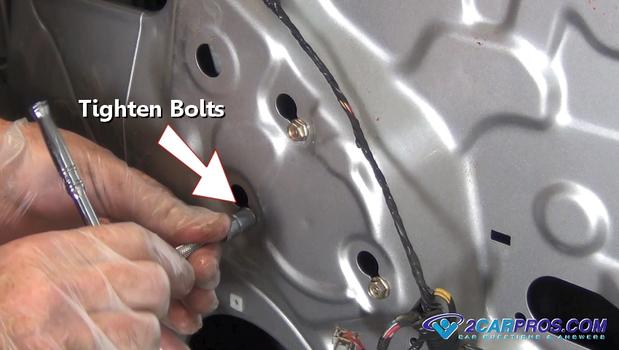
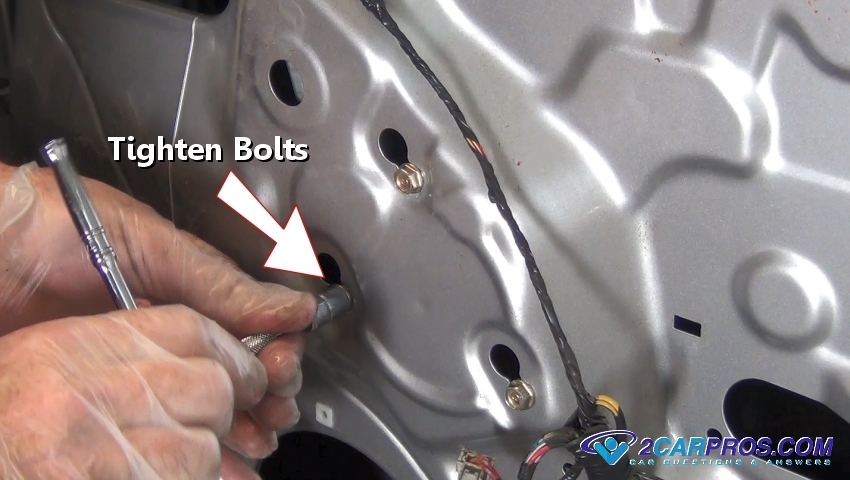
 Step 15 - Using a ratchet or wrench tighten the motor and regulator mounting bolts.
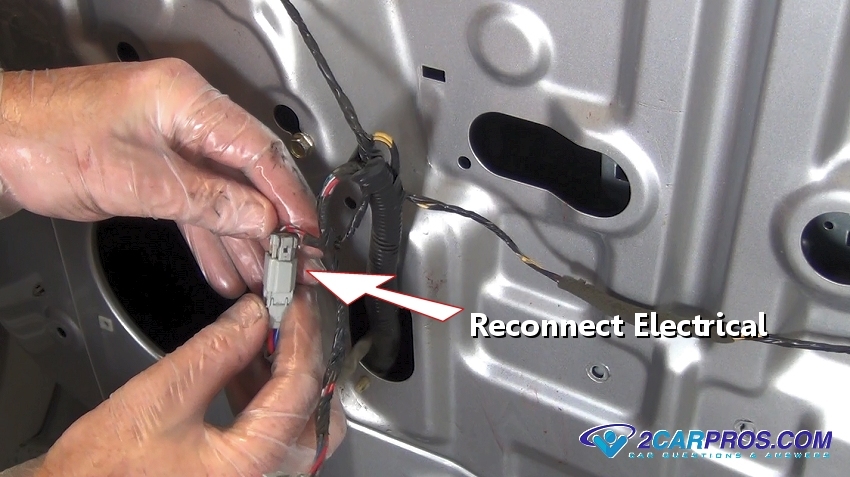
 Step 16 - Feed the electrical connector through the access hole and reconnect it to the door wiring harness.
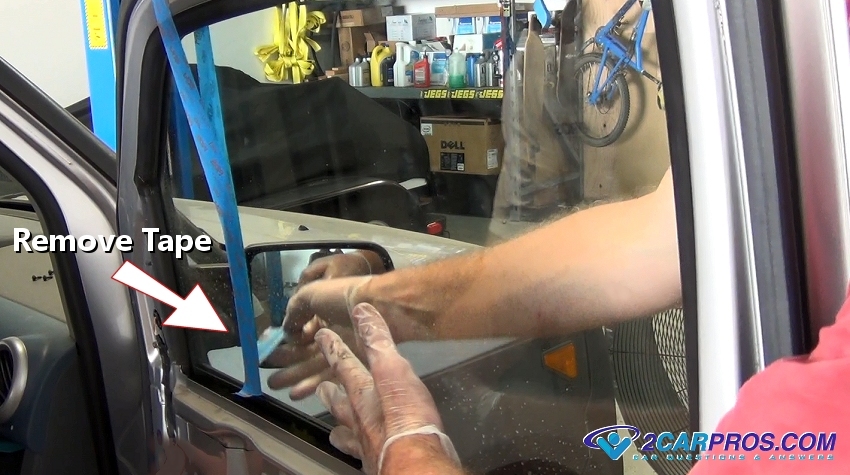
 Step 17 - While holding the window in place, remove the masking tape and lower the window into the new regulator.
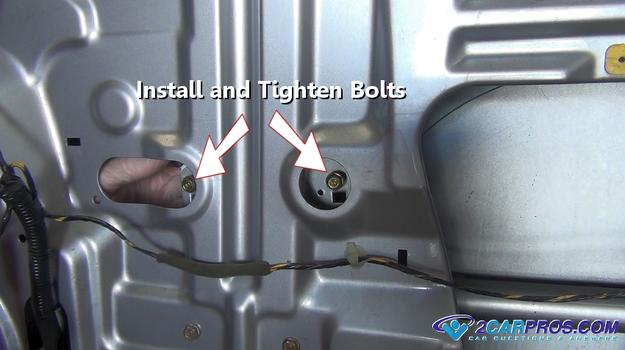
 Step 18 - Once the window is lowered into place, thread in and tighten the mounting bolts. You may need to turn the ignition switch "ON" and work the window switch to position the regulator cradle so the mounting bolts can be installed.
 Step 19 - Recheck all mounting bolts for tightness and re-install the plastic weather liner and door panel assembly.
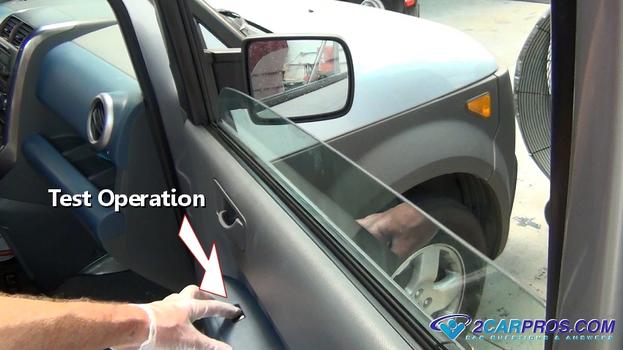
 Step 20 - Once the job in complete, turn the ignition switch to the "ON" position and test both up and down actions of the window motor.
 Helpful Information
Electric windows are controlled by three main parts; motor, regulator and a control switch which can fail in many ways, some of the more popular failures include non operation (stuck), window loose in its track sitting down in the frame while the motor turns.
In some cases there are minor adjustments for the window rails to re-position the window if needed, check vertical operation for hard spots or clicking noises.
All power window system are protected by a fuse which should be checked if the window is non-operational. Fuse testing
Helpful Information
Electric windows are controlled by three main parts; motor, regulator and a control switch which can fail in many ways, some of the more popular failures include non operation (stuck), window loose in its track sitting down in the frame while the motor turns.
In some cases there are minor adjustments for the window rails to re-position the window if needed, check vertical operation for hard spots or clicking noises.
All power window system are protected by a fuse which should be checked if the window is non-operational. Fuse testing
Severe misalignment caused by loose fasteners can jam gear-type regulators.
Sticky
All windows have gaskets and seals to keep wind noise and rain out. If the window has a slow spot or won't open or close properly, check the gaskets. A gasket that's misplaced or torn can prevent proper operation. If the gasket is loose, or even torn, you may be able to repair it. If the gasket is simply loose, get some 3M Super Weatherstrip Adhesive at the auto parts store. Clean off the old adhesive with lacquer thinner and reglue the gasket into place. Allow this to dry overnight with the window closed, and be certain you're not gluing the window to the gasket.
If the gasket is torn, you might be able to use a super glue to simply repair the tear. You may be able to judiciously trim a loose corner of gasket away with a single-edge razor blade. Be particularly careful about doing this on the part of the gasket that sits outside of the glass, because it may admit rain and salt spray to the inside of the door in quantities too large for the door's internal drainage system to cope with.
Replacing a gasket or seal with a new part is generally straightforward. If it's not obvious that the gasket is astray, inspect the entire gasket and channel carefully. Look for damage, but also look for such things as pine sap, fossilized Froot Loops or other foreign objects that might make the window stick or bind. Clean the surface of the gasket and window with lacquer thinner to remove oxidized rubber and scum.
There's a fair amount of friction between the gasket and the window glass. Almost any misalignment can dramatically increase the friction to the point where the motor no longer has enough torque to move the glass properly.
Lubricate the entire channel with silicone spray or protectant, because the reduced friction just might get your window working again.
It's also possible that the problem is deeper inside the door. If so, you'll need to pull the door panel and go poking around. Remember to pull the fuse to prevent amputating your fingers. You can use either a rubber wedge doorstop or a couple of feet of duct tape to anchor the glass up while you work.
Sometimes the problem is nothing more than a loose bolt allowing the door's inner structure to move around, misaligning the window track. Many doors have slotted holes for the attachment points for internal parts, so careful consideration of the misalignment will sometimes let you simply slide one adjustment a 1/4 in. or so and straighten it all out. All bets are off if the door has been damaged in a crash. It may take a long time to get everything working right.
Lastly, the mechanism that runs the window up and down may be faulty. Whether it's a gear-and-sector, scissors lift or cable-operated mechanism, you'll need to watch it moving up and down a few times. Again, keep your fingers out of the works. Sometimes the problem will be a loose fastener or rivet, sometimes a broken or missing bushing. Cables can bind on the drum or become sticky. Lube all the friction points with white grease. Don't forget there are gaskets in the window track down below the top of the door, and you may need to reglue, repair or lubricate them.
It may be possible to replace a bad motor, or you may need the entire mechanism.
Access the Power Window Motor
This section describes how to access the power window motor. It is a somewhat laborious process, involving the removal of the door panel and of the panels attached to the door panel, but it is not technically difficult so long as readers follow the instructions carefully.
Remove the Door Access Panel
Start the process of removing the door panel by first detaching the door access panel. This is the panel around the handle that enables the driver to open the door from inside the car. It is only necessary to remove this panel if it is covering a bolt that helps to hold the entire door panel in place. If removal is necessary, use a door panel removal tool to pry the door access panel loose and then slip it off over the handle.
Remove the Control Switch Panel
Once the door access panel is off, remove the control switch panel covering the window controls. Some cars have the control switch built into the door panel, in which case there is no control switch panel to remove. Assuming that there is, use the door panel removal tool to gently pry the control switch panel loose and slip it off, but not with too much force since there will be electrical wiring attached to it.
Disconnect the Electrical Wiring
The next step is to remove the electrical wiring, assuming that there is a removable control switch panel. If there is not, skip ahead to the next step and disconnect the electrical wiring when directed to do so. If the control switch panel is removable, there should be an electrical connector with a few wires running to it that is connected to the bottom of the control switch panel. Gently pull the connector away from the point where it is attached and set the control switch panel aside. Leave the connector to hang there while addressing the door panel.
Remove the Door Panel and the Plastic Insulator
Once any auxiliary panels have been removed, find the mounting bolts or screws that fix the door panel in place and remove those. Without the fasteners in place, the door panel should pop out easily. Pull it out and disconnect the electrical wiring connector if the control panel is fixed to the door panel. Set the door panel aside.
The removed door panel will expose a plastic insulator over the wiring, motor, and regulator inside the metal door frame. This plastic helps to protect these parts from water and it will need to come off in order to access the motor. There is usually a rubbery adhesive holding the plastic insulator in place, so gently pull at the insulator around its perimeter and it should come off. Set this aside as well.
Replace the Motor
This section describes how to replace the faulty power window motor with a functioning one. The process involves removing the regulator and motor, possibly separating the old motor from the regulator and attaching the new one, and reinstalling the assembly.
Remove the Regulator and the Motor
Start the process of replacing the motor by taping the window in place. If the window is not fully closed, it may need to be pushed into place from the bottom. Holding the window in a closed position is important, lest it fall and break during the regulator and motor removal process. Once the window is taped in the closed position, remove the regulator by using a center punch and hammer the punch in the center pin of each rivet that is holding the regulator in place. Collect these rivets and set them aside. In some cases, bolts hold the regulator in place, so remove these instead if the window control's design employs them. With a bit of finagling, the regulator and attached motor should slide out from the metal door chassis through a gap in the chassis.
Remove the Motor from the Regulator
It is possible to purchase a motor and regulator together, but those that wish to save a few dollars can purchase a motor separately. If they choose to do this, they will have to remove the faulty motor from the regulator and attach the new one. It is important to start by clamping the regulator arm to a bench vise and drilling a 1/4-inch hole through the middle of the plate holding the chassis. Put a nut and a bolt in the hole to keep the coil spring that counterbalances the regulator arm and the gear from snapping these parts together when the motor is removed. Readers should exercise caution because skipping this step can result in injury.
With the regulator secure, find the rivets that hold the motor to it and remove these by drilling off their heads with a drill bit that corresponds to diameter of the rivets. Slide the motor off the regulator and clear away any leftover pieces of the rivets before attaching the new motor.
Attach the New Motor
Before attaching the new motor, lubricate its gear with a dab of grease to prevent future problems. As long as the new power window motor is compatible with the car, it should fit onto the regulator and the mounting holes should line up. Attach the motor using either rivets, machine screws, or nuts and bolts, then remove the nut and bolt from the plate holding the gear, and finally, unclamp the regulator arm.
Reinstall the Motor and the Regulator
The regulator with its new motor is now ready for reinstallation. Slide it through the gap in the door chassis and line the holes in the regulator up with the holes in the door chassis. Fix the regulator in place with the rivets that originally held it before the regulator was removed. Reattach the door panel to the door chassis and reattach the wiring connector to the control switch. Fasten any panels that were removed at the beginning of the process, remove the tape holding the window in place, turn the car on, and test the windows to verify that the new motor works.
Power Window Regulator Defined
With most vehicles today, the majority of operations are automated and run by electricity. The up and down motions of the windows fell into this category with the invention of the power window regulator. Window regulators were common in an automobile by the 1960s, but most were run manually by a hand crank located on the inside of the door. During this decade, the power window regulator was invented and gained popularity quickly.
The regulator is the same basic design with the difference being a small electric motor now attached instead of using a hand crank. The regulator is made up of a "c" channel that the window sits in and a scissor-pulley system attached. The motor or crank is attached to one side of the "scissor" arms and causes the "c" channel to move up or down. If the window is not moving, there can be a few reasons why that is and there are some ways to assess the problem.
Fixing a Power Window Regulator
To fix a power window regulator, it is important to not only understand what it is and how it works, but to see the parts in motion, so it is possible to properly assess the malfunction. The following steps will help readers work through how to discover the problem with their vehicles and how to fix them.
Assessing the Problem
The two main reasons for the power window failing in an automobile are the regulator itself is in need of replacement or the electric motor is faulty. An easy way to discover the problem is to try to move the window using the controls located on the inside door panel. If the button is pushed and there is a humming sound like the motor is running, but the window is not moving, then the problem is most likely with the regulator. If the button is pushed and there is no sound coming from the motor, then there might be a problem with power reaching the motor or the motor might be in need of replacing.
It is best to check the fuses and verify that they are functioning and power is reaching the motor before dismantling the vehicle door.
Accessing the Window Components
To diagnose the malfunction properly, the inside door panel needs to be removed so the window components are visible. Different makes and models of vehicles will have a variety of ways that the door panels are secured and it is important to research the specifics of each automobile before dismantling any parts. Places to find specific vehicle information are the manual,, online, and in automotive repair books..
Most door panels can be removed with a screwdriver or wrench. Make sure to first remove any pieces that are holding the panel in place, like the door handle or arm rest. There should be screw heads visible, but some vehicles have small plastic covers to hide the screws. Using a flat tip screwdriver, pop off the covers and then use the appropriate tool to remove the screws. Then, disconnect any wiring or cables running to the window controls or door locks. Once these pieces are off, slide the door panel up and out, but make sure to check resources before doing so to verify there is no other hardware in place, to avoid damaging the door.
Deciding What to Repair or Replace
Once the door panel is off, the first thing to do is verify the wiring from the motor and to the control panel are functioning. Check for signs of wear or disconnection before removing any other parts.
If the wiring is in order and the troubleshooting steps have been completed, the next step is to remove the regulator or motor. Look at how the items are attached to the door and make sure the door will not be damaged if they are removed.
Some door designs are made with the motors or regulators as permanent parts, and if so, this is when it must be brought to a professional to see what can be done. There are many other door designs where the parts are easy to remove and it may take only a few tools, such as a screwdriver,, ratchet,, or Allen wrench.. If removing the parts at home, be sure to retain all hardware in case it’s not included with the new parts.
Final Result
Some vehicle repairs can be simple and it gives many owners the opportunity to fix the problems themselves. This can mean more knowledge for owners and less cost to fix issues.
Unfortunately, not all vehicle designs give owners the option to perform certain repairs themselves. Therefore, some readers will find they have to bring their automobiles to a professional and have the problem taken care of, but it is important to be knowledgeable about the types of malfunctions and ways they are repaired. This will help people be confident that their vehicles are being repaired properly and protect them from poor service professionals.
Common Problems
- The window motor can short out and stop working, or work very slowly.
- The control switch short circuits, due to excessive amperage draw from a worn out motor.
The car we're checking out is a 2002 Pontiac Grand Am 4 door sedan. We'll be looking at the drivers side (left) front window. The cable mechanism used in this vehicle is typical of many late model GM, Ford and Chrysler vehicles as well as most Asian imports. These systems are light weight, extremely adaptable and inexpensive to manufacture making them the system of choice. Unfortunately, high reliability isn't on the top of this list.
Tap the window switch for the bad window and carefully listen for motor noise, etc. in the door. No noise may mean a faulty switch, motor, regulator or wiring. A motor whirring or grinding sounds may indicate a faulty regulator. In either case, we need to pull the door panel and do a little investigative work to be sure of the fault.
So one of your power windows doesn’t work. Check the fuse first. If that’s good, the problem is either a bad switch or motor or a broken regulator (the device that actually lifts and lowers the glass). A shop will charge you at least a few hundred dollars to replace the motor/regulator, but you can do the job yourself in about four hours. Regulators are available online or at auto parts stores.
You need a basic set of metric sockets, screwdrivers, a drill and most important, a subscription to an online service manual. That way, you can download instructions and diagrams that are specific to your car. Use our instructions as a rough guide, and refer to your manual for specifics.
Start the repair by removing all the trim panel fasteners to access the switch for testing. Remove the trim panel and peel off the vapor barrier. A trim panel removal tool is inexpensive and saves you a lot of time.
Reach into the door panel and disconnect the power connector to the window motor (wear leather gloves to protect against cuts). Connect the leads of your voltmeter to the two terminals on the connector. Turn the key to the “on” position and toggle the window switch up and down. If the switch is good, you’ll see the voltage reading change from plus-12 volts to minus-12 volts. That means the problem is the motor/regulator. If your meter doesn’t display those readings, you’ve got a bad switch or a broken power or ground wire. Download an electrical diagram and check the power and ground wires leading to the switch to isolate the problem.
Replace the entire regulator assembly, not just the motor. Start by removing the window-to-regulator bolts (have someone hold the glass while you do this).
Then remove the glass by tilting it away from the door and lifting it out. Next, remove the regulator bolts or rivets (drill them out and snake the old regulator out through one of the door panel openings. Reverse the procedure to install the new regulator. Bolt the regulator in place and then reinstall the motor and window switch electrical connectors and the window glass. Test the window for proper operation. If the glass binds, you may have to loosen the bolts and make minor adjustments to the regulator. Then tighten everything and replace the vapor barrier and trim panel.
Begin the vehicle on level ground, engine "OFF" with the parking brake set, using a basic set of tools while wearing gloves and protective eye wear. (Warning; Some older electric window regulators are equipped with a helper spring that can have tension, use caution when disassembling.)- Test light
- Metal scribe or equivalent
- Test wire leads w/clips
- Screwdriver set
- Protective gloves and eye wear
- Torx driver set
Diagnose the Problem
The first step in the diagnostic process is simple. Test one of the power switches to see if the window that it controls will move. At the same time, listen closely to the door panel. If the window does not move and if no sound comes from the door panel, there is probably a problem with the motor or with the fuse. If the motor is audible inside the door panel, then there is probably a mechanical problem that is unrelated to the motor. Assuming the former, check the car's owner manual to locate the fuse to see if there is any problem. If the fuse is not blown, the problem is likely the power window motor.. To confirm this, measure the voltage at the switch panel with a voltmeter.. Once again, car owners should consult the owner's manuals for their cars to see how to access the switch panel. Most power windows run on 12 volts, so if the voltmeter reads 12 volts switch panel, the problem is likely the motor since the wiring is carrying the proper amount of electricity to it.


Severe misalignment caused by loose fasteners can jam gear-type regulators.
Sticky
All windows have gaskets and seals to keep wind noise and rain out. If the window has a slow spot or won't open or close properly, check the gaskets. A gasket that's misplaced or torn can prevent proper operation. If the gasket is loose, or even torn, you may be able to repair it. If the gasket is simply loose, get some 3M Super Weatherstrip Adhesive at the auto parts store. Clean off the old adhesive with lacquer thinner and reglue the gasket into place. Allow this to dry overnight with the window closed, and be certain you're not gluing the window to the gasket.
If the gasket is torn, you might be able to use a super glue to simply repair the tear. You may be able to judiciously trim a loose corner of gasket away with a single-edge razor blade. Be particularly careful about doing this on the part of the gasket that sits outside of the glass, because it may admit rain and salt spray to the inside of the door in quantities too large for the door's internal drainage system to cope with.
Replacing a gasket or seal with a new part is generally straightforward. If it's not obvious that the gasket is astray, inspect the entire gasket and channel carefully. Look for damage, but also look for such things as pine sap, fossilized Froot Loops or other foreign objects that might make the window stick or bind. Clean the surface of the gasket and window with lacquer thinner to remove oxidized rubber and scum.
There's a fair amount of friction between the gasket and the window glass. Almost any misalignment can dramatically increase the friction to the point where the motor no longer has enough torque to move the glass properly.
Lubricate the entire channel with silicone spray or protectant, because the reduced friction just might get your window working again.
It's also possible that the problem is deeper inside the door. If so, you'll need to pull the door panel and go poking around. Remember to pull the fuse to prevent amputating your fingers. You can use either a rubber wedge doorstop or a couple of feet of duct tape to anchor the glass up while you work.
Sometimes the problem is nothing more than a loose bolt allowing the door's inner structure to move around, misaligning the window track. Many doors have slotted holes for the attachment points for internal parts, so careful consideration of the misalignment will sometimes let you simply slide one adjustment a 1/4 in. or so and straighten it all out. All bets are off if the door has been damaged in a crash. It may take a long time to get everything working right.
Lastly, the mechanism that runs the window up and down may be faulty. Whether it's a gear-and-sector, scissors lift or cable-operated mechanism, you'll need to watch it moving up and down a few times. Again, keep your fingers out of the works. Sometimes the problem will be a loose fastener or rivet, sometimes a broken or missing bushing. Cables can bind on the drum or become sticky. Lube all the friction points with white grease. Don't forget there are gaskets in the window track down below the top of the door, and you may need to reglue, repair or lubricate them.
It may be possible to replace a bad motor, or you may need the entire mechanism.
Access the Power Window Motor
This section describes how to access the power window motor. It is a somewhat laborious process, involving the removal of the door panel and of the panels attached to the door panel, but it is not technically difficult so long as readers follow the instructions carefully.
Remove the Door Access Panel
Start the process of removing the door panel by first detaching the door access panel. This is the panel around the handle that enables the driver to open the door from inside the car. It is only necessary to remove this panel if it is covering a bolt that helps to hold the entire door panel in place. If removal is necessary, use a door panel removal tool to pry the door access panel loose and then slip it off over the handle.
Remove the Control Switch Panel
Once the door access panel is off, remove the control switch panel covering the window controls. Some cars have the control switch built into the door panel, in which case there is no control switch panel to remove. Assuming that there is, use the door panel removal tool to gently pry the control switch panel loose and slip it off, but not with too much force since there will be electrical wiring attached to it.
Disconnect the Electrical Wiring
The next step is to remove the electrical wiring, assuming that there is a removable control switch panel. If there is not, skip ahead to the next step and disconnect the electrical wiring when directed to do so. If the control switch panel is removable, there should be an electrical connector with a few wires running to it that is connected to the bottom of the control switch panel. Gently pull the connector away from the point where it is attached and set the control switch panel aside. Leave the connector to hang there while addressing the door panel.
Remove the Door Panel and the Plastic Insulator
Once any auxiliary panels have been removed, find the mounting bolts or screws that fix the door panel in place and remove those. Without the fasteners in place, the door panel should pop out easily. Pull it out and disconnect the electrical wiring connector if the control panel is fixed to the door panel. Set the door panel aside.
The removed door panel will expose a plastic insulator over the wiring, motor, and regulator inside the metal door frame. This plastic helps to protect these parts from water and it will need to come off in order to access the motor. There is usually a rubbery adhesive holding the plastic insulator in place, so gently pull at the insulator around its perimeter and it should come off. Set this aside as well.
Replace the Motor
This section describes how to replace the faulty power window motor with a functioning one. The process involves removing the regulator and motor, possibly separating the old motor from the regulator and attaching the new one, and reinstalling the assembly.
Remove the Regulator and the Motor
Start the process of replacing the motor by taping the window in place. If the window is not fully closed, it may need to be pushed into place from the bottom. Holding the window in a closed position is important, lest it fall and break during the regulator and motor removal process. Once the window is taped in the closed position, remove the regulator by using a center punch and hammer the punch in the center pin of each rivet that is holding the regulator in place. Collect these rivets and set them aside. In some cases, bolts hold the regulator in place, so remove these instead if the window control's design employs them. With a bit of finagling, the regulator and attached motor should slide out from the metal door chassis through a gap in the chassis.
Remove the Motor from the Regulator
It is possible to purchase a motor and regulator together, but those that wish to save a few dollars can purchase a motor separately. If they choose to do this, they will have to remove the faulty motor from the regulator and attach the new one. It is important to start by clamping the regulator arm to a bench vise and drilling a 1/4-inch hole through the middle of the plate holding the chassis. Put a nut and a bolt in the hole to keep the coil spring that counterbalances the regulator arm and the gear from snapping these parts together when the motor is removed. Readers should exercise caution because skipping this step can result in injury.
With the regulator secure, find the rivets that hold the motor to it and remove these by drilling off their heads with a drill bit that corresponds to diameter of the rivets. Slide the motor off the regulator and clear away any leftover pieces of the rivets before attaching the new motor.
Attach the New Motor
Before attaching the new motor, lubricate its gear with a dab of grease to prevent future problems. As long as the new power window motor is compatible with the car, it should fit onto the regulator and the mounting holes should line up. Attach the motor using either rivets, machine screws, or nuts and bolts, then remove the nut and bolt from the plate holding the gear, and finally, unclamp the regulator arm.
Reinstall the Motor and the Regulator
The regulator with its new motor is now ready for reinstallation. Slide it through the gap in the door chassis and line the holes in the regulator up with the holes in the door chassis. Fix the regulator in place with the rivets that originally held it before the regulator was removed. Reattach the door panel to the door chassis and reattach the wiring connector to the control switch. Fasten any panels that were removed at the beginning of the process, remove the tape holding the window in place, turn the car on, and test the windows to verify that the new motor works.
Power Window Regulator Defined
With most vehicles today, the majority of operations are automated and run by electricity. The up and down motions of the windows fell into this category with the invention of the power window regulator. Window regulators were common in an automobile by the 1960s, but most were run manually by a hand crank located on the inside of the door. During this decade, the power window regulator was invented and gained popularity quickly.
The regulator is the same basic design with the difference being a small electric motor now attached instead of using a hand crank. The regulator is made up of a "c" channel that the window sits in and a scissor-pulley system attached. The motor or crank is attached to one side of the "scissor" arms and causes the "c" channel to move up or down. If the window is not moving, there can be a few reasons why that is and there are some ways to assess the problem.
Fixing a Power Window Regulator
To fix a power window regulator, it is important to not only understand what it is and how it works, but to see the parts in motion, so it is possible to properly assess the malfunction. The following steps will help readers work through how to discover the problem with their vehicles and how to fix them.
Assessing the Problem
The two main reasons for the power window failing in an automobile are the regulator itself is in need of replacement or the electric motor is faulty. An easy way to discover the problem is to try to move the window using the controls located on the inside door panel. If the button is pushed and there is a humming sound like the motor is running, but the window is not moving, then the problem is most likely with the regulator. If the button is pushed and there is no sound coming from the motor, then there might be a problem with power reaching the motor or the motor might be in need of replacing.
It is best to check the fuses and verify that they are functioning and power is reaching the motor before dismantling the vehicle door.
Accessing the Window Components
To diagnose the malfunction properly, the inside door panel needs to be removed so the window components are visible. Different makes and models of vehicles will have a variety of ways that the door panels are secured and it is important to research the specifics of each automobile before dismantling any parts. Places to find specific vehicle information are the manual,, online, and in automotive repair books..
Most door panels can be removed with a screwdriver or wrench. Make sure to first remove any pieces that are holding the panel in place, like the door handle or arm rest. There should be screw heads visible, but some vehicles have small plastic covers to hide the screws. Using a flat tip screwdriver, pop off the covers and then use the appropriate tool to remove the screws. Then, disconnect any wiring or cables running to the window controls or door locks. Once these pieces are off, slide the door panel up and out, but make sure to check resources before doing so to verify there is no other hardware in place, to avoid damaging the door.
Deciding What to Repair or Replace
Once the door panel is off, the first thing to do is verify the wiring from the motor and to the control panel are functioning. Check for signs of wear or disconnection before removing any other parts.
If the wiring is in order and the troubleshooting steps have been completed, the next step is to remove the regulator or motor. Look at how the items are attached to the door and make sure the door will not be damaged if they are removed.
Some door designs are made with the motors or regulators as permanent parts, and if so, this is when it must be brought to a professional to see what can be done. There are many other door designs where the parts are easy to remove and it may take only a few tools, such as a screwdriver,, ratchet,, or Allen wrench.. If removing the parts at home, be sure to retain all hardware in case it’s not included with the new parts.
Final Result
Some vehicle repairs can be simple and it gives many owners the opportunity to fix the problems themselves. This can mean more knowledge for owners and less cost to fix issues.
Unfortunately, not all vehicle designs give owners the option to perform certain repairs themselves. Therefore, some readers will find they have to bring their automobiles to a professional and have the problem taken care of, but it is important to be knowledgeable about the types of malfunctions and ways they are repaired. This will help people be confident that their vehicles are being repaired properly and protect them from poor service professionals.
- The window motor can short out and stop working, or work very slowly.
- The control switch short circuits, due to excessive amperage draw from a worn out motor.


Comments
Post a Comment